Showing posts with label The Twinery. Show all posts

Saturday, August 23, 2014

Road Trip with UmWowStudio!

Happy weekend to you!  I have a fun project to share with you that I created for UmWowStudio featuring the new "Souvenir" collection from BoBunny.

I have a confession, I have some favorite chipboard elements and I was hoarding one of them. Do you ever have a piece or two that you just love like that?

We recently took a family vacation and I wanted to grab a few images that my husband shared on FaceBook.

Road Trip!

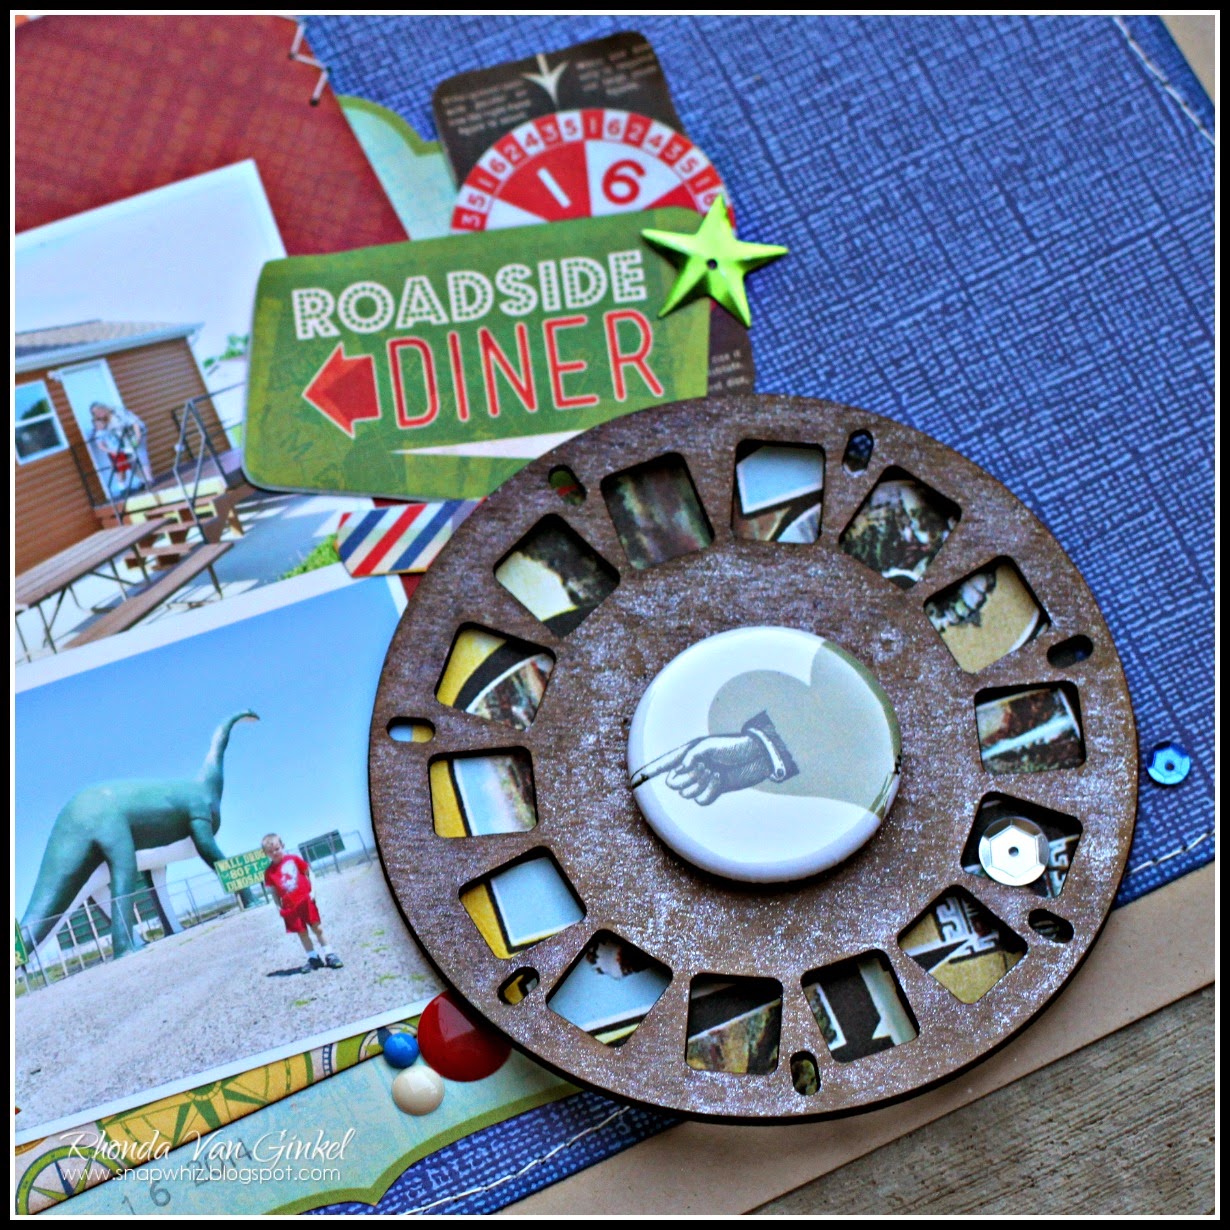
The View Finder inspired my page, I decided to add some funky pattern paper to back it so it looked like there was film in it. I coated it with Radiant Rain in Pewter.


One of the Layered Arrows was base coated with cream paint and I stamped an ampersand on it. The Confetti Heart was inked with a Cherry Red Ink.


The Christmas Speech Bubble was used to frame one of my elements.


UmWowStudio Products:

Other Products:
Souvenir Pattern Papers by BoBunny
Stamp and Button by BoBunny
Navy Cardstock by Core'dinations
Kraft Cardstock by The Paper Company
Enamel Dots by Basic Grey
Twine by The Twinery
Other: Sequins, Thread and Sewing Machine

Thanks so much for stopping on over to my blog today! What's your favorite UmWowStudio item right now? Perhaps you've guessed but one of mine is the View Finder. 

Wednesday, August 13, 2014

Pretty Little Studio: The Twinery Hop

Hello and welcome to the Pretty Little Studio
and The Twinery Blog Hop!
 
 
You should have arrived from
 
 
If not you can start at The Twinery blog!

*******

"Enjoy Everyday Vacation Fun!"

I thought it would be fun to use the Pretty Little Studio Marigold collection for my vacation photos. I liked the contrast of the colors here with my pictures from the Black Hills.


I used the Solid Marigold and SeaWeed Stripe twine on my page. The Solid Marigold for my stitched "Fun" in the title and I tied a bow around my "Enjoy Everyday" Flair by Pretty Little Studio.

Thank you so much for hopping along with us! Just as a reminder, this is a three day hop, be sure to visit each of the participating designer's blogs (and comment!) for your chance to win some fabulous prizes!


If you got lost along the way, here is our line up for today:

Thursday, June 20, 2013

Batter Up!

Thursday Greetings crafty peeps!

It's my day on the Moxxie blog and for this project I decided to showcase the TeeBall collection. Today's post features multiple images, yet white space a a bit of fun with patterns.

I took a series of photographs of our boys playing ball in the backyard and decided to create a bit larger collage of them. These were printed scaled to 8x10, but when I cropped it the final size was 6x6.  This resulted in a nice size for balancing a page without feeling cramped.

Batter Up!

I matted my photo onto this very cool patterned paper:

See how it changed in appearance as I cropped it to a single block width?

I knew that I wanted some white space in my design, so I kept my accents and embellishments to a minimum. It's fun to play with the design strips sometimes to create your own look.  Here is the sheet of design strips.  Do you see the ones I selected?  Practice, practice, practice!  The baseball stitching thin strip, the red t-ball strip and the polka dot thin strip.


Once I had my bits and pieces arranged and positioned, I adhered everything and then added my coordinating stickers and rub-ons.  I loved the long border of baseballs that narrowed in size, so I added that to the top of my page.  


I added a few extra embellies from my stash like the baseball button:
My date tab uses a piece of paper from Midway Madness.  : )

I hope I've inspired you to get those photos on paper today!  Why not try a photo collage?  It makes a big impact and keeps the focus of your page to your subject. 

Ingredients:
TeeBall papers, rub-ons and stickers by Moxxie
Baseball Button by Buttons Galore
Baker's Twine by The Twinery
Flair by The Paper Bakery
Epiphany Crafts Star 25 Tool and Bubble Cap
Smash Date Stamp by K and Co.
Black Ink by Memento
Coal Miner PowderPuff Chalk Ink by Quick Quotes
Black Arrows by LittleB
Blue Adhesive Note by Smash

Thanks so much for stopping on over today!  Have a super scrappity day!


Friday, September 28, 2012

Designer's Challenge for Imaginisce

Happy Friday crafty peeps!!!

It's a fun filled couple of weeks over at Imaginisce!  The designers were challenged to create a project using a special recipe... 
  • Must create a shaped project, no circles or rectangles
  • Must include a smidge of orange
  • Must include three patterned papers


I was so inspired by this challenge, I just love shaped cards!  I found this cute design in the Silhouette store and knew I wanted to make some of these little bird cards!
 

There are a few friends of mine who are expecting right now so I thought how cute it would be to create a baby card!  I started with the Makin' Waves collection and used the blue chevron pattern paper as my base.  I added a smidge of orange in the wing and my favorite silver tear shaped gems for accent.  A bit of baker's twine for hair was my finishing touch. 
 
After I created him, I figured he needed a friend so I created the pink girl themed card next.  : )

I used a bit of pink baker's twine with her wing.
 
I thought these also work nicely for the holidays, so I created a few more using our Christmas Cheer collection.  A bit of orange is layered into their wings.   


Blue and Pink Bird Ingredients:  Makin' Waves papers, i-rock, Glam Rocks in Black, Silver Tears, Hearts and Hot Rocks Compact - Rhinestuds and Glitter by Imaginisce, Twine by The Twinery, White and Black Cardstock by AC and Silhouette.  Cutting file is Samantha Walker. 
 
Christmas Bird Ingredients:  Christmas Cheer and Makin' Waves collections, i-rock, Glam Rocks in Red, Hot Rocks Compact - Glitter, Rhinestuds and Crystals by Imaginisce, Snowflake and Frond punches by Martha Stewart, Silhouette, Martha Stewart Twine, White and Black Cardstock by AC and Silhouette.  Cutting file is Samantha Walker.
 
Thanks so much for stopping on over!  Be sure to visit the Imaginisce blog for all kinds of amazing inspiration from the other designers!!!

~ Rhonda

Tuesday, July 24, 2012

Gathering My Family Mini Album with Quick Quotes

Happy Tuesday crafty peeps!

Today is my turn to share with you my canvas project over at Quick Quotes.  Did you know that Quick Quotes store carries a wonderful variety of canvas in a variety of sizes?  It's really a fun and versatile medium to use for projects!

I started with two flat canvas panels in 5x7 size.  The edges were inked with Biscotti PowderPuff Chalk Ink.  The canvas is a perfect foundation to create a mini album in a convenient size, so I took the new "Just Because" line, Itty Bitty Vellum Quotes and some of my favorite pictures and this is my project.

To the cover, I added some die cuts, chipboard and Prima flowers.

The fence is white card stock inked with Biscotti and Mocha Mama.

This size canvas is perfect for 4x6 photos!

I added a journaling spot, Itty Bitty Vellum Quote attached with eyelets and die cuts.

Simple stitching is all that was added here.

A little kraft envelope accented with Tahiti to emphasize the design can hold journaling.

I loved this Itty Bitty Quote and used my Spellbinders to frame it.

A piece of scrap acetate overlay from a prior Club Q kit worked perfectly here!

The blue partial mat here is a scrap from my page 3 die cuts.  

This floral paper was a perfect fit for this Grandma photo!

Very simple page, the colors were so nice for this!

I thought the little die cut was a fun addition here.


In decorating the back cover, I really wanted to be sure it would lay flat and stand the test of time so I created a simple grid pattern to feature some of the various pattern papers in the line.  A bit of added stitching added just a little extra texture.

Designer's Notes:  

To attach paper to the canvas covers I used Beacon's 3-in-1 adhesive.  My fence was attached using my Xyron 5" Creative Station.

To conserve paper on my interior pages, I stitched only on photos and then adhered to my page, so it looks like it was stitched actually to the page.  This allowed me to use a single piece of paper on each interior page and make use of the double sided pattern papers.

This line is perfectly named...  "Just Because" you really can use it for any kind of project, it is incredibly versatile!  The soft buttercream, blues, green and still pinks and orange and brown are amazing.

I hope that I've inspired you to take a look at using Canvas as a foundation for your next album.  

Quick Quotes Ingredients:
Just Because papers
Itty Bitty Vellum Quotes - "Babies, Kids, Family"
PowderPuff Chalk Inks:  Tahiti, Biscotti, Mocha Mama, Limeade, Green with Envy 
Green Binder Rings and Acetate Transparency (Creative Imaginations) from prior Club Q Kits.

Other Ingredients:
Xyron 5" Creative Station
Kraft Envelope - Maya Road
Spellbinder Dies - Deckled Rectangle, Circles
MFT Dies - Fishtails, Hex, Flourish, Squiggley Line
CLD Dies - Fence
Martha Stewart Punches - Rose Leaf, Frond
Fiskars Punch by JBS - Tab
Flowers - Prima
Diamond Stickles - Ranger
Twine by The Twinery
Other:  Journaling Spot, Eyelets, Thread, Sewing Machine

Thanks so much for stopping on over today!  Have a super rest of your week!!!

Friday, April 20, 2012

Imaginisce Wrapping with The Twinery!!!

Happy Friday all!

We're so excited to be hopping with The Twinery this week at Imaginisce!!!  Today's hop sequence is provided below for your reference. 

If you're hopping along already, you should have arrived from the amazingly talented Shannan Teubner's blog

If you haven't started yet, you definitely want to hop over to Imaginisce to get all of the details!

You have to check out the amazing prizes up for grabs too!  3 of the "Makin' Waves" collections by Imaginisce and 3 of these fabulous "I Dream in Twine" collections from The Twinery!!!


In order to win:
  • You MUST comment on each particpating blog on the hop throughout the week
  • Follow the Imaginisce blog & The Twinery blog
  • Follow the Imaginsce & The Twinery Facebook pages
  • Deadline to comment will be Midnight EDT, Sunday, April 22nd
  • Winners will be announced Monday, April 23rd on each company's blog


My project:  "Sun Kissed" A2 card using the Makin' Waves line.
I cut a flower border using Cheery Lynn Designs die and used coordinating colors of the twine to create the floral buds.  A needle threading tool was used to assist in getting the twine through nicely. This was then adhered with foam tape squares.


I tied some twine around the surfboard as well.  To play on the sentiment, I cut an extra fish and had a little fishy kissing going on with the help of my i-Rock and one of our fabulous heart studs.  I love those!  A little aqua hot rock was added to one of my spare flowers and added to the chipboard sentiment.  The water themed paper I folded a bit for some added dimension.

The play of orange off of the bright turquoise blue and all of the fun colors in this line still make me happy just looking at it!

Supply List:
Makin Waves collection (Die Cuts, Chipboard, Canvas Stickers and Pattern Paper) by Imaginisce
i-Rock by Imaginisce
Heart Glam Rock (1) and Hot Rock Jewel in Aqua (1) by Imaginisce
White Foam Tape by Imaginisce
Twine by The Twinery: Peapod, Mandarin, Caribbean, Lemon Drop, Pink Sorbet and Blossom
Blue and White Cardstock by Bazzill
Mini Scallop Border Punch by EK Success
Lemonade PowderPuff Chalk Ink, Quick Quotes
Orange Distress Ink by Ranger
Flower Chain Border Die by Cheery Lynn Designs
Diamond Stickles by Ranger 
 
Be sure to hop on over to Stacy Rodriguez's blog next to check out her fabulous project!
 
Thanks for stopping on over and I'd love it if you decided to follow my blog! 

Have a super scrappity Friday!
~ Rhonda