Showing posts with label Flair. Show all posts

Saturday, February 11, 2017

A Library of Memories with ScrapBerry's

Greetings and welcome to the blog, it's Rhonda here today to share a project with you featuring the timeless "Words Live Forever" collection by ScrapBerry's.

Library of Memory Vintage Scrapbook Page featuring Words Live Forever designed by Rhonda Van Ginkel for ScrapBerry's

This collection is so perfectly suited for all of those historical photos. When I looked at the papers, I knew immediately what photos that I wanted to scrapbook. Part of my family history involves this schoolhouse that was built for my grandfather and his eleven siblings so that they had a school to attend. Later on, it became a museum full of artifacts and rich with our family history.

Library of Memory Vintage Scrapbook Page featuring Words Live Forever designed by Rhonda Van Ginkel for ScrapBerry's

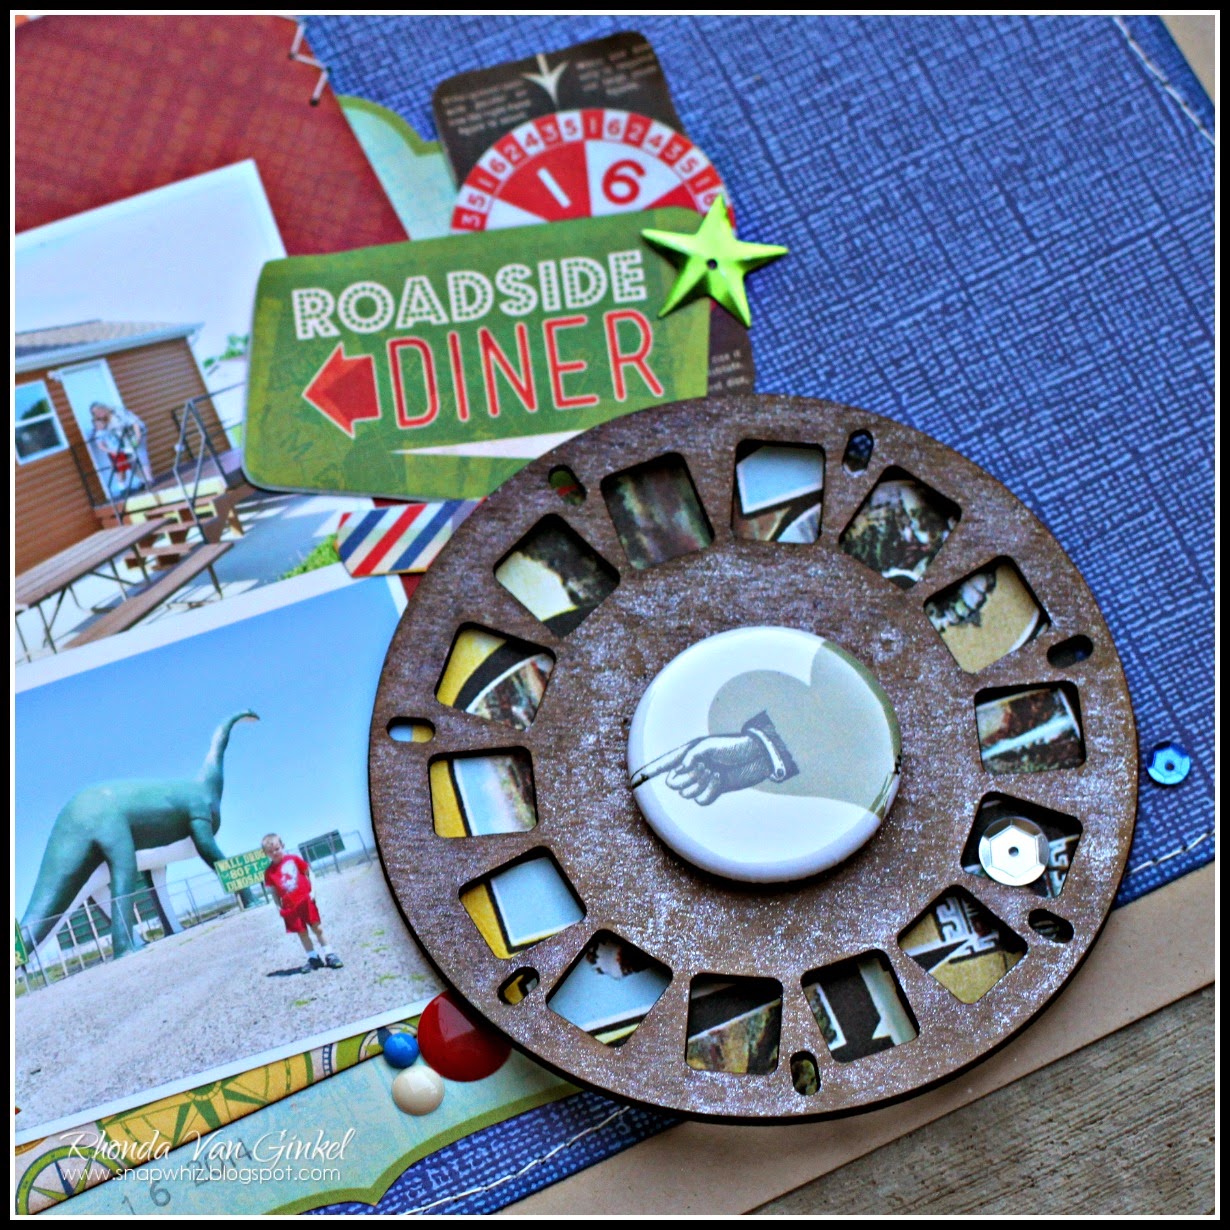
I played off of the timeless elements in the papers by cutting a few pieces from the "Postcards for Pennies" paper to get the feel for the direction that the page would take. I started by layering the background papers so the "Moments" notebook sheet is on top of the "7th Street Library" paper. A bit of modeling paste and a clock stencil was added. I added a variety of ink splatters and set aside to dry.

Library of Memory Vintage Scrapbook Page featuring Words Live Forever designed by Rhonda Van Ginkel for ScrapBerry's

A bit of stamping using the Photo Archive stamps, both the filmstrip and the lightbulb. I also cut out the phone and added it with foam squares. I layered in the washi tape, a few die cuts and of course that gorgeous "Wind of Travel" clock.

I really love to capture pieces of our family story and heritage for our children. This collection is perfectly suited for so many types of projects!

ScrapBerry's Products:
Words Live Forever 12x12 Paper Collection - SCB220609300x
 - 7th Street Library: SCB220609302
 - Tonite on Broadway!: SCB220609305
 - Moments: SCB220609306
 - Memos: SCB220609307
 - Postcards for Pennies: SCB220609309
Washi Tape: Wind of Travel - SCB490029
Washi Tape: Around the World - SCB490001
Stamp: Photo Archive - SCB4907013b
Set of Clock: Wind of Travel - SCB34001071
Metal Embellishments: Create Wonder - SCB340001085

Thanks so much for stopping on over today! Have a super scrappity day!!!

Saturday, January 28, 2017

Love is in the Air with ScrapBerry's

Saturday greetings to you! I hope you are enjoying your weekend. I've got a ScrapBerry's project to share featuring a bit of recycling from a found object.

I've used the beautiful Birds of Paradise collection along with a piece of packaging material as my foundation to create an up-cycled home decor plaque.

Upcycled Recycle Packaging Creates Home Decor featuring ScrapBerry's Birds of Paradise Collection Designed by Rhonda Van Ginkel

How did this project begin? I received a box containing a new larger item and inside were several pieces of this oversized partition cardboard but with texture. I loved how durable and strong it was and thought, this could really work nicely for a wall decor item.

Upcycled Recycle Packaging Creates Home Decor featuring ScrapBerry's Birds of Paradise Collection Designed by Rhonda Van Ginkel

To begin, I used a coating of plain white gesso. After the first coat I applied a bit of ScrapBerry's Stains Ink in Pink to the raised areas, then muted it down with a 2nd coat of white gesso. A bit of silver embossing powder was used on top of the wet medium, then heat set with a heating tool. The final touch was an application overall of iridescent medium.

The technique accents the gray tones and softens the Pink ScrapBerry's Stains Ink to perfectly coordinate.

Upcycled Recycle Packaging Creates Home Decor featuring ScrapBerry's Birds of Paradise Collection Designed by Rhonda Van Ginkel

As you can see, I have die cut several items to layer, but the sentiment and bird with the florals were my inspiration. I've hand cut the florals and some of the leaves as they are so pretty!

I hope I've inspired you to look at some of your everyday items creatively today.

ScrapBerry's Products:

Birds of Paradise Paper Collection SCB220606300BH
- Twitter SCB220606309H
- My Melody SCB220606305H
- Birds SCB220606307H
- Fairy Garden SCB220606302H
- Barberry SCB220606306H
- Plumets SCB2206063088BH

Stamps: Photo Archive SCB4907013B
Metal Embellishment Flair: Create Wonder SCB340001085
Stains Ink: Pink SCB1210502
Metal Charms 4 Pc: For Wedding
Washi Tape: Around The World SCB49001, Wind of Travel SCB490029

Thank you for stopping on over for a visit today! Have a super scrappity day!

Wednesday, January 11, 2017

Love is... featuring ScrapBerry's Primavera

Wednesday greetings to you! I have a fun project that I created for the ScrapBerry's Blog to share with you today.

I have a romantic inspired page in honor of Valentine's Day featuring the Primavera collection. The inspiration for this page is a silly photo from Facebook. I found the sentiment on it to be so true and wanted to celebrate the silly that is shared in our relationships. To me, having a great laugh with my loved ones is the best!

ScrapBerry's Page featuring Primavera Collection designed by Rhonda Van Ginkel

To begin my page, I applied a bit of modeling paste with a stencil, then added some mist splatters in coordinating teal, blues, gold and silver. After selecting my paper to mat the photo to, I knew I wanted to have nice texture on the page so I also added a bit of corrugate.

ScrapBerry's Page featuring Primavera Collection designed by Rhonda Van Ginkel

A bit of white chalk ink was applied to the corrugate and around my photo collage to provide a soft distressed appearance. I used a stencil brush to work the ink into the paper with a soft look. After I framed the collage, I knew I wanted to add this technique around the outer border as well.

The white Chipboard Tag Frame in a scalloped oval shape I cut apart and used in opposing areas to help create the visual triangle in my design. A bit of pearl paint was added in coral, mint and pink to blend with the color scheme.

ScrapBerry's Page featuring Primavera Collection designed by Rhonda Van Ginkel

A few details so you can see some of the textures within the layers. I started with the drywall tape, added mist and ink splatters, then the white chalk ink distressing, followed by the washi tape. A few accent die cuts from the papers are added as well.

ScrapBerry's Page featuring Primavera Collection designed by Rhonda Van Ginkel

One last view to show the layers and textures.

ScrapBerry's Products:
12x12 Primavera Collection Paper Pad SCB220609000
- Ephemeral SCB220609001
- Into the Parlor SCB220609002
- Dreamcatcher SCB220609003
- Paisley Waves SCB220609004
- Cards 2 SCB220609008
Washi Tape: Wind of Travel SCB490029
Flair Metal Embellishments: Forest Friends SCB340001049
Crystal Stickers: Floral Embroidery SCB3000007
Metal Charms Set: For Wedding SCB250001056
Chipboard Die Cuts: Craft Chipboards White Tags SCB2022646
Paper Flowers: Clove Pink 8 Pieces SCB280408
Paper Flowers: Daisy Pink 8 Pieces SCB280307
Paper Flowers: Rose Light Pink 8 Pieces SCB280504
Mulberry Paper Flowers: Fern Leaves 7 Pieces SCB300603
Stamps: Elegy Precious Memories SCB4904020b

Thanks so much for stopping on over to the blog today! If you'd like to view more ScrapBerry's products, go here.


Sunday, December 11, 2016

ScrapBerry's Christmas Challenge!

Weekend greetings to you!

I have a fun ScrapBerry's Project to share with you that I created for their current challenge theme which is "Christmas". You can find the details and more inspirational challenge projects from other crafters here.

 
I took these photos of our oldest a few weeks ago when he found the Christmas decorations and decided to run around all morning with his Santa hat on. As you can see, it takes a few iterations and patience to get a photo.
 
The "Once Upon a Winter" paper collection was perfect to coordinate! I used a variety of mixed media here to bring in some background glitter snowflakes. The ink splatters, lace and string added the texture I was looking for.
 
 
I loved the "Ho! Ho! Ho!" sentiment and the Flair Metal Embellishment was nicely paired to create my title work for the page.

Some stamping with the Photo Archive film strip stamp along with a few layers of Around the World Washi Tape worked in nicely.
 
ScrapBerry’s Products:
12x12 Once Upon A Winter Paper Pad
  • Winter
  • Happy Holiday
  • Welcome Winter
  • Blizzard
  • Snowflakes
Decorative Brads: Once Upon A Winter
Flair Metal Embellishments: Create Wonder
Stamps: Photo Archive
Washi Tape: Around the World

Thank so much for stopping on over for a visit, have a fabulous scrappity day!
 

Saturday, November 12, 2016

Vintage Inspired Gift Bag with ScrapBerry's

Saturday greetings to you!

As the weather is starting to turn into fall here, I have been inspired to create a few holiday themed items. Today I have a sweet little nostalgic gift bag to share with you featuring the “Once Upon A Winter” collection by ScrapBerry's.

The gift bag is 8.5” tall x 5” wide.

I started by selecting the focal point nostalgic character for the bag along with the sentiment. I found a delicate oval frame die that would frame my focal point nicely. Next, I selected coordinating layers of pretty oval shapes to create dimension and texture.


The sentiments were cut from the “Happy Holiday” paper. Edges are inked and then collaged with other coordinating embellishments. I’ve included a touch of cheesecloth and vellum for a soft feel.


You’ll also see subtle that I’ve used one of the snowflake brads as well. The finishing touches were a tiny tag attached to a bit of tied netting that was warped a bit with my heat gun. Touches of Diamond Stickles were added to the snowflakes.
 
ScrapBerry’s Products:

12x12 Once Upon A Winter Paper Pad
- Winter Dream
- Happy Holiday
- Bullfinches
- Welcome Winter
- Blizzard
- Snowflakes
Wooden Buttons – Winter Joy
Decorative Brads – Once Upon A Winter
Flair Metal Embellishments No1 – That Special Time of Year
Shabby Ribbon - White

I hope you enjoyed my gift bag project. Thank you so much for stopping on over to visit the blog today! Be sure to visit the ScrapBerry's Blog for more inspiration too.


Thursday, November 3, 2016

ScrapBerry's November Challenge!

Happy Thursday to you!

I've got a fun project to share with you today that I created for ScrapBerry's November and December Challenge. This year is just flying by, I can't believe it's November already. My project features the Winter Joy collection by ScrapBerry's.

The foundation is a plain canvas binder sized 7.25” x 8” that I picked up at my local craft store. It is primed with white gesso. I used stencils and modeling pastes, glass bead gel along with several spray mists and paints for color.  A pretty variety of ScrapBerry’s embellishments helped create the design.


The binder will be used to store our family memories during the holidays. I loved altering the Resin Flowers and the Cherry Blossom Flower to fit with my design theme.


To accent my Convex Metal Frame, I added gel medium lightly to the scalloped frame, then sprinkled with gold embossing power. I heat set the powder. I also have done this to the Set of Wings to blend into my design.


ScrapBerry’s Supplies:
12x12 Winter Joy Paper Pad (Postcards and Sprinkle of Snow)
Convex Metal Frame – Winter Joy 1
Decoration - Winter Joy
Resin Flowers – Fairy Tale
Epoxy Brads – Once Upon a Winter
Chipboard Die Cuts White Tags 2 cards
Set of Wings White - Metal Embellishments
Torsel’s Stamp – Fairy Tale
Flair Embellishments – That Special Time of Year
Charms Set - Brass Trumpet
Chipboard Die Cuts No 2 – Birds of Paradise
Cherry Blossom 10 Piece Set Pink and White

Thanks so much for stopping on over today for a visit. Be sure to check out all of the details about the ScrapBerry's Challenge here.

Sunday, October 30, 2016

Vintage Season's Greetings with ScrapBerry's

Greetings and happy Sunday to you.
 
I was recently up over on the ScrapBerry's blog with a project in vintage and romantic holiday theme. I'm excited to share with you my card featuring the "Winter Joy" collection by ScrapBerry's. This collection has some wonderful vintage images as well as coordinating sentiment cut outs.
 
"Season's Greetings"
 
To begin, I selected an oval focal image from the “Postcards” paper and cut it out. I then selected my base paper to coordinate with, the “Sprinkle of Snow”. After trimming to an A2 size, I used a distress die and cut the bottom right corner relief design. Added a piece of “Winter Garden” to peek from behind.


Once I selected those elements, I cut several more die cut elements and layered them with the focal image. First, I cut a circular floral vine from “Ice Feathers”. This is layered on top of a pinecone that was cut from “Winter Music”. As each piece was muted, I added touches of shimmer using my Wink of Stella clear glitter. To complete the framing for my image, I cut another circular flourish and layered underneath.
 
The sentiment was trimmed from the “Cards” paper. Edges are inked, distressed a bit and then touched with a bit more Wink of Stella to add a hint of shimmer. I added a die cut deer peeking out and a sweet bow in White Wax String for interest.
 

You’ll also see subtle snowflakes punched from vellum. One is accented with a coordinating white snowflake brad The collages of embellishments in the right corner were the finishing touches.
 
ScrapBerry’s Products:
12x12 Winter Joy Paper Pad
  • Winter Music
  • Sprinkle of Snow
  • Miracle
  • Cards
  • Ice Feathers
  • Postcards
  • Sprinkle of Snow
  • Winter Garden
Wooden Buttons – Winter Joy
Decorative Cork – Winter Joy
Decorative Brads – Winter Joy
Flair Metal Embellishments No1 – That Special Time of Year
White Wax String

I hope you enjoyed my project today. Thank you so much for stopping on over and spending a moment with me here on the blog! Have a super scrappity day!!!
 

Thursday, October 13, 2016

October Stack-a-Holics Challenge!

Happy Monday to you!  It's already October, can you believe that?

It's time for a brand new DCWV Stack-a-Holic's challenge, which is always so inspirational! For my project here I used the Happy Day stack along with a bit of mixed media on top of an Embossed A2 White Card.


This is a personal blog. All editorial content and projects are intellectual property of Scrappity Dappity Doo!. 
I do receive financial compensation and products from DCWV to develop certain blog posts, 
but all of the ideas and opinions noted are my own.


I used a bit of glimmer spray drops and then my Ranger mister with a few distress markers. A few of the pretty elements, like the doilies and bow from the stack were cut out and arranged. I used one of my Martha Stewart Punches for the blue center doily.

Check out the sketches!


If you are in the mood for a scrapbook page check this out:

How cute are these sketches!!?! We would love for you to play along with us and show your take on the sketch! Check out the post here.

DCWV Products:
Happy Day Stack
DCWV A2 12 Pack Card and Envelope Set: Embossed White

Other Products:
Glue Dots
Gold Foil Chipboard Heart - MME
Gold Glimmer Spray - BoBunny
Pink Spray - Lindy's Stamp Gang 
Splatter Template - Ranger
Texturez Patina - Shimmerz
Flair - A Flair for Buttons 
Ranger Distress Markers and Splatter Tool

Thanks so much for stopping on over today for a visit!

Tuesday, May 17, 2016

May Stack-a-holics Inspiration

Greetings to you!

I have a card to share with you today featuring the Birds and Butterflies Stack and the Embossed White Stack by DCWV.

For May, the card sketch has this very fun circular design. I chose to feature one of my favorite pattern papers from the Birds and Butterflies Stack as my focal point.

This is a personal blog. All editorial content and projects are intellectual property of Scrappity Dappity Doo!
I do receive financial compensation and products from DCWV to develop certain blog posts, 
but all of the ideas and opinions noted are my own.

Some details...

Here is the card sketch for May:

Feel more page inspiration? Here's the fabulous sketch for it:


DCWV Products Used:
Birds and Butterflies Stack
Embossed White Stack

Other Products:
Cheesecloth
Flair
Hemp
Prills
Punches for Flower and LeavesStick Pins

Be sure to stop on over to the DCWV blog for more information on the May Stack-a-holics Challenge. We would love to have you join us and play along.

Thanks so much for stopping on over today!

Sunday, December 7, 2014

A Vintage Page with UmWowStudio

Greetings, I was recently up on the UmWowStudio blog with a project to share.

I've been wanting to scrap this photo of my father and his sister for the longest time. When I found it again going through photos the other day, I really wanted to celebrate it.  There aren't a ton of photos of my Dad from his youth, so these are very special to our family.


I used some papers with a sepia type of feel to them. Once I selected my papers, I chose my chipboard embellishments that would fit the feel of the page. The Doilies chip was covered in a chocolate pearlescent product.  The Soar Tab was coated in gesso, then touched with a variety of pearlescent product to give a variegated feeling and match the photo.


Don't you just love those doilies?!!!


A bit of background stamping and ink droplets with a bit of cheesecloth helped pull the page together.  When I was done stamping, I added bits of Mica to the areas to create a bit of shine and texture.

UmWowStudio Products:
Butterfly Swarm Mask
Damask Mask
Flourishes One
Doilies
Soar Tags
Sidewalk Chalk Flair

What's your favorite way to honor those special photos? Thanks so much for stopping on over today and have a super scrappity weekend!

Wednesday, November 5, 2014

Butterfly Kisses with UmWowStudio

Happy Wednesday to you!  I hope your week is treating you well so far.

I have a page to share with you today that I created for UmWowStudio featuring their Damask Mask, Butterfly Kisses Flair, Love Speech Bubble and Flora Chipboard.  I love how versatile and pretty their products are!

Butterfly Kisses Scrapbook Page by Rhonda Van Ginkel for UmWowStudio featuring Damask Mask, Butterfly Kisses Flair

I was a bit nostalgic over my youngest heading off to Kindergarten and when I found this photo, it just moved me, so I had to scrap it. Do you ever do that?

Butterfly Kisses Scrapbook Page by Rhonda Van Ginkel for UmWowStudio featuring Damask Mask, Butterfly Kisses Flair

I layered one of the speech bubbles with a relief heart in a coral mist to give a little character.  : )

Butterfly Kisses Scrapbook Page by Rhonda Van Ginkel for UmWowStudio featuring Damask Mask, Butterfly Kisses Flair

I used modeling paste with the Damask Mask and then added some drops of mist in Greens, Gold and Coral to accent the color scheme. My Floral Flourish is misted with Green.

UmWowStudio Products:
Butterfly Kisses Flair
Damask Mask
Floral Flourish
Love Speech Bubbles

Other Products:
Butterfly Garden - DCWV
Craft and White Mat Stack - DCWV
Sunday Afternoon Mat Stack - DCWV
Premium Paper Collection - DCWV
Cheery Lynn Designs Doily Die
MFT Tab Die
Lindy's Stamp Gang Mists
Modeling Paste

Thanks so much for stopping on over today! Have a super scrappity day!!!

Saturday, October 18, 2014

You and Me with a bit of UmWowStudio

Happy Saturday and weekend to you! I have a fun little card to share with you that I recently created for UmWowStudio.

I thought it would be fun to create a mixed media card using a mask, a chipboard tag and some flair.  I've also added in other elements like cheesecloth and hemp for texture and interest


I started by using the Damask mask for my background here with some glass bead gel and let it dry.  I then sprinkled a few different mists on and let them pool up and run together a bit. After that, I took a gold mist and lightly misted all over.


There is a chipboard tag from the soar collection on the right, it's been base coated with gesso, then pearlescent pens rubbed on it to create a variegated effect.


I just love our beautiful Flair and used the "You and Me" from The 2 of Us collection as a sentiment for my card.  

UmWowStudio Products:

Have you been busy creating with your UmWowStudio goodies? If so, be sure to enter the UmWowStudio challenge this month - it's Anything Goes!

Have a super scrappity weekend!

Tuesday, September 23, 2014

September Sketch Inspiration with UmWowStudio!

Happy Tuesday to you! I have a project to share with you that features the September sketch over at UmWowStudio. Have you seen it yet?


I had the perfect photo for this sketch and had so much fun putting this page together:
 

I stayed pretty true to the sketch and just had fun with it!


UmWowStudio Products Used:
Love This Flair
Layered Arrows Chipboard

Other Products Used:
Nature Walk by 7 Dots Studio
Transparent Cards and Date Stamp by Heidi Swapp
Texture Stamps by BoBunny
Journaling Stamp by Pebbles
Mica by Stampendous
Cheery Lynn Designs Dies (Scalloped Rectangle, Vertical Heart Mesh and Dutch Doily Square for Border)
Memento Black Ink
Lindy's Stamp Gang Tiffany Lou Blue and Whale Watch Blue Mists


We can't wait to see what you do with the sketch! Visit this post for all the details. You still have 7 days to play along!

Thanks for stopping on over to the blog today, have a fabulous week.

Saturday, August 23, 2014

Road Trip with UmWowStudio!

Happy weekend to you!  I have a fun project to share with you that I created for UmWowStudio featuring the new "Souvenir" collection from BoBunny.

I have a confession, I have some favorite chipboard elements and I was hoarding one of them. Do you ever have a piece or two that you just love like that?

We recently took a family vacation and I wanted to grab a few images that my husband shared on FaceBook.

Road Trip!

The View Finder inspired my page, I decided to add some funky pattern paper to back it so it looked like there was film in it. I coated it with Radiant Rain in Pewter.


One of the Layered Arrows was base coated with cream paint and I stamped an ampersand on it. The Confetti Heart was inked with a Cherry Red Ink.


The Christmas Speech Bubble was used to frame one of my elements.


UmWowStudio Products:

Other Products:
Souvenir Pattern Papers by BoBunny
Stamp and Button by BoBunny
Navy Cardstock by Core'dinations
Kraft Cardstock by The Paper Company
Enamel Dots by Basic Grey
Twine by The Twinery
Other: Sequins, Thread and Sewing Machine

Thanks so much for stopping on over to my blog today! What's your favorite UmWowStudio item right now? Perhaps you've guessed but one of mine is the View Finder. 

Wednesday, July 30, 2014

Believe Tag with UmWowStudio

Happy Wednesday crafty peeps!  I've got a project to share with you that I created for UmWowStudio. For my project today I decided to go out of my comfort zone.

I created a feminine inspirational tag featuring the relief of the "Believe" sentiment from our Christmas Speech Bubbles chipboard.

"Be You-nique and Believe"

Believe. One of my very good friends always says this to me. It's funny how this one little word can have such a profound and calming impact. When I saw this in the Christmas Speech Bubbles, I knew I wanted to use in as part of the inspirational message on the tag.


Both of my chipboard elements were colored with some Smooch in Lettuce and a touch of Frosted Acadia. To accent the delicate features of the Leaf Stems I added some crystals from Prima in a variety of styles. I love the way the chipboard and flair created their own embellishment cluster!

UmWowStudio Products:
Leaf Stems
The 2 of Us Flair
Christmas Speech Bubbles

Other: Tag Base, Papers, Stamp and Crystals by Prima. Smooch in Lettuce and Frosted Acadia. Be You-Nique sentiment from Primrose 3x4 Misc Me card by BoBunny, Copics and Ribbon. Ribbon Bow on Dress by Maggie Holmes for Crate Paper. Bell Doily Die by Cheery Lynn Designs.

This was a fun project for me, hope you enjoyed it.  Thanks so much for stopping on over to my blog today and have a super scrappity day!

Tuesday, July 22, 2014

Quick Quotes July Club Q

Happy Tuesday to you!  It's my day to host the blog and share my project at the Quick Quotes blog today.

My project features pieces from the July Club Q along with a few items from my personal crafting treasures.


I started my page with a few layers, then stenciled the title at an angle using Glossy White Embossing Paste which was heat set to provide the texture. The texture is so much fun!


The July Club Q Kit contains these adorable summer die cut shapes, the sun, the umbrella and the Palm Tree in white card stock.  I added Lemonade PowderPuff Chalk Ink and a touch of Orange Slice on the Sun. The Umbrella was colored with Blue Lagoon.  I added a bit of Stickles to my Palm Tree and to the edge of the umbrella also.


The kit also contains the orange button and the orange ribbon, the perfect finishing touches!

Quick Quotes Products Used:
July Club Q
Calypso Chipboard Die Cuts
PowderPuff Chalk Inks: Blue Lagoon, Orange Slice, Baja Blue

Other Products:
Flair by Recollections
White Glossy Embossing Paste by Dreamweaver
Rectangle Horizon Boutique die by Cheery Lynn Designs
Tab die by MFT
White and Orange Cardstock
Stickles by Ranger
Enamel Dots by Prima and Doodlebug
Tim Holtz Sunshine Mask
Washi Tape by BoBunny
Sewing Machine and Thread

Thanks so much for stopping on over to the blog today for a visit!  Have a super scrappity day!