Showing posts with label Release Party. Show all posts

Monday, August 27, 2012

Monster Mash... Imaginisce Style!


We're very excited over at Imaginisce this week to continue to share with you 
our latest release called:  "Monster Mash"!

Here are a few of my favorite images from the collection:


~~~~~~~

"Boo! Bam! Pow!" 12x12 layout

This collection is so fun to work with, the colors and adorable characters just spoke to me!   These fun photos were taken of my boys trying on their costumes from last year.  I thought it would be a fun play on the "Boo" to add a few additional phrases. 

The spiderweb style doily and "Pow!" and "Bam!" were cut using my Silhouette. The sentiments that I cut were accented with Crackle Accents and Glossy Accents. A few glam rocks were added using my i-Rock to the tree's eyes and to the "Boo!" sentiment.


The mini tray was a fun little Halloween scene to create for some decor.  The boys absolutely love it and can't wait to put it out!  (I'm pretty sure they really just can't wait for the c-a-n-d-y!!!)


Ingredients:
Monster Mash Collection
i-Rock and glam rocks
Cheery Lynn Designs flourish die
Silhouette
MFT Bumpy Road die
Crackle Accents and Glossy Accents by Ranger
Mini Artists Tray by 7 Gypsies
Thanks so much for stopping on over!  Be sure to visit the Imaginisce blog for even more inspiration and peeks of this fun collection.

Have a super scrappity week!
~ Rhonda

Wednesday, May 16, 2012

Hello Cupcake Release Party!

Happy Wednesday to you!

I'm thrilled today to share some of my newest projects for Imaginisce with you!  We are releasing a brand new birthday line called "Hello Cupcake".  It's not just for birthdays, although I will let you see that for yourself in a bit.

My first project is a door hanger that we can put on the special birthday person's door in the house!  I thought this would be very fun and get the kids excited and involved in celebrating other's birthdays.  (Like cake, ice cream and presents don't do that well enough!)  The hanger is from K and Co.


A few details:
I created an accordion flower here, layered it with a Cheery Lynn 
doily die and then added a chipboard sentiment on top.  
The orange striped ribbon is May Arts.

My next project is a layout of my Brother and Nephew:

I loved these photos that I took of them during our son's 3rd birthday party.  Although this is not my Nephew's birthday celebration, it is about celebrating spending Father and Son time together.  It probably doesn't hurt that we were at Chuck E. Cheese either.  Ha!

I cut the green strip of scalloped paper with my fringe scissors.  To this, I have added a bit of festive ric-rak and a little flourish courtesy of an MFT die.  I did not overly embellish this page, but did add texture by sewing and layering.  Of course, the sticker stacker's do a fantastic job of adding the right oomph to any page too!  *Sigh!*  I  just love those things!!!

I've left the journaling spots so my brother can help complete it.  My hope is to create several more pages so my Nephew will have a book next year of his special moments.  : )

My final project:  A Birthday Hat Card with Cardholder:

Here it is opened:

My project inspiration came from this tutorial on Split Coast for a 
"beanie cap" card by CaffeineGirl13 (Thank you!) 
I simply modified the design a bit to become a pointed party hat.  
I used a few Imaginisce flowers and some baker's twine for the tassel.
 
I thought it would be fun to use an i-top brad daddy to hinge the hat and some of our cute Imaginisce flowers were used as the tassel for the hat.  Be sure to watch the video for a really cute tassel idea using the i-Top punch!!!

Directions:
  1. Cut triangle portion of your paper, bottom section length of 5"wide x 5.5" high.
  2. I cut mine as a rectangle, then marked my 2.5" center point and cut my side angles to that center point.
  3. Cut one more triangle for your back, same size.  (I cut a third and sewed it as a 2nd piece to my cover, but that's optional.)
  4. Cut 2 pieces of paper 1.25" x 6.25" for the bottom trim for the hat.
  5. Cut a 5" diameter circle.  I used a Spellbinders Grand die for this. 
  6. Trim 2" off one end of the circle and fold up approximately 1" to create your card holder.
  7. Place adhesive on the back of the flat portion of your circle and adhere to your triangle back.
  8. Adhere the back trim piece of 1.25' x 6.25" paper on center and to the back of your hat.
  9. Cut a scallop piece of trim and stitch around your bottom trim for the front of the hat.
  10. Create a coordinating 16mm brad daddy with your i-top.
  11. Attach triangle front to trim front using your brad daddy.  It's attached about 1/4" down.  Add a bow using baker's twine around the brad
  12. Run your strong holding adhesive along the left, bottom and right sides only to allow your hat to open and close to reveal your gift card.
  13. Add a sentiment sticker as desired.
  14. Embellish the top of your hat with flowers, and twine to finish your design!
That's it for me today, I hope that you've enjoyed my projects!  

Please make sure you stop on over to the Imaginisce blog today to check out all of the other amazing inspiration from our designers and leave a comment!!!  Some very lucky person will be able to win their own collection of Happy Cupcake!  It might just be YOU!

Have a super scrappity day!
~ Rhonda

Monday, March 12, 2012

Makin' Waves Release Party!

Happy Monday to you!

We're so excited this week to release our latest line over at Imaginisce!  It's called Makin' Waves and you're going to love the colors!!! 

Last summer we enjoyed a little pool time at my sister-in-law's home and it was a really fun time to take a few photos.  I love the bright orange mats in contrast with the blue water and yellow of the float.

"Fun Makin' Waves!!!" (12x12 layout)

To bring a little motion and attention to the wavy pattern of the fish pattern paper, I stitched and left tails along the way.

I added some bling with my i-Rock on the umbrella, in the sun of my Hot Summer Day chipboard and a few sprinkled accents down in the water too.  Don't you love those Cheery Lynn Designs doilies here?  I thought they were awesome! 

To create my little scuba boy tag, I used my little Martha Stewart mini tag punch.  I thought he was so cute!!!

Thanks to Becky Fleck for the inpiration of one of her March sketches for this!!!

----------

My next project is a fun card with an encouraging sentiment.  I thought so anyway...  lol!

"Keep On Swimmin" (A2 Card)

Some details:
 The waves are hand cut from cardstock and I pressure embossed them. 

The i-Rock, hot rocks and silver tears were used to accent the fish, crab eyes, and waves and bubbles.  I also used one of my i-Top punches to give a bit more "wave" simulation. 

Imaginisce Supplies:

Other Supplies:
Mega Sunflower Doily die, Cheery Lynn Designs
Nautical Wheeler Doily die, Cheery Lynn Designs
Circle Punch, Uchida
Cuttlebug Embossing Folders
Cardstock, Core'dinations (layout)
Cardstock, Bazzill (card)
Twine, The Twinery
Mini Alphas, MLS
Tickets, Pink Paislee
Grand Calibur, Spellbinders
Scrapbook Adhesives Runner, 3L
Other:  Ribbon, Button, Sewing Machine and Thread

Thanks so much for stopping on over!  Be sure you stop on over to the Imaginsce blog to see what lovely creations that the rest of the design team has to share with you!

Have a super scrappity day!
~ Rhonda

Tuesday, January 17, 2012

Sole Sisters Release Party!!!

Can you feel the excitement in the air? 

I sure can and all of the gals over at Imaginisce are super excited to share with you our latest collection!


When I took a look at the all new Sole Sisters collection, the only photo that came to mind was of course, the one of my best forever friend!  We had such a wonderful time shopping for our dresses for Spring Formal and the entire evening was magical.  I am so grateful that we ditched our dates for a minute and got this photo snapped of us together, because there aren't that many photos of us together from college.

I love how the different styles of shoes represent that we are different, but so very alike!
I used my i-Rock, heart gem, and coordinating color gems to pop the colors.  A bit of maneuvering makes the handbag hang from the corner of the frame.  : )  I also used the frame diecut and filled it in with some fussy cut flowers from the collection.

---------------------------
The next project that I created was to take the collection and spin it a bit.  This is an Anniversary gift that I created for my husband.  I thought it would be fun to use the sentiments here in a different way:

"I Pick You...  Forever"
The frame here is by Kaisercraft.  I thought it lended the shape nicely to a wedding feel with these pattern papers in the collection, aptly named "I Pick You".  Gotta love it when that happens!  he he
So you all know the d-Stress tool is one of my favorite life-saving tools for Altered projects, right?  For projects like this, it's such a fabulous go-to, hands down!  See how nicely it finished my edges? Seriously, if you do any frames or altered chipboard, etc., you need one in your life! 

I used the canvas flower sticker, layered it on top of an accordian flower and another punched scallop for some interest.  Tucked in a few leaves to bring the flower alive. 

There aren't many projects that don't get a visit from my i-Rock either.  It makes everything just come alive!  Check out the tiara - I added the tiny little hot rocks from my multi case for it.

---------------------------

I had to do it!  The cliche~ Purse Card

Ok, so I didn't want to be predictable, but this was too perfect to let it go.  lol!  I've used my canvas sticker here from the collection along with my i-Top 2.0 and a 22mm brad daddy for the closure.  I filled in the white space with a red copic on the canvas sticker.
A few embellishing gems in fun colors with the sticker stacker finish this cute card up!  This shaped card inspired by Kelly Panacci.  Thanks Kelly, I just love it!

---------------------------

Thanks for popping on over and visiting today, make sure you stop by the Imaginisce Blog to see the rest of the team's amazing creations!!! Word has it, there might be a way for YOU to win a collection for yourself too!

Have a super scrappity day!
~ Rhonda

Wednesday, September 21, 2011

Destination - Play!

Happy Wednesday my blogging friends! 

I'm so excited to share with you a fun project that I created with the new Imaginisce line "Bon Voyage"!  It's a collection that is near and dear to my heart with its elegant vintage vibe and very classic appeal!!! 
I always like to put a bit of a twist on things, so of course I didn't use the collection for a travel themed page.  Instead, I used it with some playful photos.  Without further delay here it is:
I love the mix of patterns and colors in this line so I tried to use as much as possible in my layering.  These are photos of our oldest rolling down the hay bale pile at the Apple Orchard last fall.  I just loved the sequence of the action and the look ok his face.  The colors were a perfect match for the line too!

I used the Snag 'em Compass stamp on my kraft envelope with Quick Quotes Powder Puff chalk ink in Amaretto, then colored an i-rock gem with my Copic marker for the center.
I opted to create a bit of a collage with a variety of the die-cuts and sticker stackers. I used my i-Top and a 28mm brad for the large compass. Here is a detail image for you:

I've also added some very tiny i-Rock crystal gems to the background compass paper for a little extra interest as well. There are additional glam rocks in the upper left of my layering too.  The kraft envelope and mini tickets on here are Maya Road, the acetate heart is K&Co.  Twine is from Martha Stewart.  The mini words on the Destination Chipboard plaque are Authentique.
Be sure to stop on by the Imaginisce blog today to see all of the inspiration from the Design Team using this beautiful line!  There is also a chance for you to win a collection of your own!!!

Thanks for stopping on by, have a super scrappity day!
~ Rhonda

Tuesday, September 20, 2011

Bon Voyage! It's a Release Party Week!!!

It's a very exciting week for us at Imaginisce!  We're celebrating the release of our newest line "Bon Voyage"!  You definitely want to stop over at the Imaginisce blog and check this out, it is nothing less than stunningly beautiful!

If you visited us at ScrapFest, you were fortunate to get a hands on super sneak peek!  I had a blast hosting the make 'n takes using this wonderful line.

You'll want to see the amazing projects that our uber talented design team has for you as well!  Word has it there is also a chance for you to win a collection of your very own!

I'll be back tomorrow to share a project with you.

Have a super scrappity day!
~ Rhonda

Thursday, August 25, 2011

Introducing the Newest Imaginisce Release... Geek is Chic!

Greetings!  I'm so excited to share some of my creations with you today using the new Geek is Chic line from Imaginisce!  This is one of my favorite collections to date, just look at the wonderful vibrant colors in this line!!!  It just screams happy and fun!

First up is a layout titled Love to Read. 
You'll notice that I used my i-top and 3, 16mm brads to create my 1, 2, 3 brads respectively... so the title is "Love to Read... A to Z, 1,2,3".  I also cut my vertical paper at an angle to add some interest and to mimic the angles of the mats on the photos also.  A mini paper clip also highlights the number 3 which is how old our son is here in these photos.

This line has the cutest die-cuts, sticker stackers and journaling spots!  I can tell you that this page went together so quickly for me I couldn't believe it!!!   It sounds cliche, but really, it almost scraps itself!

For my next layout I played a little with the die-cuts to create a custom title for a non-school page.  I used my Cricut Expression 2 for the title and my Spellbinders Grand Calibur for the large circle die cuts:
I added a little wire and wrapped up one of my hearts on a pop dot.  The aqua scalloped square layer is also cut with the Spellbinders Grand Calibur.

My husband is so great with the kids, he loves to play with them and be goofy just to make them laugh.  That hat just cracks me up! 
Thanks so much for stopping on over today!  Make sure you visit the Imaginisce Blog as well for lots more inspiration from the Design Team.  They have some amazing projects!!! 

Psst..  Did I hear "Giveaway"?  They are giving away a collection to a lucky commenter!

Have a super scrappity day!
~ Rhonda

Tuesday, August 23, 2011

Check out the Geek!


You definitely want to stop on over at the Imaginisce Blog this week and check out the latest release:

You will fall in love with this bright and cheerful back to school line!!!  I will be back to share a few projects with you later on this week. 

The Imaginisce Design Team has created some absolutely amazing projects to share with you, so be sure you stop by the blog every day and leave a comment for your chance to win it!

Have a super scrappity day!
~ Rhonda

Monday, July 25, 2011

Santa's Little Helper Release Party!

Happy Monday to you!  We're so excited this week to be celebrating a little "Christmas in July" at Imaginisce

Welcome to the Release Party for "Santa's Little Helper"!

I have a few projects to share with you today, let's start off with a layout that I did using our official holiday photo from 2010.  We are really hoping for a better Santa experience in 2011, which was the prompt for my journaling card.  "All Done Santa, See You Next Year!": 

I used my i-Rock and a variety of gems and of course that awesome flourish template!  These papers have the best patterns, I found it really quick to put my projects together.  On the top of the page I used some ball trim that I had in my stash. 

The journaling card is from Maya Road and the mini alpha's are from My Little Shoebox.  They were so generous to send alpha stickers to our Design Team and I have been using them all the time! 

My next project is a "Dear Santa" card that I created using my Cricut Expression and the Sentimentals Cricut cartridge to create the stamp card base.
I placed some black card stock behind the wavy lines and the sweet Santa image into the stamp cutout.  I thought this was such a cute shaped card!  Of course, I used my i-Top and a 28mm brad to embellish my gifts die-cut along with my i-Rock and assortment of gems.  You'll see my MLS min alpha's were used for the sentiment.

My final project(s) are a trio of Christmas ornaments that were created from a thrifty find.  Those are the best kind, no?  Michael's has these cute dollar chipboard albums in all kinds of shapes during the holidays.  Well I grabbed a few of the star ones because they transcend the holidays, but they really do make wonderful ornaments as well!

I used the larger Sizzix Tim Holtz accordion flower die, then a few Martha Stewart snowflake punches with some kraft cardstock.  The final stack of little punched stars finished this nicely.  Doing chipboard projects is a breeze with our d-Stress tool!  Don't you just love how it worked the edges of this ornament?  This one feels so classic to me. 

This ornament was lovingly adorned with many glam rocks using my i-Rock.  I love the metal studs, they go on so fast and really add that perfect little spark.  I started with a Martha Stewart doily tag, inked it in some Antique Linen distress ink and it matched the paper perfectly.  The accordion flower was layered on it and topped off with Santa. 


My final ornament I had some fun with my i-Top and the fun characters in the line.  Rudolph is just adorable!  I used some frosted lace stickles on my snowflakes and a few strategic gems.  I love the classic feel of these ornaments and am pretty excited to have a few already made for this year.  Our sons love to play with them, so chipboard covered ornaments are perfect for their ages.

Imaginisce Tools Used:

That's what I have to share with you for today.  I hope you enjoyed a little Christmas in July with me and be sure to stop on over to the Imaginisce Blog to see what the other Designers have created.  You'll want to be sure and leave a comment too!  They are giving away three collections to some lucky commenter's this week...  it could be YOU!

Have a super scrappity week!
~ Rhonda

Thursday, June 30, 2011

Happy Harvest Release Party!

Greetings my blog loving friends! 

I'm so excited to share my projects for the newest Imaginisce release with you today!!!  Without further delay, allow me to share with you my Happy Harvest projects!


My first thought when I received this collection was these really fun photos that I took of our oldest last year.  Our annual tradition is to take him pumpkin picking on his birthday.  I got a particularly fun photo of him running toward the wagon last year.  I titled this one "Birthday Pumpkin Fun!"


This project started out with my Cricut and the Elegant Edges cartridge.  I just love the beautiful shapes on it and I used it to cut the brown paper.  Using that template, I created several more punched strips to create texture and interest without becoming too cluttered.  I added a few punched maple leaves into the mix here as well.

Naturally, I had to use my i-rock and some bling on here too!  I used clear bling on the beaver's eyes and orange on my pumpkins.  I also snuck in one teal one in the owl's wing up in the tree.  Tiny clear gems are in the centers of my leaf flourish as well.


The adorable Fall Friends Icon Die Cuts that come with this collection made the rest of the page come together so easily! I just love the leaf flourish!!!  The mini alphas are by My Little Shoebox.  A great big Thank You to MLS for partnering with us and sending us all those yummy alpha's!  You'll be seeing them on more of my projects for sure!

My next project is a classic and simple layered card:


I added the little crochet trim for interest and the teal and brown leaf stick pins by Maya Road just seemed to fit so nicely!  My i-rock was used here to add the Metallic Pearl Glam Studs and some teal gems from the Hot Rocks Compact - Jewel.


I just love the pop of teal combined with all of the beautiful traditional fall colors!  Make sure that you stop on over to the Imaginisce Blog today to see more inspiration from the uber talented Design Team. 

If I know my friends at Imaginisce, I'm quite certain there is a giveaway (prizes!!!) to be had as well!

Thank you so much for stopping on over and spending a moment with me here today!  Have a super scrappity day!!!
~ Rhonda

Thursday, May 26, 2011

Who's a Happy Camper?

Happy Thursday to all you Happy Campers out there!  Sorry, I couldn't resist!

It's been a week packed full of amazing creativity over at Imaginisce while we celebrate our newest release...  "Happy Camper"!  The line is just wonderful and lends itself to so many types of projects!

My first project:  "NOT a very happy camper".  Our youngest is two years and three months old...  need I say any more?  *giggles*

I'm a firm believer in scrapping things real.  This is a very real, unstaged, typical moment of disappointment when we were leaving from the park.  I decided to use the words "Rest Stop" and "Waterfall" on my sign to convey the moment. 
I used my Cricut Expression and the "Campin Critters" Cricut Cartridge for the tree with the deer, the sign and my suns circle. 

To create my sun, you will see several 22mm i-top punched pieces to create the rays.  Our petal roller tool helped roll them and provide some texture.  I used my Cuttlebug "Mesh" folder for the tree top.  For the bling eyes of the deer I used my i-Rock tool and black gems for his nose, the new Glam Rocks - Silver Tear, but I colored it with my Copic marker to make it brown.  Isn't that fun?
I cut apart my thermos/coffeecup diecut and turned it sideways, then added the log diecut on top to create a fun embellishment.  I used my sewing machine in several places as well,.  

You'll notice I added a little bling in the sun, the tree and on the title work.   The Deer was cut at 7" on my Campin' Critters Cricut Cartridge using my Cricut Expression.  The sign was cut at 3" and my sun (badge) was cut at 6".

Ingredients:
Imaginisce "Happy Camper": Pattern Papers, Great Outdoors Word Die Cuts, Camp Critter Icon Die Cuts
Kraft Cardstock, "The Paper Company"
Blue Cardstock, Bazzill
Alphas:  AC Thickers, Making Memories
I-Rock by Imaginisce, assorted gems
Petal Roller by Imaginisce
Corner Chomper, We R Memory Keepers
Cricut Expression
Campin' Critters Cricut Cartridge
Brown Baker's Twine, Martha Stewart
Bazill Basics Trim flourish in kraft
Ranger Distress Inks: Walnut Stain, Shabby Shutters, Fired Brick
----------------------------------------------------------------------------------------------------
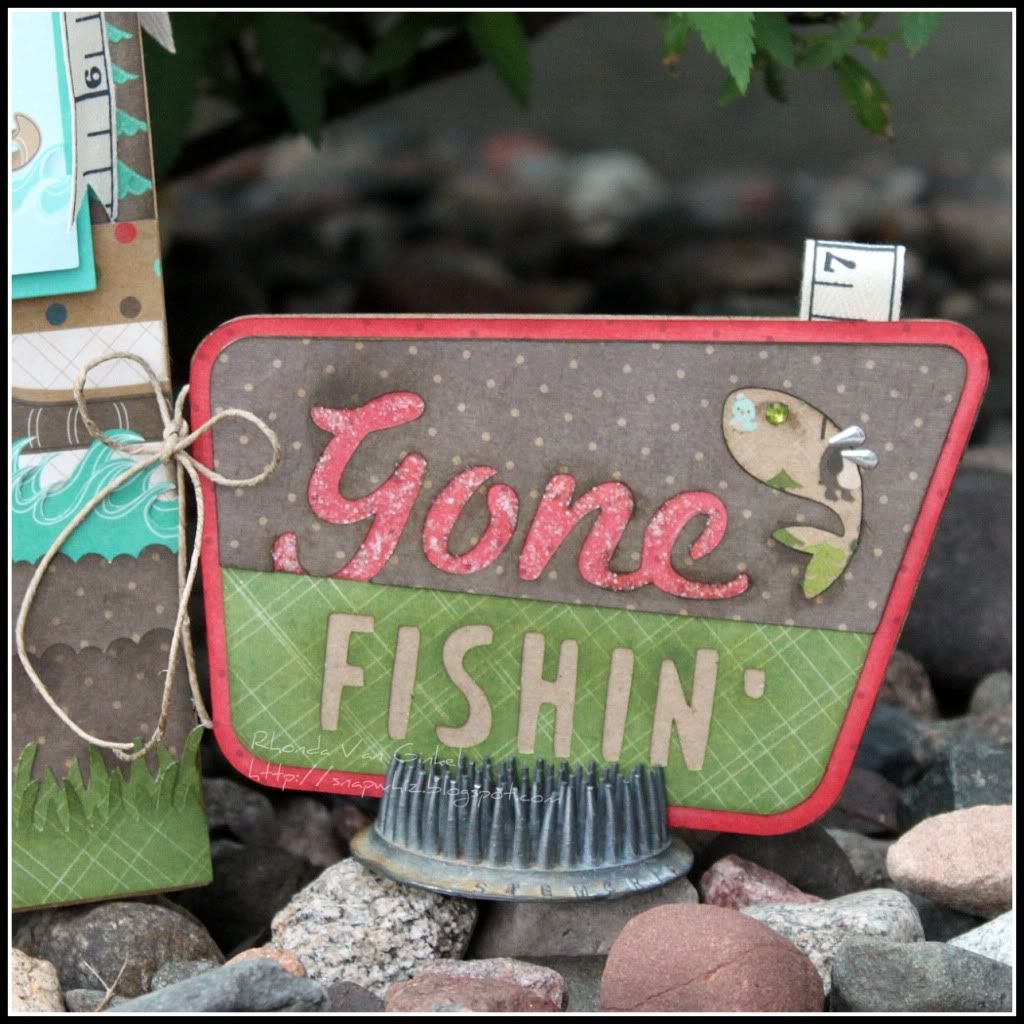
For the next project I thought it would be fun to create a Father's Day gift bag and gift card holder for my sweet Husband.  He is just starting to get into fishing, so I thought this would be the perfect thing to tuck in some new fishing tackle.  I love how this project turned out and for sure will be making more for my Brothers who are avid fisherman.

The bag is a simple kraft paper bag you can buy in bulk packages for an affordable price at your local craft store.  The tag I created using my Campin' Critters Cricut Cartridge at 2.5" and I used the packaging from my Happy Camper Sticker Stackers for one of the layers.  (Use your multi-cut feature for packaging this heavy to be sure you cut all the way through.  I cut mine twice.)  I used a clear gem and my handy Copic marker to color the fish's brown eye.  The silver tear bling were just perfect to create a little splash of water onto the tag.

On the bottom layers, I used some punches, then hand cut the waves for a little layered effect for the water.
For the card, again, I used Campin' Critters at 3.5".  To give the text some "pop", I did slip in other papers in between my layers for interest.  The word "Gone" is accented with some Ranger Stickles Rock Candy. 
The final little touch was this cute ruler grosgrain ribbon I found in my ribbon stash.  I just love it tied onto the bag and peeking out from my card!

Ingredients:
Imaginisce "Happy Camper":  Pattern Papers, Canvas Stickers, Chipboard Sticker, Sticker Stacker
Kraft Cardstock, "The Paper Company"
I-Rock by Imaginisce, assorted gems
Cricut Expression
Campin' Critters Cricut Cartridge
Fiskars "Grass" punch
EK Success "bumpy" punch
Ranger Distress Inks:  Walnut Stain, Shabby Shutters, Fired Brick
Brown Baker's Twine, Martha Stewart
Copic Marker to color i-rock gem
Other: Hemp, Grossgrain ruler trim, Kraft gift bag
------------------------------------------------------------------------------------------------------
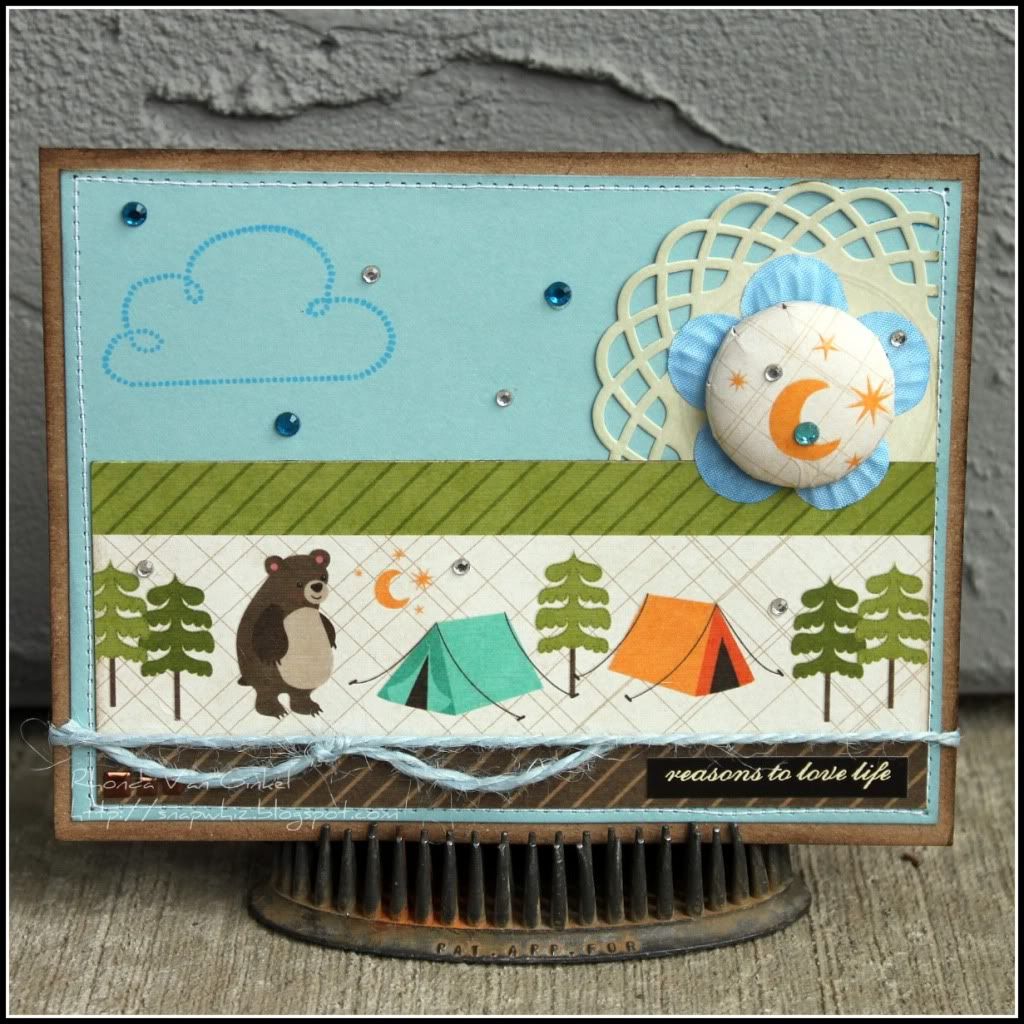
My final Project:  "Reasons To Love Life" card
I thought it would be fun to showcase the cute strips that come on the "Fireside Fun" paper and the adorable Snag 'Em cloud stamp. 

The moon and stars are from the "Fresh Air" paper on an i-Top in 28mm size, then using my i-rock, I attached a few little gems.  To add a little dimension, that blue flower is layered between it and the Martha Stewart doily tag that I slipped in. 

Ingredients:
Kraft Cardstock,  The Paper Company
Blue Cardstock,  Bazzill
Imaginisce "Happy Camper": Pattern Papers, Snag 'Em cloud stamp
i-Rock by Imaginisce, Assorted Gems
i-Top by Imaginisce, 28mm Brad, 28mm Punch
Doily Tag by Martha Stewart
Distress Inks by Ranger:  Walnut Stain, Weathered Wood, Antique Linen
Powder Puff Chalk Ink by Quick Quotes:  Blue Hawaiian to stamp cloud
Other:  Sewing Machine, thread, blue jute, Sentiment sticker by Cosmo Cricket

Thank you so much for taking a few minutes with me here today!  I really have enjoyed this collection so much, it's just fun and incredibly versatile.

Please take a moment today to stop on over to the Imaginisce Blog and see what the other Design Team gals have created as well!  There are some incredible projects for sure, and of course, the opportunity to win some of this yummy collection for your very own!!!

Have a super scrappity day!!!
~ Rhonda