Showing posts with label SEI. Show all posts

Friday, November 4, 2016

Holiday Card Inspiration with SEI

Friday greetings and welcome to the blog today. I was recently up on the SEI Blog with my final projects for my Design Team term. It has been an honor and sincere pleasure to design for them. I have loved their products from the very start of my paper crafting journey.

I have a bit of holiday inspiration that pushed me out of my comfort zone just a bit. I've created three quick and fun cards using the Merry Mistletoe collection. Yes, you read that correctly, I said quick! 
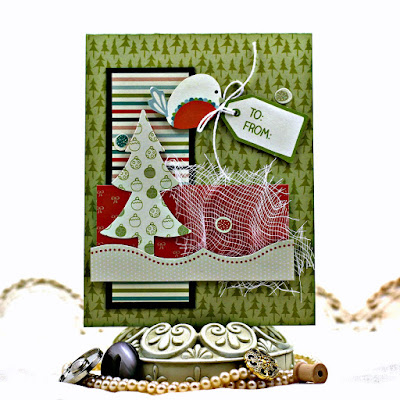


For the first A2 sized card, I've featured a bit of the packaging from my Die Cut Pack and also some of the Alpine Velvet Papers.The sweet little die cut bird is delivering the sentiment tag. The design here is very simple, but the cute stickers and embellishments make it easy to create something fun in a flash!


To create my second card, I went with a bit of a smaller scale card, it's approximately 4" square. 

I loved the sweet reindeer sticker, so I selected him and then layered the pine bough swag behind the reindeer antlers to give him a festive look. A bit of fabric trim from my stash creates a focal point for the sentiment sticker which is adhered with foam squares.


It doesn't get much simpler than this, yet cute! A gem on his nose would be fun too.


The third card is again a smaller scale 4" square design. I used a die cut circle, punched a snowflake and layered between it and the "Love" sticker sentiment. I added the "Happy Holidays" on the bottom to anchor the design and added a bit of banner light bulb sticker underneath.


A bit of dimension in the layers keeps it interesting.
SEI Products:
Merry Mistletoe Collection

I hope I've inspired you to take out your SEI holiday papers and put together a few cards! It's always nice to do a few here and there to be sure you have plenty on hand for the holidays.

One final thank you again to SEI for having me on their Design Team this year, what a wonderful group of folks to work with!

Thanks so much for stopping on over today for a visit. Have a super scrappity day!

Monday, March 7, 2016

Just Chillin' with SEI

Monday greetings to you!  I have an SEI project to share with you today that was recently up on their blog.  I've created this with the vibrant and fresh new collection called "Florets" which will be featuring in their upcoming April Scrapbooking Kit.

Just Chillin' featuring the Florets Collection by SEI designed by Rhonda Van Ginkel

When I opened up this collection, I was really impressed by how fun and fresh the design elements are in it, there are floral elements, some pinks and blues along with a bit of geometric type of designs. It is truly versatile for any project, masculine to feminine.
Just Chillin' featuring the Florets Collection by SEI designed by Rhonda Van Ginkel

I used a bit of everything including the cute die cut circles and doilies as part of the design mimics the background glass within my photo. It was fun mixing the various patterns together until I had my final design.
 
Just Chillin' featuring the Florets Collection by SEI designed by Rhonda Van Ginkel
SEI Products Used:
 
Other Products Used:
Date Stamp 
Dymo Labeler
Flair
Circle Piercing Template
Sewing Machine and Thread
 
Thanks so much for stopping on over today!

Wednesday, December 30, 2015

Top Ten Blog Hop of 2015


Greetings and welcome to the Top Ten Blog Hop for 2015! If you are hopping, you should have arrived here from Kelly Holbrook's blog. If you popped by here first, you are in for some fun!

This blog hop is always so much fun and full of inspiration. Be sure to hop along and leave a comment on each participating blog for your chance to win a super yummy $80 gift certificate prize to the crafty store of your choice.

I have done this now for a couple of years and it's always a treat to go back and reminisce through the creations and select a few favorites from the year to share. I have ten projects and ten cards selected.

One thing is certain, I am so very honored and fortunate to design for some generous and amazing companies. I want to take a moment to thank them here for giving me the opportunity to create with some of the best paper crafting products in the market.

1. Happiness featuring Rose Café by BoBunny
Happiness page featuring Rose Cafe collection for BoBunny designed by Rhonda Van Ginkel

2. Hello... Be Your Best Self featuring You're Invited by BoBunny
Hello page featuring You're Invited collection for BoBunny designed by Rhonda Van Ginkel

3. Creative Me Canvas for Canvas Corp
Creative Me canvas designed for Canvas Corp featuring 7 Gypsies Papers and Tattered Angels designed by Rhonda Van Ginkel

4. This Life is Pretty Wonderful for C'est Magnifique Kit Club
This Life is Pretty Wonderful page designed for C'est Magnifique by Guest Designer Rhonda Van Ginkel
 
5. Happy Place featuring Boardwalk by BoBunny
Happy Place scrapbook page featuring Boardwalk collection by BoBunny designed by Rhonda Van Ginkel
6. Memories page designed for C'est Magnifique Kit Club
(Guest Designer featuring papers by Blue Fern Studios)
Memories page designed for C'est Magnifique featuring Blue Fern Studios papers by Guest Designer Rhonda Van Ginkel

7. Radar featuring Carnival by BoBunny
Radar scrapbook page featuring Carnival collection by BoBunny designed by Rhonda Van Ginkel

8. This Happened page designed for Quick Quotes
(Inspired by a Sketchabilities sketch and featuring the July Club Q Kit)
This Happened Scrapbook page featuring Quick Quotes Club Q designed by Rhonda Van Ginkel

Mariposa Mini Album for DCWV designed by Rhonda Van Ginkel

10. Happiness and Loving Life featuring Genevieve by BoBunny
Happiness and Loving Life page featuring Genevieve collection by BoBunny designed by Rhonda Van Ginkel


Top 10 Cards

1.Something Blue for You card for Cheery Lynn Designs
(Featuring Lemoncraft papers and flair from a C'est Magnifique Kit)
Something Blue for You card for Cheery Lynn Designs featuring Lemoncraft papers designed by Rhonda Van Ginkel
2. Love This for C'est Magnifique Kit Club
Love This card for C'est Magnifique Kit Club designed by guest designer Rhonda Van Ginkel

3. Vintage Themed Card for Cheery Lynn Designs
Vintage Themed Card for Cheery Lynn Designs featuring Pion Designs papers designed by Rhonda Van Ginkel

4. Love Card for DCWV October Sketch Challenge
Love Card featuring DCWV designed by Rhonda Van Ginkel

5. I Am So Blessed for SEI
I am So Blessed card featuring SEI papers designed by Rhonda Van Ginkel as Guest Designer for SEI

6. Oh Deer for BoBunny
Oh Deer card for BoBunny designed by Rhonda Van Ginkel

7. Vintage Happy Holidays for the December DCWV Sketch
Vintage Happy Holidays card designed for DCWV by Rhonda Van Ginkel

8. Noel for BoBunny
Noel Card designed for BoBunny featuring DoubleDot Cardstock designed by Rhonda Van Ginkel

9. Lattice and Trellis for Cheery Lynn Designs
Lattice and Trellis card designed for Cheery Lynn Designs by Rhonda Van Ginkel

10. Give Thanks for Cheery Lynn Designs
Give Thanks card featuring Cheery Lynn Designs Dies by Rhonda Van Ginkel
 
Thanks so much for hopping on over today, your next stop on the hop is the lovely and talented Jennie McGarvey.

Be sure to leave a comment on each blog along the way for your chance to win an $80 gift certificate to the crafty store of your choice. To be eligible, you need to leave comments on the participating blogs by 11:59 pm CST on January 3.

2015 Top Ten Blog Hop Order:
Rhonda Van Ginkel (You are here)

Thursday, December 24, 2015

Gift Packaging with SEI

Greetings and a happy Christmas Eve day to you! 

I was recently up on the SEI Blog to share a gift packaging idea. I used a cute Corrugated Pillow Box and decorated it with Borders and Sundries from the Glimmering Boughs collection along with one of the papers.


Have you seen these Corrugated Pillow Boxes? They are adorable and very sturdy in design, something that a mom of young boys completely appreciates! (Think toy cars or smallish gifts that you really want to limit the peeking factor on!)
 

To add a bit of holiday pizazz, I selected a few borders from the Glimmering Boughs Border pack and adhered them by wrapping around to the back. On top of that I added a pretty kraft foiled doily from the Sundries Pack.
 

The crowning glory is the poinsettia flower that I created and placed on top of the doily. In the center is one of the pretty buttons that is included in the Sundries pack as well. I added some holly greens and flourish using my die cutting machine and "Evergreen Branches" paper .
 
The Glimmering Boughs collection has such pretty elements with elegant finishes and designs.
SEI Products Used:
Glimmering Boughs "Evergreen Branches" paper
Glimmering Boughs Borders
Glimmering Boughs Sundries
 
Thanks so much for stopping on over for a visit today. Have a super scrappity day and enjoy the holidays!

Thursday, December 3, 2015

Merry and Bright with SEI

Greetings and welcome, I am super excited to share with you my first design team project for SEI, featuring their Merry Mistletoe collection of pattern papers, die cut pack and stickers.


I thought it would be fun to create a page featuring a family photo for 2015. Even though the photo isn't perfect, I like that it's more of a casual shot taken when we were out goofing off at a park.


Design Steps:
  • Once my photo was matted, I selected my background paper and layers. 
  • I stitched the red 10.5" square using my sewing machine. 
  • Next I added a bit of modeling paste using a stencil with crack shapes for a bit of subtle texture.
  • Once dry, I used a scrap piece of 6" diameter circle corrugate that I had, trimmed it and tore the paper a bit and inked with a touch of Iced Spruce distress ink. 
  • The corrugate was attached to my page by stitching it, then I stitched around the outside of it to frame the shape a bit.
  • A 3.5" x 5.5" piece of cheesecloth was trimmed to layer on top of the corrugate
  • I die cut a few banners using my die cut machine and a border and notebook paper element which are layered under the photo
  • Layered the vertical strip and attached, stapled a few staples at the top.
  • The banner pieces were layered with the border below and notebook paper. 
  • Photo was adhered using foam dimensional adhesive.
  • Reindeer, With Love Tag and Red Bird elements from the Merry Mistletoe Die Cut Pack were tucked in. Mr. Reindeer has his eyes accented with Glossy Accents, a sticker on his nose, topped with a touch of glitter glue. The With Love Tag was accented with glitter glue around the border also.
  • Final touches are the snowflake stickers tucked in and the branch sticker layered under the bird.
  • I cut the "Merry & Bright" title using the Under Mistletoe paper and my Silhouette Cameo. I used one of the stickers to dot the "i" in the title.
SEI Products Used:
Merry Mistletoe Paper Collection
Merry Mistletoe Die Cut Pack
Merry Mistletoe Stickers

Thank you for stopping on over to visit my blog today.  Have a super scrappity day!

Wednesday, October 21, 2015

Exciting SEI News to Share!

Happy Wednesday! If you're looking for the Clique Kits October Pep Rally, go here.

I have happy crafty news to share with you today! I've excited to share that I've been invited to design for S.E.I. in 2015/2016! You can see the announcement here.


Congratulations to Connie, Piali and Stephanie!  I'm excited to work with you!

When I first started scrapping six years ago, one of the first collections I ever worked with was the Moravia collection by SEI. I've always adored the sundries packs of embellishments as well.  They have such a great assortment of goodies in them and make putting together your project so easy!

Earlier this year I created a few projects as a Guest Designer for SEI using Neon Vibe:


Thank you so much to SEI for having me, I'm really looking forward to working with your products and the new team.
Have a super scrappity evening!

Saturday, March 28, 2015

Cheerful Everyday Cards with SEI!

Greetings!

I'm back today with one more post as guest designer for SEI Lifestyles Blog! Today I have a few card creations to share with you that I hope you enjoy. I loved working with the Spring Picnic collection for these.


My first card features a sentiment from the sentiments sheet which is so extremely versatile and perfect for card making or adding a journaling spot to your page. I trimmed the scallop piece at the top from the strip of the page as well.


I used the yellow ric-rac from the Forever Sassy Sundries as well as the sweet little bird and branch are from the Basics Die-Cut Elements. The die cut elements are just adorable!!! the little vellum accents added a nice subtle touch as well.
 
 
My next card is a more clean and simple design. I cut the base from the Spring Breeze - Clear Skies paper. The next layer is from Spring Breeze - Grandpa's Handkerchief. I used a circle die and cut through the top of these 2 layers

Next, I lined from behind with the Mother's Perfume paper. My blue circle layer was cut from the "Hoo's Sweet" Sundries packaging, followed by a Basics Die Cut Accents #1 sentiment. 

I finished the card with a paper bow and banners that were cut from some dies that I have.

These two creations give me a little bit of spring fever, I hope they do for you as well!

Thank you so much for having me as a guest designer at SEI, it's been an absolute pleasure! 

Friday, March 27, 2015

Good Times Page with SEI!

Friday greetings to you! I'm super excited to share a project that I created as a Guest Designer for the SEI Lifestyles Blog. I was so honored to get the chance to work with their amazing and fun products!


I created a page featuring some really beautiful papers from the Neon Vibe collection along with some Paper Doilies and Sundries. The pretty envelope was the perfect anchor to my design, it's been embellished with a bit of modeling paste and sprinkled with a variety of mist colors.

Do you ever take photos of the signs for places you visit? I never used to until I began scrapbooking. Sometimes those images really help give a bit of fun design to your page. That's what I decided to do here.


I adore the sequin ribbon in the Hoo's Sweet Sundries pack and used it as an anchor on the bottom of the envelope. The large paper clip is from the Forever Sassy Sundries pack. The die cut elements are just perfect to finish your page beautifully!

I'll share a secret with you, one of my favorite goodies to purchase at crops has always been the Sundries packs. It's just the perfect mixture of gems and embellishments to work with.  So much fun!

Ingredients:
Neon Vibe paper collection - SEI
Forever Sassy Sundries - SEI
Die Cut Elements - SEI
Joyful Paper Doilies - SEI
Mists: Heidi Swapp and Lindy's Stamp Gang
Border Die and Fishtail Banner Dies by MFT

Thank you so much to SEI for the opportunity to guest design for you today. I'll be back soon with a bit more inspiration for you.