Showing posts with label Guest Designer. Show all posts

Tuesday, September 15, 2015

C'est Magnifique Guest Designer Part II for September

Tuesday greetings, I'm super excited to be hosting the blog on over at C'est Magnifique today as a Guest Designer with Part II of my September projects. I am featuring designs using the C'est Magnifique September 2015 Card Kit which includes Cocoa Vanilla Studio and Authentique papers.

"This Life is Pretty Wonderful" (12x12 Page)

I love the elements in the Card Kit so much, I also had a few extra goodies to include from the Embellishment Add-On Kit as well as the black flower from the Flower Add-On September 2015 Kit. I started this page inspired by the green card base which I used to mat my photo collage, along with some simple black cardstock.


I loved the idea of mixing this strong chevron design with some florals. I used a sheet of kraft card stock from home, then used crackle modeling paste and a stencil. I added the small gold glitter paste stars using a stencil. You will also see a few wood veneer stars mixed in which I lightly touched with Gold Glimmer Spray to blend in.

Some Gelatos were used in 4 different colors, and just smeared in to blend. After that, I sprinkled drops of Glimmer Spray about in coordinating colors to the pattern papers. I stamped using some of my BoBunny stamps and black ink.


The blue banner and pink arrow and sequin elements are from the Embellishment Add On Kit. I added the string and pearl along with the ink for coloring the "Hello" speech bubble. The partial tag I cut using a simple tag die.

"Hello Sunshine" Tag
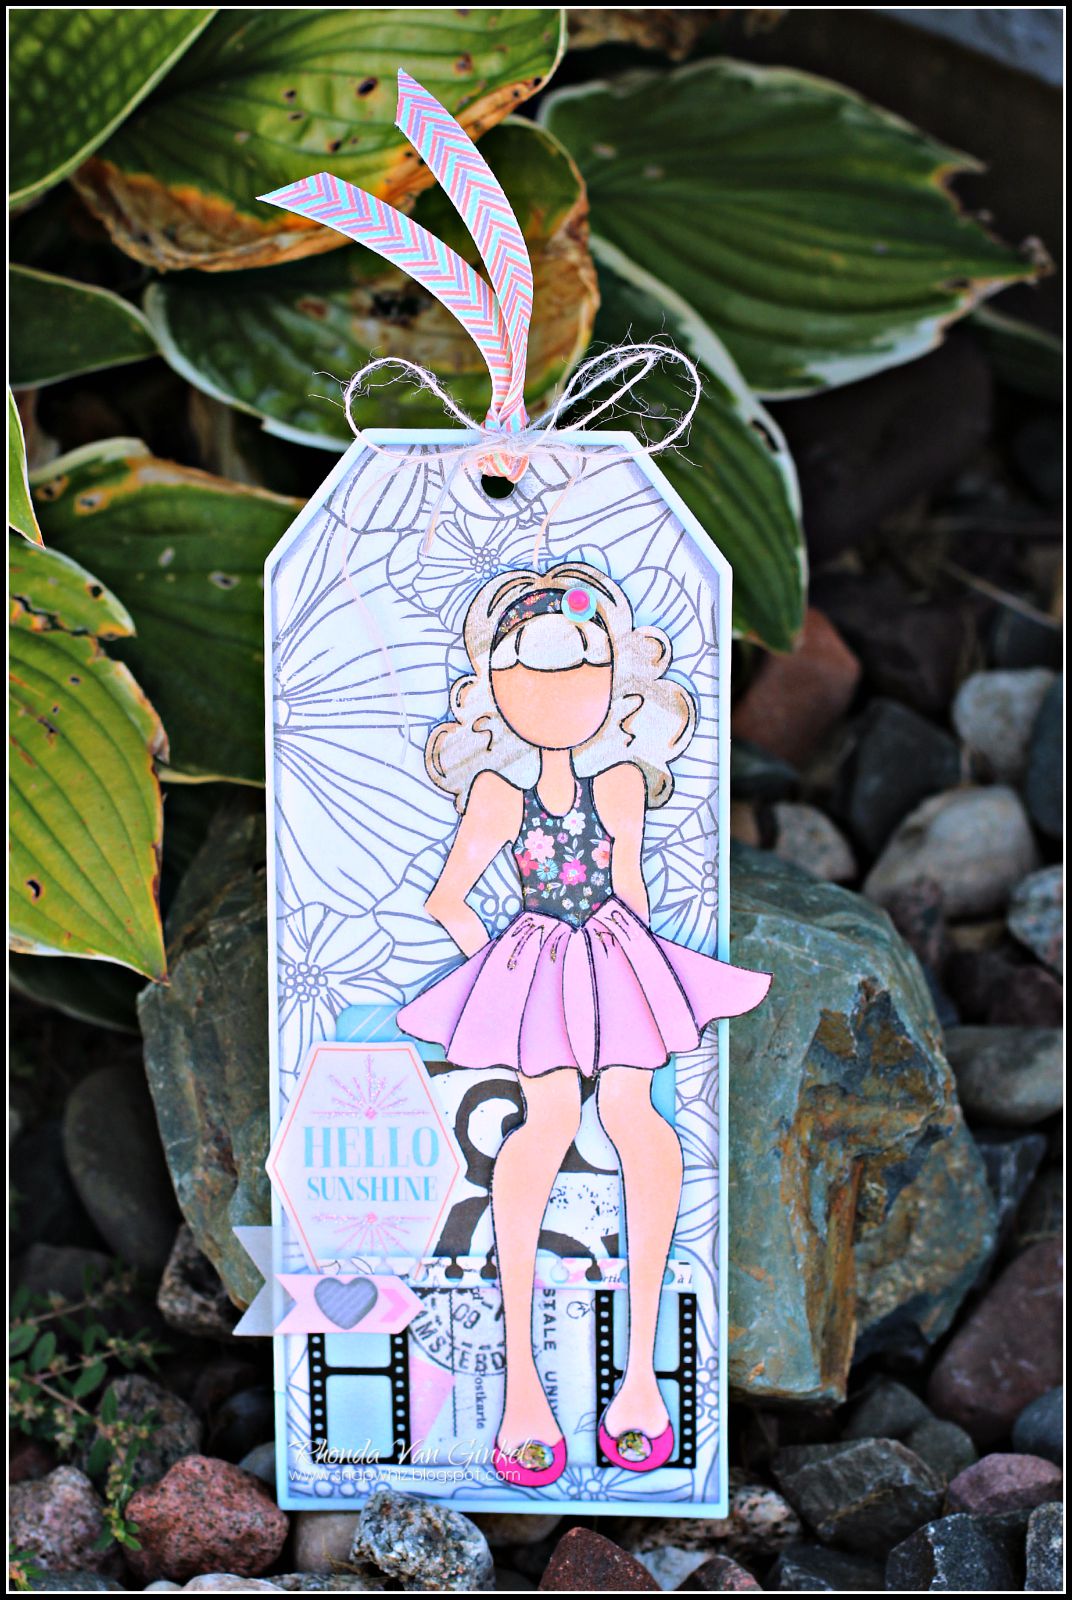
For my next project, I created a tag to fit the cute pink polka dot envelope that comes in the kit. I've used the Prima Doll Stamp included in the kit as my focal point. She is colored with Copics and paper pieced. 


I've used a scrap from one of my first projects on this. In the background you should see a frame and behind it I've backed it with the black and white ampersand. This was a really fun project to do, I love using these doll stamps, the possibilities are endless!


I added some Diamond Stickles to accent the bodice florals as well as the top of the skirt. The paper piecing that I did with her hair is from a woodgrain pattern paper included in the kit. I highlighted some of the hair design with my marker.

The headband, bodice and florals on her shoes all coordinate to the same patterned paper. To accent the headband, I added a single sequin and an Enamel Dot.


Here's the coordinating envelope. I added a few simple touches and love how it fits perfectly! 

For this project I used a Prima Tag Pad from my own collection of items for the base, then added other papers and embellishments to it.

"Hello" (A2 sized card)

This card showcases another one of the beautiful designed card bases included in the kit. I decided to layer over the florals lightly with a few other pieces. 


The "Hello" sentiment flag was cut from the pattern papers in the kit. I cut one of the vellum hearts in half and used for "leaves" under the flower cluster on the left. To create this look, I used a few of my MFT dies and my die cutting machine.

Are you loving the projects you've been seeing? If so, be sure to check out the C'est Magnifique Store to get your very own September 2015 Card Kit today!

If you love those enamel dots, wood veneers, die cuts, sweet bows and arrows, be sure to check out the Embellishment Add-On Kit while you're there. There is also a Flower Add-On September 2015 Kit if you crave some flowers for your projects.

Thank you to C'est Magnifique Kit Club for inviting me Guest Design again with you this month. I loved working with these beautiful papers and goodies!  

Have a super scrappity day!

Monday, July 27, 2015

Guest Designer for C'est Magnifique Kit Club

Monday greetings to you! I am honored today to be a Guest Designer over on the C'est Magnifique Kit Club blog featuring some card and tag projects created with the C'est Magnifiique August 2015 Card Kit.

"Garden Trellis" (3"x 6")

I used a 6x6 piece of solid card stock from my stash, then folded in half for my base. It coordinated so nicely with the Bohemian papers by Dovecraft that are in the kit. I actually used the cover sheet of the paper pad and cut out a part of it for my first layer behind the trellis on the left.


Those shaped buttons coordinate perfectly and added so much character to the card! This card is made to fit into the smallest envelopes (6 1/8" x 3 1/2") included in the kit. The next several projects were made specifically for these envelopes.

"Lovebirds Tag" (3.5" x 6")

I started this by die cutting a tag from a cereal box, then cut the base paper and covered the printed side of the cereal box so that the back that shows is just plain kraft. The edges are inked, then using some stamps and items from my stash, I stamped designs in black and added a bit more texture using a stencil and glitter paste.


I spent some down time cutting out the birds and florals and had such a good time layering and collaging them into a lovebird design.  A little bit of vellum from my stash and the stripes and grid paper designs from the paper stack were a lovely contrast to the florals here.

"Thank You" (3" x 6")

For this card, I wanted to use the striped glitter paper for the background. I thought it would be interesting to contrast with softer elements like a doily, cheesecloth and decorative corners. The sweet Mini Satin Bows and the coordinating Adhesive Gems and Pearls included in the kit make it a breeze to find that perfect extra touch! 

"Lovebird Envelope" (3 1/2" x 6 1/8") 

I used the coordinating stamps in the kit to decorate one of the envelopes. I used watercolor pencils to color in the design, then water to blend it. Drops of Glimmer Spray were used as well. I added touches of Stickles to the flowers in the design.

"Enjoy" (A2 Card)

This card was created to coordinate with the cream A2 envelopes in the kit. I used some cream card stock for my base, inked the edges with Antique Linen ink, then added my layers. I used the sentiment stamp from the coordinating stamps for my banner tag.


Be sure to check out the C'est Magnifique Store to get your very own August 2015 Card Kit today! Thank you for having me back again as a Guest Designer.  I'll be back again soon with some more projects from this beautiful kit!

Saturday, March 28, 2015

Cheerful Everyday Cards with SEI!

Greetings!

I'm back today with one more post as guest designer for SEI Lifestyles Blog! Today I have a few card creations to share with you that I hope you enjoy. I loved working with the Spring Picnic collection for these.


My first card features a sentiment from the sentiments sheet which is so extremely versatile and perfect for card making or adding a journaling spot to your page. I trimmed the scallop piece at the top from the strip of the page as well.


I used the yellow ric-rac from the Forever Sassy Sundries as well as the sweet little bird and branch are from the Basics Die-Cut Elements. The die cut elements are just adorable!!! the little vellum accents added a nice subtle touch as well.
 
 
My next card is a more clean and simple design. I cut the base from the Spring Breeze - Clear Skies paper. The next layer is from Spring Breeze - Grandpa's Handkerchief. I used a circle die and cut through the top of these 2 layers

Next, I lined from behind with the Mother's Perfume paper. My blue circle layer was cut from the "Hoo's Sweet" Sundries packaging, followed by a Basics Die Cut Accents #1 sentiment. 

I finished the card with a paper bow and banners that were cut from some dies that I have.

These two creations give me a little bit of spring fever, I hope they do for you as well!

Thank you so much for having me as a guest designer at SEI, it's been an absolute pleasure! 

Friday, March 27, 2015

Good Times Page with SEI!

Friday greetings to you! I'm super excited to share a project that I created as a Guest Designer for the SEI Lifestyles Blog. I was so honored to get the chance to work with their amazing and fun products!


I created a page featuring some really beautiful papers from the Neon Vibe collection along with some Paper Doilies and Sundries. The pretty envelope was the perfect anchor to my design, it's been embellished with a bit of modeling paste and sprinkled with a variety of mist colors.

Do you ever take photos of the signs for places you visit? I never used to until I began scrapbooking. Sometimes those images really help give a bit of fun design to your page. That's what I decided to do here.


I adore the sequin ribbon in the Hoo's Sweet Sundries pack and used it as an anchor on the bottom of the envelope. The large paper clip is from the Forever Sassy Sundries pack. The die cut elements are just perfect to finish your page beautifully!

I'll share a secret with you, one of my favorite goodies to purchase at crops has always been the Sundries packs. It's just the perfect mixture of gems and embellishments to work with.  So much fun!

Ingredients:
Neon Vibe paper collection - SEI
Forever Sassy Sundries - SEI
Die Cut Elements - SEI
Joyful Paper Doilies - SEI
Mists: Heidi Swapp and Lindy's Stamp Gang
Border Die and Fishtail Banner Dies by MFT

Thank you so much to SEI for the opportunity to guest design for you today. I'll be back soon with a bit more inspiration for you.

Saturday, August 3, 2013

Pretty Little Studio - Guest Designer

Happy Saturday to you!

I'm very excited to share another project that I created for my Guest Designer week over on the Pretty Little Studio blog today!

I was so happy to receive the “Nature Walk” collection from Pretty Little Studio to work with! We went to a Deer Park in the Wisconsin Dells last year with the boys and the line was just perfect for capturing those memories.


Sunburst Layout

I was so inspired by this "Pine Needles" paper in the Nature Walk collection:
I absolutely had  to use it!


I found a sunburst background pattern in the Silhouette store knew I had to use it with this paper!  I cut it from white cardstock and layered these pieces behind it.


Some stitching in between the rays and around it added a bit of texture.  I thought the feel of motion was perfect for this fun photo of our oldest jumping.  It’s one of my favorite photos from this trip.

I chose the “Favorite Story” from the Nature Trail Note Tabs to feature for my title, cut it out and layered it with the Vintage Label and a Paper Ribbon.

Pretty Little Studio Ingredients:
Flair

I've got one more project still to share with you, so I will be back with that soon.  A big thank you to Pretty Little Studio for the opportunity to Guest Design for you, it’s been such a pleasure!

If you haven't had a chance to stop over to check the collections in the Pretty Little Studio Store, you really need to take some time and browse - they are amazing!!!

Have a super scrappity Weekend!

Monday, July 29, 2013

Guest Designing for Pretty Little Studio

Happy Monday to you!

Today is an exciting post for me, I am very honored to be a Guest Designer over on the Pretty Little Studio blog today!

I was so happy to receive the “Nature Walk” collection from Pretty Little Studio to work with! I always love to create cards in between projects, it’s a great way to utilize those scraps that you have just looking at you on your table. 

The Wild Berry Paper Ribbons are the inspiration for my card.  When I sat down with the collection, I started cutting these out first.  They are so versatile and always add a perfect touch.


Overall, this is a very clean and simple design, but that sweet little owl just stole my heart so I made it the focal point of my card and built the sentiment around it.


The little paper bows are the perfect anchor for a little banner. Simple piercing around the border added texture and was quick and easy to do.

Pretty Little Studio Ingredients:

Other:  Memory Box Bow die, Tiny Scallop Border Punch by EK Success, Sentiment by A Jillian Vance Designs

Thank you so much for having me Guest Design for you, it’s been such a pleasure! I have a few more fun projects to share as well.  : )

If you haven't had a chance to stop over to check the collections in the Pretty Little Studio Store, you really need to take some time and browse - they are amazing!!!

Have a super scrappity Monday!