Showing posts with label Blue Fern Studios. Show all posts

Saturday, June 13, 2015

C'est Magnifique Guest Designer for June

Saturday greetings to you! I have one more post to share with you here as a Guest Designer for C'est Magnifique Kit Club. My projects are created from the oh so beautiful June Kit which features the Blue Fern Studios collection "Déjà Vu".

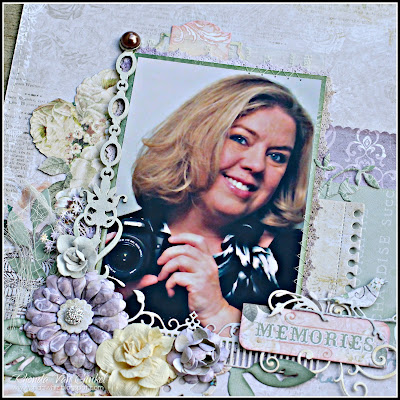
Memories by Rhonda Van Ginkel featuring the Deja Vu collection by Blue Fern Studios for C'est Magnifique Kit Club June 2015 Kits Guest Designer

My first project is a page that I created that features the sentiment from the pretty Blue Fern Studios "Déjà Vu" paper, Petites Cartes. I also used the Blue Fern Studios "Déjà Vu" Dangles chipboard here, touching it lightly with sage green ink. To anchor it at the top I used the KaiserCraft Pearl Brad included in the kit.

Memories by Rhonda Van Ginkel featuring the Deja Vu collection by Blue Fern Studios for C'est Magnifique Kit Club June 2015 Kits Guest Designer

I used some of the Prima acetate packaging as part of my design as well as the pretty Frost Gypsy Rose in yellow and grey. The grey flower, I pulled the outer leaves off to use a smaller bud for the design.

Memories by Rhonda Van Ginkel featuring the Deja Vu collection by Blue Fern Studios for C'est Magnifique Kit Club June 2015 Kits Guest Designer

The larger daisy and smaller scrunched rose are cut using some dies in my stash along with the leaves, flourishes, bird on a branch, scalloped cove rectangle, notebook paper layer and banner. Other florals are fussy cut from the paper.

Bring Out the Best Card created by Rhonda Van Ginkel featuring the Deja Vu collection by Blue Fern Studios for C'est Magnifique Kit Club June 2015 Kits Guest Designer

My next project is a card that I tried to create with a masculine appeal to it with several fussy cut elements from the papers. Even though it has a bit of floral elements, it felt masculine to me with the bird envelope. This card uses the Prima packaging as a background layer over the top of the pattern paper.

Bring Out the Best Card created by Rhonda Van Ginkel featuring the Deja Vu collection by Blue Fern Studios for C'est Magnifique Kit Club June 2015 Kits Guest Designer

The transition line for the acetate is disguised by the lacy border die cut, then the other elements are collaged under the sentiment block.

Non-kit items used here include: Stickles, Enamel Dots, Prima Say It In Crystals Center, Sentiment Stamp by My Favorite Things. The border, flourishes, flowers, dandelions and sentiment block are all dies by Cheery Lynn Designs.

Those Were The Days Card created by Rhonda Van Ginkel featuring the Deja Vu collection by Blue Fern Studios for C'est Magnifique Kit Club June 2015 Kits Guest Designer

For my final project, I went with a vintage romantic theme and again cut out some of my favorite elements from the papers. I created a tent fold card base from Kraft card stock, then rounded the corners on the top.  After layering my first two layers on top, I stitched around the card.

Those Were The Days Card created by Rhonda Van Ginkel featuring the Deja Vu collection by Blue Fern Studios for C'est Magnifique Kit Club June 2015 Kits Guest Designer

I added the smaller scalloped rectangle die cut behind the lacy rectangle die cut, and then layered the sentiment on top after cutting it from a smaller scalloped rectangular die to keep the soft and round elements continuing. 

I used a scalloped lacy trim across the bottom and finished it with my purple ribbon that I softened with a bit of gesso. Next, I cut the floral cluster out, then lady on the swing out and arranged them around the design, adhering with foam squares. The final step was to add the grey Prima Frost Gypsy Rose to the design and ink it lightly with lavender distress ink.

I hope that you've enjoyed my projects today as much as I enjoyed creating them!
 
Thank you so much to the C'est Magnifique Kit Club for inviting me to join you and  Guest Design this month, it was so much fun and I am so in love with these papers!!!

Be sure to check out the June Kits here!

Tuesday, June 2, 2015

June Guest Designer for C'est Magnifique Kit Club!

Greetings and happy Tuesday to you! I've been keeping a little secret and I am excited to share with you that I'm a guest designer for C'est Magnifique Kit Club for the month of June!

The June Kit is just beautiful featuring some a lovely new paper collection by Blue Fern Studios, "Déjà Vu" and I had so much fun creating the projects that I am sharing with you today!


My first card showcases the pretty Maya Road Scallop Trim in Antique Pink along with the Prima Gypsy Roses in Frost. The Déjà Vu papers are so very pretty I used some of my lacy dies to create this first card.


I just love the vintage image and used it for my focal point.


My next card makes use of the sentiment banner from the Blue Fern Studios Déjà Vu Petites Cartes paper included in the kit. I've included some fussy cutting on this along with the Prima Rebecca Mini Bouquet.


The flower that I've die-cut from the papers is accented with the C'est Magnifique Fairy Frost Glitter in the center. A few other accents on the other flowers on the card have it also. I've cut the leaves apart and tucked them in behind my flower and banner to add a pop of pretty green.


I wanted to create a masculine card for some Father's Day inspiration and this was my end result. I added some gesso to the ribbon to soften the color and give it a shabby chic appearance. While I had it out I also coated the Blue Fern Studios Déjà Vu Dangles and then touched it lightly with sage green and lavender inks.


The Prima Alphablends Cardstock and Chipboard Alphabet Stickers in yellow were used for my sentiment here, and I outlined them with a black journaling pen.


For my last card, I went a little bit more simple in the design, just letting the beauty of the papers shine.  I again used the sentiment paper from the Blue Fern Studios Déjà Vu Petites Cartes sheet, and collaged with some fussy cut elements.  


I added one die-cut element which I cut apart. I then used the relief of my die-cut as part of the monochromatic design on the left. I think this would make a very romantic wedding or anniversary card.  A bit of zigzag stitching finished the card.  


For my final project for this post today, I created a sweet little gift box using the Paper House Colorways Seek Beauty Rub-On Transfers for my sentiment banner. I added a floral collage on top of a pretty doily die-cut to complete the decorations. The grey flower is ready to add from the kit and the others are cut from floral dies I have.


Designer's Tip: 
After creating the box, I flip mine upside down so the tabs to open it are on the bottom, that way the decor on the top stays in place and your box can be re-purposed if desired.

Products Used:

Other Items Used:
Gift Box Punch Board - We R Memory Keepers
Silver Floral Centers - Magnolia
Dies by Project:
  • Fiona's Magic Mirror - Cheery Lynn Designs (Card 1)
  • Royal Scandinavian Oval Doily - Cheery Lynn Designs (Card 1)
  • Sentimental Flourish Frame - Die-namics Dies - My Favorite Things (Card 1)
  • Leaves - Confetti by American Crafts (Card 1)
  • Chicken Wire - Cheery Lynn Designs (Card 2)
  • Daisy Strip - Cheery Lynn Designs (Card 2)
  • Hawaiian Luau Doily Frame - Cheery Lynn Designs (Card 3)
  • Scalloped Rectangular Stacker - Cheery Lynn Designs (Card 3)
  • Dutch Daisy Boutique Stacker - Cheery Lynn Designs (Card 3)
  • Bird on a Branch - Penny Black (Card 3)
  • Scalloped Coved Rectangle Stacker - Cheery Lynn Designs (Card 4)
  • Memory Box - (Card 4)
  • Pierced Banners - Cheery Lynn Designs (Gift Box)
  • Sweet Williams - Cheery Lynn Designs (Gift Box)
  • Daisy Strip - Cheery Lynn Designs (Gift Box)
  • Doily - Memory Box (Gift Box)
  • Ivy Strip - Cheery Lynn Designs (Gift Box)
Gesso
Cheesecloth
Piercing Tool
Gems for Floral Centers
Adhesive: Foam, Glue Dots and ATG

Thank you so much for stopping on over today for a visit, be sure to stay tuned for even more beautiful inspiration featuring this amazing kit over at the C'est Magnifique Blog!  I will be back soon with a few more projects to share.

Saturday, July 6, 2013

July Place in Time with ScrapTownLady

Happy Saturday crafty friends!  (Moxxie Hoppers - the hop post is here.)

It's my day to post over at the ScrapTownLady blog and for today it's all about Place in Time for July.  All of you Graphic 45 fans know exactly what I'm talking about!

Place in Time is a beautiful collection created to allow you to make your own calendar project with beautiful touches of nostalgia and timeless elegance.  I am using the 12x12 paper stack and mixing in some 6x6 papers from the French Country collection.

Here's my July project:

I decided to use the decorative strips for my July title and the "B" side of the July calendar paper.  I took my scissors to the cut-aparts and just had a little fun with it.  Aren't these classic summer images amazing?  I just love them all!  You'll see a card from me using these scraps soon too.

This page features a variety of manufacturer dies from the store.

I used a beautiful chipboard flourish by Blue Fern Studios, painted with some cream acrylic paint and once dry, dabbed a bit of Weathered Wood Distress Ink on it. It made the flourish morph into the design so nicely. You can find a beautiful variety of Blue Fern Studios chipboard in the store here.

Layered up a few doilies for texture.

ScrapTownLady Ingredients:
Ornate Metal Keys by Graphic 45
Stamped Metal Brads by Graphic 45
Italian Flourish Doily by Cheery Lynn Designs
Dutch Scallop Square by Cheery Lynn Designs
Canadian Kaleidescope Mini Doily by Cheery Lynn Designs
Victorian Romance Flourish by Cheery Lynn Designs
Olive Branches by Cheery Lynn Designs
Chevron DieNamics by My Favorite Things
3x4 Note Book Paper by My Favorite Things
Stacking Stars by My Favorite Things
BluePrints 2 by My Favorite Things (July Header)
Tessatina Border by Memory Box Border
Bliss Pearls by KaiserCraft
Glossy Accents by Ranger

Other: Kraft Card Stock, Blue Core'dinations, Cream Acrylic Paint, Hole Punch, String, Thread, Buttons, Sewing Machine, Butterfly and Lady Kate Edger dies by CLD and Vagabond Die Cutting Machine.   

I hope you enjoyed my project!  I can't wait to bring you the August feature next month. Be sure to pick up your Place in Time paper pad and join us in the fun!  If you do, we would love to see your work on the ScrapTownLady Facebook Page!

Thank you so much for stopping by!  Have a super scrappity weekend!!!
~ Rhonda

Friday, June 7, 2013

My Sweet Memory

Happy Friday crafty friends!

It's my day over at the ScrapTownLady blog and I decided to go with a bit of masculine inspiration since we are getting close to Father's Day.

This is created with Authentique's "Hope" pattern papers with a few die cut elements from "Strong" and "Renew".

The chipboard sentiment I painted with some cream paint and thought about inking with some blue ink but I liked it so well in cream that I left it plain. All of the die cuts on this page are by Cheery Lynn Design.


I love the sweet little hummingbird from Cheery Lynn Designs!
The chipboard here is Blue Fern Studios and is wonderful!!!

A little creative title work with stickers.

The inspiration for this page begins completely with the photo of our boys with their Grandpa on the farm.  I thought the colors matched the collection so well!  Hard to believe it's an Easter line, but I love it!  You'll find it very versatile for all of those masculine pages.  Don't be afraid to add a little floral or flourish charm or sparkle, it often adds that unexpected bit of warmth you want.

Be sure to visit the ScrapTownLady store for all of your crafting needs, she has an amazing array of products (dies!)  that you have to check out!

ScrapTownLady Ingredients:
Hope "Adorn" Paper - Authentique
Hope "Lavish" Paper - Authentique
Hope "Faith" Paper - Authentique
Hope "Custom" Paper - Authentique
Hope "Statements" Stickers - Authentique
Hope "Elements" Stickers - Authentique
 
Thanks so much for stopping on over today!
~ Rhonda