Showing posts with label Maya Road. Show all posts

Monday, January 26, 2015

Vintage Themed Card with Cheery Lynn Designs

Monday greetings to you!  It's my day to host the blog over at Cheery Lynn Designs!

I have a vintage themed card to share with you today as it's one of my favorite style of card. There are several layers of our stackers as you can see, from our A2 Frames in Classic and Scalloped to the Coved Rectangles in Classic and Scalloped.


The Alpine Flourish Doily was the perfect size to layer into the design here. You can also hopefully see the subtle hint of snowflakes which are cut from vellum here.


Since the vintage image I've used includes thread spools in it, I used a tiny wooden one I had found in my local craft store. It is wrapped with a cut from one of our Tiny Expandable Borders and secured with glue.  I then used it with a stick pin for an embellishment with my florals.


Details of the floral cluster.


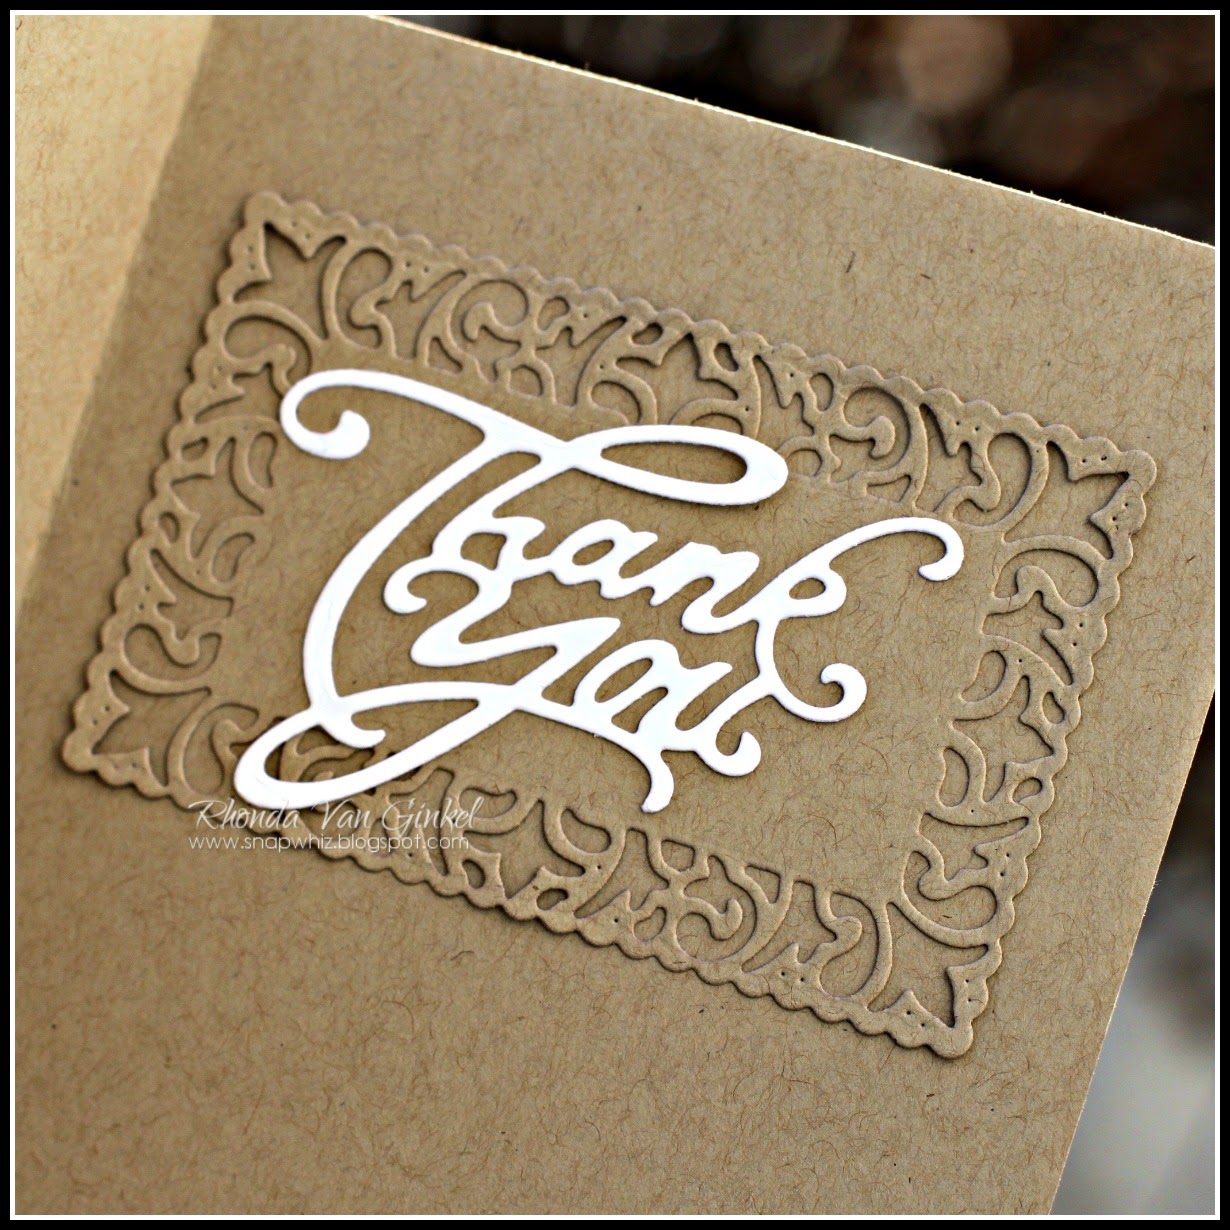
I finished the interior of my card simply with our new Dutch Daisy Boutique Stacker, then cut it again using the A2 Frames Rectangular Scalloped die to create the border. The Thank You #2 was added as the final step. 

Cheery Lynn Designs Dies Used:
A2 Frames Rectangular Scalloped (Set of 7) - CM6
Coved Rectangle Scalloped LG - XL-11
Snowflakes - C146

Please be sure to join in this weeks challenge "Anything Goes!"!  It's always really fun and just so inspirational to see all of your creativity!!! You could be the lucky winner of a $20 gift certificate just for playing along too!

Thanks so much for stopping on over to the blog today, have a super scrappity day!!!

Monday, August 4, 2014

Romantic Steampunk with Cheery Lynn Designs

Monday greetings to you!  It's my day to host the blog over at Cheery Lynn Designs today.

I decided to feature our steampunk Pocket Watch and put a little feminine twist on it today.  I've used several of our stackers here including some of my favorite pretty Horizon Boutique shapes as well.


My shasta daisy, cherry blossom and darling daisies were lightly misted and then gently crumpled to provide a little texture and interest. 


I cut apart a branch and arranged the leaves around my miniature rose in the center of the pocket watch. A few pretty gems and stick pins were the finishing touches.

Cheery Lynn Designs Dies Used:
Index Card - A107

Other Products:
Papers by 7 Dots Studio
Bling by Prima
Pearls by Want2Scrap
Coal Miner and Feather Gray PowderPuff Chalk Ink

Please join us for our all new challenge this month "Anything Goes".  We always love to see your pretty creations!

Thanks so much for stopping on over today for a visit here on the blog. Have a super scrappity day!!!

Monday, October 21, 2013

Owl Be Your Friend with Cheery Lynn Designs

Happy Monday crafty peeps!  It's my day over at Cheery Lynn Designs blog today.

My card features some of our new release dies that I just fell in love with, the Birch Tree with Cute Critters and the Owls with Gears.  It's always fun to create cards with both masculine and feminine appeal and these dies are perfect for the task!


I added a touch of Flower Soft to the stomach of the small owl on the right for texture.  My clouds are cut from a glassine bag, then after attaching with a touch of glossy accents, I added some Picket Fence distress stickles on the two right, a touch of Rock Candy on the left cloud.


I cut some pieces of two different French Flair Silver Stackers to create my kraft "hills" for the background.  I strategically started with my tree to cover the point, then trimmed it.  I cut a small piece of glassine, then inked it and adhered to my Owl with Gears from the back.

I've inked my edges lightly of the hills and critters using a q-tip to highlight some of the notches in the sweet little birch tree for fun.

Cheery Lynn Designs Dies Used:
Birch Tree with Cute Critters - B370
Owls with Gears (Set of 2 - Steampunk Series) - B383
Sentiment Frame #1 - B189
Clouds and Rain - B320
French Flair Silver - L12

Other Products Used:
Sentiment Stamp - A Jillian Vance Designs
Pattern Papers - "The Bright Side" by My Mind's Eye
Kraft Cardstock - Bazzill
Bling by Want2Scrap
Stick Pins by Maya Road.
Biscotti Ink - PowderPuff Chalk Ink by Quick Quotes
Distress Ink - Weathered Wood, Walnut Stain by Ranger

We would love to have you join us this week for the new Vintage challenge here at Cheery Lynn Designs!  There's a $20 gift certificate up for grabs to a lucky player!!!  

Thank you so much for stopping on over today!  

Saturday, July 27, 2013

Be(You)tiful!

Happy Saturday to you and hurray for the weekend!

It's my day to share my project with you over on the ScrapTownLady Blog.  I created a fun little card based on inspiration from the current sketch #79 over at Cardabilities and the Be-You-Tiful collection by Authentique which you can find in the ScrapTownLady store.

Here's the sketch:

Here is my interpretation:

Don't you just love the yellow and grey in this line with a pop of coral?

I arranged my card so that the Be(you)tiful You sentiment was in the upper corner.  I love to have all purpose note cards ready to give on hand. 

ScrapTownLady Ingredients:
Authentique Be(You)tiful "Abundant"
Authentique Be(You)tiful "Expressed"
Authentique Be(You)tiful "Majestic"
Authentique Be(You)tiful "Persevere"
My Favorite Things BluePrints 2 (Banner Die)
Cheery Lynn Designs Flourish Leaf Strip
Maya Road Ruffle Blossoms (Red and Cream)
Maya Road Jewel Trinket Pin
May Arts Satin Pleats 5/8 Sage Trim
Want2Scrap LaCreme Pearls
Glue Dots
Glue Dots Mini 3/16
Glossy Accents by Ranger
3D Foam Squares - Black by 3L
Elmer's High Tack - Dot Runner
Fiskar Paper Trimmer
Scissors

Other:  Kraft cardstock, Leaf Pin and coral string.

Thanks so much for stopping on over today!  Have an amazing weekend!!!

Friday, June 21, 2013

Mixing It Up!

Happy Friday to you!

I'm excited to share my project with you that I created for the ScrapTownLady Store! I decided to mix things up a little bit and create a masculine card, but using a totally feminine line.

So without further delay, here is my creation:


Once I selected the grey papers in the collection, I looked to the natural patterns and shapes for inspiration.  My boulder's or shrubs on the right are really hand cut roses, just crumpled up and inked.

Here are the papers I used:


The car is a cut file for the Silhouette.

The "grass" here is some pretty pleated ribbon from May Arts, and the blacktop road is a simple MFT die that I used, then ran it through again on the opposite side.  It gave me the look I was going for and then stitching it down the middle tidied it up.

There are several dies that I used here from the chicken wire to the clouds and sentiments and flourish.  I cut a negative space cloud from my base pattern paper and backed it with white card stock.

I added a little bit of character to my car by adding some button wheels, a tiny paperclip "vent" and a stickpin for the hood ornament.

ScrapTownLady Store Ingredients:
Satin Pleats Ribbon 5/8" Sage

Other Items:
Silhouette Cameo, Vagabond, Buttons, String, Glassine Bag, Card Stock, "Best Wishes" sentiment die by Cheery Lynn Designs.

Thanks so much for stopping on over today!  Make sure you stop on over to visit the ScrapTownLady Store for all of your crafting goodies.  You'll be amazed at the selection!

 Have a super scrappity day!
~ Rhonda

Friday, May 3, 2013

May Moxxie Blog Hop

Welcome to Moxxie's May Muse-A-Palooza Blog Hop! 

This month we are featuring and you could WIN the entire "Graduation Day" collection! Many people are preparing for graduations of all kinds this time of year, from Pre-school all the way up to College and everything in between plus don't forget those other successes and milestones that are overcome with a little less flare. This line is perfect for all of those moments, inspiring quotes, fabulous designs and a color palette to match whatever you need for your page or project. Check it out!


To have a chance to win, you need to:
  • Follow the hop through all eleven participating blogs, check out the beautiful work of the Moxxie Muses, and leave a comment for each of them.
  • Comments will close at midnight CST on Tuesday, May 7th.
  • Winner will be announced the next day on the Moxxie blog.
  • International fans are welcomed to play along if they agree to pay shipping in the event of their win.
Here is your hopping order in case you get lost along the way, you can come back here and pick up where you left off. Good luck and happy hopping!

*******

Happy May to you! I'm super excited to show you my project for today's blog hop. Moxxie's 'Graduation Day" collection gave me the perfect papers to scrap my high school graduation photos. Now I have to say -- these pictures are not my favorites, but they are the only photos that I have.  


Some florals help soften the black, grey and white color scheme.

A bit of babies breath and bling...  I softly inked the florals.

This collection is so elegant and full of very inspiring quotes in sticker and die cut form.  I wanted to show that even with a bold color combination like this, you can create a soft and pretty page.  Later this Spring I get to scrap our son's preschool graduation and this collection will be just perfect!

Don't be afraid to alter your patterned paper with a bit of ink or to cut apart your bling to work it into your design.  Here I have cut apart my bling and tucked it in around my design in 4 places.

Ingredients:
Graduation Day collection - Moxxie
Sweet Williams - Cheery Lynn Designs
Darling Daisies - Cheery Lynn Designs
Cherry Blossom - Cheery Lynn Designs
Olive Branches - Cheery Lynn Designs
Fanciful Flourish - Cheery Lynn Designs
Mini Dimensional Butterflies with Angel Wings - Cheery Lynn Designs
Build a Flower Embellishment #2 - Cheery Lynn Designs
Lace Light Deco Border - Cheery Lynn Designs
Chrysanthemum Strip - Cheery Lynn Designs
French Pastry Tiny Doily - Cheery Lynn Designs
Coal Miner PowderPuff Chalk Ink - Quick Quotes
Dusty Rose PowderPuff Chalk Ink - Quick Quotes
Flair - American Crafts
White Pearls and Blue Bling - Want2Scrap
Grey Pearl and Bling Flourish - Prima Say it In Crystals
Metal Brads - Stamp it Up
Small Scallop Border Punch - Fiskars
Floral Vine Deep Border Punch - Martha Stewart
Stick Pins - Maya Road
Diamond Stickles - Ranger
Weathered Wood Distress Ink - Ranger
Other:  White button flower and blue crystal brad

Thanks so much for stopping on over today!  Have a super fun hop!!!
~ Rhonda
*******

I am entering this page into the Cheery Lynn Designs "Bling It" challenge.

Wednesday, March 13, 2013

March Club Q!

Happy Wednesday crafty friends!  I'm so excited today to be up on the Quick Quotes blog to share a March Club Q project today. It features the new Dusty Road collection, our new Coconut, Coal Miner and Plum Crazy PowderPuff Chalk Inks and our new Quotes Bundles.

I've also used Kiwi Lane Designs Templates here as well.  We are partnering with Kiwi Lane Designs this month and you will see more fabulous designs from our team in the coming weeks.

Today's project that I get to share with you has a very shabby chic vibe to it and I just had a great time putting it all together!  I used the March Club Q "B" Altered kit for this project.

Coal Miner was used to color the Chipboard Key.

Some details...

To begin, I used our Coconut PowderPuff Chalk Ink on the chipboard frame.
Tip:  Use an emory board to sand down the nubs left after removing die cuts.

Next I inked the die cut border with Coal Miner PowderPuff Chalk Ink.
I left some variation in the coloring to enhance the shabby feel.

I decided to stitch down the die cut frame onto the chipboard.  Once that was completed, I worked on filling in each of the windows. The "Love is Patient, Love is Kind..." quote is from our Quotes Bundle and was my starting point. The "Take Time to Do Something Silly" is also from the Quotes Bundle as well.  I added some papers from our coordinating 6x6 paper pad for the collection. 


You will see the die cut chipboard buttons here that I colored using Baja Blue, Coconut and Coal Miner PowderPuff Chalk Inks.  I added Crackle Accents on the scalloped button, Diamond Stickles on the top button and Glossy Accents on the bottom floral button.

The die cut branches and flourishes were colored with Coconut and dry brushed with Baja Blue to give the soft feel.  I also did the same on the flourish die cut as well.  I really love to use a dry brush with the Chalk Inks for just a hint of artistic touch.  

I've used the Kiwi Lane Tiny Wildflower Template #1 and layered for interest.

Ingredients Used:
March Club Q Kit B (Chipboard Frame, Die Cuts, Blue Ribbon and White Pearls)
PowderPuff Chalk Ink:  Biscotti and Baja Blue
Tiny Wildflower Template #1 - Kiwi Lane Designs
Grey Bling Pin - Jenni Bowlin
Grey Triple Ball Pin - Maya Road
Beige Pearls - Prima
Foam Squares - 3L
Other:  Seam Binding Ribbon, White Offray Ribbon, Sewing Machine and Thread

New Ingredients Used:
Coconut, Coal Miner and Plum Crazy PowderPuff Chalk Inks (Available 3/20)
Dusty Road Chipboard Stickers (Available 3/20)
Dusty Road Stickers (Available 3/20)
Dusty Road 6x6 Paper Pad (Available 3/20)
Quotes Bundle - Inspire (Available 3/20)

Thanks so much for stopping on over today and spending some time today!  Have a super scrappity day!
~ Rhonda

Friday, December 14, 2012

Perfect Harmony

Happy Friday to you!

Today I have a layout to share with you featuring Moxxie's line called "Musically Inclined".  The patterns and designs in this line are elegant and so very pretty all at once.  I used the die cuts and stickers in the line for my title work.

Perfect Harmony...  we make Beautiful Music together
  This photo is our violinist at our wedding.  I thought it worked nicely!

The splash of aqua here is one of Moxxie's Mini Die Cut Stacks - Fall.

I started this page with my favorite light kraft card stock, then I kept layering and collaged until it felt "done".  Of course, then I would add another touch of this or that again - ha! The "Perfect Harmony" sentiment block and the little ribbon-esque strips are the coordinating die cuts for the line.  LOVE!  


For fun, I've added a kraft envelope by Maya Road, a few transparencies by K and Co., along with some buttons under my flower.  It's a nice anchor for the cross that I cut using a Cottage Cutz die.  The elegant swirl flourish spraying out is Memory Box.  The upper right corner die is Fanciful Flourish by Cheery Lynn Designs.

I thought it would be nice to add a few small and subtle romantic elements...   there are "X and O's".  The hand stitches on the right and the three white pearls on the bottom left.  I repeated the scallop theme in a few places.  

Initially, I wouldn't have considered this line for a wedding page, but it sure worked wonderfully and I'm so happy that I did.  I love it when that happens!!!

Thanks so much for stopping on over today!  Have a super scrappity day and weekend!!!
~ Rhonda 

Monday, November 12, 2012

Love You More Release Party!

Happy Monday to you crafty peeps!  It's a big day over at Imaginisce, we are celebrating all this week with the brand new "Love You More" release party.  

Love You More is our romantic new release that you will not be able to put down!  This collection is incredible!!!  New embellishments include washi tape, buttons and some pretty cool alpha stickers too!


"Always and Forever"

My first project is a layout that I created using one of our wedding photos.  The inspiration was the "Always and Forever" sentiment on the 4x6 card.  I had my husbands ring engraved with this sentiment so it seemed the perfect fit to use it for my title work here.  


I selected one of our wedding photos in black and white to compliment the grey tones in the collection.  The lacy border was fussy cut and layered under my photo with some additional die cuts.  I used the washi tape and layered it with some ribbon to the right of my photo.  


Tip:  To help keep thicker ribbon together when using your iMagicut ribbon cutter to make a chevron cut, use a bit of washi tape to keep your fold in place.  

Ingredients:  Love You More collection, Foam Tape, POGO, i-Rock, Glam Rocks Heart, Hot Rocks Compact - Crystal, ImagiCut by Imaginisce.  Cheery Lynn Anastasia Border Die, MFT Scallop Border die and Fishtails, Spellbinder's Grand Oval and Rectangle Scallop dies, Memory Works die, Corner Chomper by We R Memory Keepers, Jenni Bowlin Studio Tab punch and gray stick pin, Maya Road heart stick pin, Cardstock by Bazzill.  Other:  Sewing Machine, thread, seam binding ribbon.

~~~~~~~

"For You With Love" (A2 Card)

My next project is a card. I wanted to create something that can be used for a loving note of encouragement or a birthday. You see several of the stickers from the collection here. Some foam tape was used under my sentiment for dimension. A bit of thin ribbon tied simply finished the card.  

The inside of the card features one of the 3x4 journaling cards.

Ingredients:  Love You More collection, Foam Tape and POGO by Imaginisce, Doily Die by Cheery Lynn Designs, Corner Chomper by We R Memory Keepers, Cardstock by Bazzill

I hope you enjoyed my projects today!  Be sure to visit the Imaginisce blog all week long for some incredible projects featuring this stunning line!!! 

Have a super scrappity week!!!
~ Rhonda

Tuesday, July 24, 2012

Gathering My Family Mini Album with Quick Quotes

Happy Tuesday crafty peeps!

Today is my turn to share with you my canvas project over at Quick Quotes.  Did you know that Quick Quotes store carries a wonderful variety of canvas in a variety of sizes?  It's really a fun and versatile medium to use for projects!

I started with two flat canvas panels in 5x7 size.  The edges were inked with Biscotti PowderPuff Chalk Ink.  The canvas is a perfect foundation to create a mini album in a convenient size, so I took the new "Just Because" line, Itty Bitty Vellum Quotes and some of my favorite pictures and this is my project.

To the cover, I added some die cuts, chipboard and Prima flowers.

The fence is white card stock inked with Biscotti and Mocha Mama.

This size canvas is perfect for 4x6 photos!

I added a journaling spot, Itty Bitty Vellum Quote attached with eyelets and die cuts.

Simple stitching is all that was added here.

A little kraft envelope accented with Tahiti to emphasize the design can hold journaling.

I loved this Itty Bitty Quote and used my Spellbinders to frame it.

A piece of scrap acetate overlay from a prior Club Q kit worked perfectly here!

The blue partial mat here is a scrap from my page 3 die cuts.  

This floral paper was a perfect fit for this Grandma photo!

Very simple page, the colors were so nice for this!

I thought the little die cut was a fun addition here.


In decorating the back cover, I really wanted to be sure it would lay flat and stand the test of time so I created a simple grid pattern to feature some of the various pattern papers in the line.  A bit of added stitching added just a little extra texture.

Designer's Notes:  

To attach paper to the canvas covers I used Beacon's 3-in-1 adhesive.  My fence was attached using my Xyron 5" Creative Station.

To conserve paper on my interior pages, I stitched only on photos and then adhered to my page, so it looks like it was stitched actually to the page.  This allowed me to use a single piece of paper on each interior page and make use of the double sided pattern papers.

This line is perfectly named...  "Just Because" you really can use it for any kind of project, it is incredibly versatile!  The soft buttercream, blues, green and still pinks and orange and brown are amazing.

I hope that I've inspired you to take a look at using Canvas as a foundation for your next album.  

Quick Quotes Ingredients:
Just Because papers
Itty Bitty Vellum Quotes - "Babies, Kids, Family"
PowderPuff Chalk Inks:  Tahiti, Biscotti, Mocha Mama, Limeade, Green with Envy 
Green Binder Rings and Acetate Transparency (Creative Imaginations) from prior Club Q Kits.

Other Ingredients:
Xyron 5" Creative Station
Kraft Envelope - Maya Road
Spellbinder Dies - Deckled Rectangle, Circles
MFT Dies - Fishtails, Hex, Flourish, Squiggley Line
CLD Dies - Fence
Martha Stewart Punches - Rose Leaf, Frond
Fiskars Punch by JBS - Tab
Flowers - Prima
Diamond Stickles - Ranger
Twine by The Twinery
Other:  Journaling Spot, Eyelets, Thread, Sewing Machine

Thanks so much for stopping on over today!  Have a super rest of your week!!!

Thursday, February 23, 2012

Kanban Elegance!

Greetings crafty friends!

I've got a little elegant card inspiration to share with you today courtesy of Kanban Crafts!  This A2 sized card features a mixture of cardstock textures and a touch of doily, pearl, lace, spool, ribbon, buttons and pins.


I used my We R Memory Keepers stub nose punch on the pink pearl card stock to keep the art deco theme to the card.  The sharp contrast of the gunmetal grey pearl cardstock gives the soft elements focus.

Here is a detail image of the button and spool cluster.  I've used my Epiphany Crafts Heart 20 button tool and button and a Heart 14 tool and bubble cap.  The little spool was a find in my local craft store.  I just added a bit of my thin ribbon to it.  The stick pins are Maya Road.  Doily is from Martha Stewart and the pearl accents are Kaisercraft.

The wavy cut on my cardstock?  That came from an American Crafts trimmer that I was fortunate to have won at my LSS crop one night this winter.

Kanban Crafts Products
Cavandish Portraits - Mink Suede - PCT9758
Pink Pearl Cardstock - A4PRL240BP
Gunmetal Grey Cardstock - A4MRS / GM

Thanks for stopping on over for a moment!  Be sure to ask for Kanban Crafts products in your local scrapbook store!!!

Have a super scrappily day!
~ Rhonda