Showing posts with label BoBunny Stamps. Show all posts

Monday, March 12, 2018

You Are So Loved with Quick Quotes

Happy Monday to you! I'm up over at Quick Quotes today and am sharing a bit inspiration to help 'perk' you up after Daylight Savings time.


I used a variety of PowderPuff Chalk Inks to edge the die cut pieces on my card. I selected the papers as they had a nice Spring feel to them. The sentiment is stamped in Cool Gray PowderPuff Chalk Ink and if you don't have it, definitely put it on your list! 


The coffee ring image is stamped with one of our 2018 PowderPuff Chalk Ink colors, Kokomo. To accent the design, I added some additional die cut pieces from my stash.

Quick Quotes Products:
Sonata: 100 and 101
Harmony: 102
49 Shades of Grey: 101
PowderPuff Chalk Inks: Cool Gray, Seabrook and Kokomo

Other Products:
Coffee Cup Die by MFT
Stamps by BoBunny
Floral and Bird Die Cuts by Tim Holtz
Other: Cheesecloth, Twine and Heart Gem

Thanks so much for stopping on over for a visit today!
~ Rhonda

Saturday, May 13, 2017

Weekend Adventures with BoBunny

Saturday greetings to you! I have a project to share with you today that I recently created for BoBunny featuring one of their newest collections, "Weekend Adventures".

BoBunny One Layout Three Ways featuring Weekend Adventures and Pentart Stencil Paste designed by Rhonda Van Ginkel

This project post is known as "1 Layout 3 Ways", I will share a page in three varying degrees of difficulty. The Weekend Adventures collection has such a fun array of patterns and designs to it as you will soon see.

The image above is a very basic design or "Level 1" that you can create using just the pattern papers in the collection along with some Noteworthy pieces. I did a bit of cut work for the oval layer with the floral that allows me to tuck my photo within.

BoBunny One Layout Three Ways featuring Weekend Adventures and Pentart Stencil Paste designed by Rhonda Van Ginkel

Level 2, building in a few more pieces into the collage here, I have now included some chipboard elements and additional sentiments while keeping the rest of the design mixed media free. (Level 1 and Level 2 exclude any mixed media.)

BoBunny One Layout Three Ways featuring Weekend Adventures and Pentart Stencil Paste designed by Rhonda Van Ginkel

Level 3, I worked in a few base pattern paper layers and added some Stamping, Glimmer Spray splatters along with a bit of Stencils and Pentart Stencil Paste. A variety of Dot Jewels are added as accents. To add a bit more dimension I also included some Layered Chipboard pieces.

BoBunny One Layout Three Ways featuring Weekend Adventures and Pentart Stencil Paste designed by Rhonda Van Ginkel

I love the glitter accents of the Layered Chipboard pieces!

BoBunny One Layout Three Ways featuring Weekend Adventures and Pentart Stencil Paste designed by Rhonda Van Ginkel

The two top layers are stitched on and edges gently distressed. Foam adhesive squares added so much texture on the page. Here's a surprise for you, the fireworks at the top (Good Vibes), are actually turned upside down. I thought it was a fun switch.

BoBunny One Layout Three Ways featuring Weekend Adventures and Pentart Stencil Paste designed by Rhonda Van Ginkel

Of course I had to add a few Dot Jewels to accent the cute designs in this collection. This page was so much fun to build and it cam together so quickly.

BoBunny Products:
Pattern Paper: Bear Hug, Blooms, Good Vibes, Let's Play and Stripe / Weekend Adventures
Chipboard: Layered Chipboard, 6x12 Chipboard / Weekend Adventures
Noteworthy: Weekend Adventures
DoubleDot Jewels: Aqua, Think Pink and Tuxedo
Stencil: Timeless Stencil
Dies: Darling Doily
Stamps: Take Note and Stained Textures
Glimmer Spray: Sugar and Gold

Pentart Product:
Pentart Stencil Paste: Vanilla Pearl

Thanks so much for stopping on over today! Sending you wishes for a fabulous weekend and for those of you celebrating Mother's Day, enjoy!

Tuesday, November 8, 2016

Off the Page with BoBunny

Happy Tuesday to you!
 
I was recently up over on the BoBunny Blog with a project featuring one of our newer collections "Winter Wishes".
 
"Let it Snow" Winter Celebration Décor

This project is a home decor pallet in celebration and anticipation of winter and snow featuring Winter Wishes and DoubleDot Jewels. In selecting my background patterned paper for this project, I loved these birch trees with the cool crisp feel of winter.


I base coated the wooden pieces with Pentart White Acrylic Paint, then adhered the Winter Wishes paper to them. When I next applied my texture using Sugar Glitter Paste and Structure Paste with the Winter Fun Stickable Stencil, I adhered all pieces together snugly, let dry. 

Once the textures dried, a bit of Glimmer Spray splatters were added. When those dried, I separated and attached the panels to the backing wood pieces.


I selected my sentiment from the coordinating Combo Stickers and accented with DoubleDot Jewels in Think Pink and Tuxedo. Several of the BoBunny dies were used to cut a variety of shapes for layering. I did a bit of fussy cutting from the papers to keep it interesting. 

I like to cut a variety of shapes from different papers all at once, and then sit down with my project and layer. It makes things go a little quicker for me.


One last image to show off the pretty textures achieved by using the different mediums and mixing in the DoubleDot Jewels and Jewel Flourish.

BoBunny Supplies:
Patterned Paper: Winter Wishes, Beautiful, Boughs, Chill, Magic and Wonderland / Winter Wishes
Noteworthy: Winter Wishes
Stickers: Combo Sticker 12x12 / Winter Wishes
Glitter Paste: Sugar
Glimmer Spray: Sugar, Gold and Bronze
DoubleDot Brads: Aqua
DoubleDot Jewels: Tuxedo and Think Pink
Stickable Stencils: Winter Fun
Pearlescents: Sugar
Pentart: Structure Paste and Creamy Acrylic White Paint
Stamps: Postale, Stained Textures and It Is Written
BoBunny White Gesso 
Jewels Flourishes: Glaze
Dies: Terrific Nested Tags, Fanciful, Ornate Doilies and Picture This
Laser Cut Chipboard: Timepiece
Doilies: Small 4"
 
Thanks so much for stopping on over to the blog today for a visit! Have a super scrappity day.


Friday, July 29, 2016

July BoBunny Inspiration

Friday greetings crafty friends! I have a fun BoBunny project to share with you here on the blog today.

One of our more recent collections, Butterfly Kisses blends tremendously well with a previous collection called Soiree. I've used pieces from both in my art journal pages that I am sharing here.

Art Journal Pages featuring the Butterfly Kisses and Soiree Collections by BoBunny designed by Rhonda Van Ginkel

I prepared the foundation papers in the journal by using the Whimsy Stickable Stencil and some White Gesso, then misted using Gold, Sugar, Tutu and Mint Glimmer Sprays. I first selected the paper that I would be using for each page, then adjusted the coloring accordingly.

Once misted, I used a slightly damp paintbrush to move and blend those colors together to coordinate best with the pattern papers I selected.

Art Journal Pages featuring the Butterfly Kisses and Soiree Collections by BoBunny designed by Rhonda Van Ginkel

Recently in between paper crafting projects, I have started a bit of quilting. It began as a simple thing that I wanted to create a quilt for each of my sons. Once I completed them, I made a few more and thought it would be nice to capture this other art form in my art journal.

Above you will see how blending a few of the Pearlescents together made my Laser Cut Chipboard Tag coordinate perfectly! 


I backed the Butterfly Kisses Chipboard Frame here with some leftover patterned paper from my 2nd Round Design Team Submission project that you will see later in my video. I tucked in the photo collage and added a few other Chipboard embellishments.

Art Journal Pages featuring the Butterfly Kisses and Soiree Collections by BoBunny designed by Rhonda Van Ginkel

For this page, my patterned paper has a stronger pink and peach tone, so I adjusted the amount of TuTu and Gold in my Glimmer Spray. I love how nicely the colors blend, but yet you still see the textures from the White Gesso and Whimsy Stickable Stencil.

Art Journal Pages featuring the Butterfly Kisses and Soiree Collections by BoBunny designed by Rhonda Van Ginkel

A few of our pretty Dies are used to add soft and elegant accents.

Art Journal Pages featuring the Butterfly Kisses and Soiree Collections by BoBunny designed by Rhonda Van Ginkel

I loved this sentiment, it is so true from any type of crafting, if hands have touched it and created it with love, that is special. It is true of cooking, children's art work in school, cards and scrapbook pages to quilted, knitted, crocheted or other handmade projects.

All of these things are so worth the invested time to learn and very rewarding and heartwarming to me.

BoBunny Products Used:
Patterned Papers: / Butterfly Kisses, Flutter, Butterfly Kisses; / Allure, Boutique, Linens, Exquisite and Splendid / Soiree
Noteworthy: Butterfly Kisses and Soiree
Chipboard: 6x12 Chipboard / Butterfly Kisses
Brads: Soiree
Stickers: Combo Stickers / Soiree
Stamps: Postale
Dot Jewels: Double Dot Blue Hues
Glimmer Spray: Gold, Sugar, Tutu and Mint
Pearlescents: Blush, Island Mist and Coral
Stickable Stencil: Whimsy
Dies: Flourish, 3x4 Lattice Frame, Keeping Tabs, Ornate Doilies
Laser Cut Chipboard: Trellis Tags 
White Gesso
Ink: Licorice
Stamp Block Set

Thanks so much for stopping on over today and spending a moment with me here on the blog! What are your favorite homemade things?  

Monday, March 21, 2016

Easter Decor with BoBunny

Hi there and Happy Monday to you! 

I was recently up on the BoBunny blog featuring the Secret Garden collection and Eggcellent Stamps. For my project I went with an Easter theme and created a Home Décor door hanger.

Easter Door Hanger Altered using Secret Garden papers and Eggcellent Stamp Set by BoBunny designed by Rhonda Van Ginkel

I was so excited to get assigned to Mixed Media with all of the delicious new products that BoBunny has just released, it's like paradise! I'm using Secret Garden with new Eggcellent Stamps for my door hanger. This foundation is a wooden door hanger that I picked up for .79 cents at Hobby Lobby.

To prepare the base, I used some White Gesso around the edges and sides. While that was drying I thought it would be fun to use one of our new Crackle products on a die cut to see how much if any of the background color peeks through. 
  • First step - apply a thin layer of the Crackle Paste Primer and let dry.  
  • Ok, I confess, I was impatient and did speed up the drying process with my heat gun, but I made certain the paper was completely dry before I did anything else.

Easter Door Hanger Altered using Secret Garden papers and Eggcellent Stamp Set by BoBunny designed by Rhonda Van Ginkel

Next I applied the White Crackle Paste using a plastic craft knife in a fairly thin layer, then applied heat using my heat gun to dry and crack. You can see the shabby results below.

Easter Door Hanger Altered using Secret Garden papers and Eggcellent Stamp Set by BoBunny designed by Rhonda Van Ginkel

While the "Picture This" die cut was drying, I traced the wooden door hanger on the back of my Vineyard pattern paper so the design aligned on the left. A bit of cheesecloth was cut and tacked down. Next, I cut a small Ornate Doily to layer with my Picture This crackled embellishment and topped it off with a pretty Brad. 

Easter Door Hanger Altered using Secret Garden papers and Eggcellent Stamp Set by BoBunny designed by Rhonda Van Ginkel

I used some Sugar DoubleDot cardstock to stamp my sweet little Eggcellent character on, then used a few color pencils to give a bit of detail. I cut a Branch Out heart branch from the Roses papers and layered behind him. Then I cut a long patch of grass from the Bike Ride die set. I arranged all of the sentiments using foam squares for dimension, then added my other layers behind it.

BoBunny Supplies:
Patterned Paper: Vineyard, Planted, Garland and Roses / Secret Garden
DoubleDot: Sugar
Stamps: Eggcellent Stamps
Brads: Secret Garden
Chipboard: 6x12; Layered Chipboard / Secret Garden
Dies: Bike Ride, Branch Out, Picture This and Ornate Doilies
Stickable Stencils: Bliss
Glitter Paste: Sugar

Thanks so much for stopping on over for a visit today! Have a super scrappity Monday!!!

Monday, November 30, 2015

Junk Journal featuring Calendar Girl by BoBunny

Greetings and happy Monday to you! Can you believe it's the last day of November?

I have an altered composition notebook project to share with you today featuring the Calendar Girl collection by BoBunny. I wanted to create a junk journal that I can write my creative notes and ideas into for 2016. This was the perfect collection for it.

Things I Love Altered Composition Notebook or Junk Journal featuring Calendar Girl by BoBunny designed by Rhonda Van Ginkel

I picked up a few extra notebooks during back to school so I would have some on hand. To begin, I covered the front with the pretty woodgrain paper from the April paper.

Things I Love Altered Composition Notebook or Junk Journal featuring Calendar Girl by BoBunny designed by Rhonda Van Ginkel

I added some Glitter Paste in hearts using the Cascade Stickable Stencil using the heart pattern. On the upper right I used the Sugar Glitter Paste and down on the bottom left, I used Sugar and layered a touch of Blush on top of it.

For the "Things that I love" layer, I used the Bliss Stickable Stencil and a variety of Coral, Blush and Sugar Pearlescents to mask my doily accent.

Things I Love Altered Composition Notebook or Junk Journal featuring Calendar Girl by BoBunny designed by Rhonda Van Ginkel

Here you can see that I anchored my grid using a cut from the largest Nested Terrific Tag, then created my grid design of the Misc Me Journaling Contents on top of it. They are adhered with foam dots for dimension. 

The center is accented with the LaserCut Chipboard Heart, topped by a Noteworthy butterfly, then a die cut butterfly using our "Flutter" dies. A few Think Pink DoubleDot jewels added the perfect finishing accent.

BoBunny Supplies:
Patterned Paper: February, March and April / Calendar Girl
6x6 Paper Pad: Calendar Girl, Love and Lace
Noteworthy: Calendar Girl
Misc Me: Calendar Girl Journaling Contents
Craft Dies: Flutter and Nested Terrific Tag
Double Dot Jewels: Think Pink
Stamps: It Is Written
Stickable Stencils: Bliss and Cascade
Glitter Paste: Sugar and Blush
Glimmer Spray: Bronze and Gold
Pearlescents: Sugar, Coral and Blush
Doilies: 4" Small
Silver Foil Transfers: Filagree
Laser Cut Chipboard: Hearts
Ink: Licorice

Thanks so much for stopping on over today. Have a super creative and scrappity day!

Thursday, November 12, 2015

Love and Lace Page with BoBunny

Thursday greetings to you!  I was recently up on the BoBunny blog featuring one of our newest collections "Love and Lace".  I created a page in three degrees of difficulty.
 
Step 1 Level - Easy
Family page featuring Love and Lace collection by BoBunny designed by Rhonda Van Ginkel Easy Page from Pages Three Ways

I was thrilled to receive the new collections recently from BoBunny! Love and Lace is such a stunning combination of colors and design elements. Today I will show you a page in three varying degrees of complexity. Above you will see the easy version. I've used Noteworthy and a few die cut shapes and layered my laser cut chipboard Family sentiment for the title.

To keep this very easy, you could opt to leave the Family laser cut chipboard plain. I first sprayed Sugar Glimmer Spray, then Bronze Glimmer Spray and dabbed it lightly.  After that, I smeared on Sugar Pearlescents mixed with Island Mist and Blush Pink to create an iridescent effect.


Step 2 Level - Medium
Family page featuring Love and Lace collection by BoBunny designed by Rhonda Van Ginkel Medium Page from Pages Three Ways

This is the Medium level page, where I have added some torn edges as well as a bit of glitter paste that was applied over a Stickable Stencil on the upper right corner and the lower left bottom under my collage. The small plain white doilies peek out of my torn papers on the top and side.

Family page featuring Love and Lace collection by BoBunny designed by Rhonda Van Ginkel Medium Page from Pages Three Ways

In case the effect is not obvious in the larger photo, I wanted to share with you how beautiful the Sugar Glitter Paste is when added. It's the perfect amount of pretty texture, and dries quickly as well.

Step 3 Level - Advanced
Family page featuring Love and Lace collection by BoBunny designed by Rhonda Van Ginkel Advanced Page from Pages Three Ways

The third version of this page with more masking and stamping added, as well as layers of tags, some Sugar and Blush Pearlescents were added to to the doilies to give them the light pink color. I've also included some Foil Transfers in Accent Gold and Flourish Jewels along with a few flowers.

Family page featuring Love and Lace collection by BoBunny designed by Rhonda Van Ginkel Advanced Page from Pages Three Ways

The extra die cut tag and Noteworthy florals and tab are added, as well as the "Always and Forever" sentiment sticker from the Combo Sticker sheet.

Family page featuring Love and Lace collection by BoBunny designed by Rhonda Van Ginkel Advanced Page from Pages Three Ways

A bit of stamping in the bottom right corner and the Layered Chipboard layered under the red floral tag.

Family page featuring Love and Lace collection by BoBunny designed by Rhonda Van Ginkel Advanced Page from Pages Three Ways

The pretty Lovely Leaf Dies paired with the Flourish Jewels, as well as the Elegant Border Die layered here.

I hope you've had a bit of fun with me. Be sure to ask for the Love and Lace collection at your favorite local craft store today! We would love to see your work, so please share with us on Facebook.

BoBunny Supplies:
Patterned Papers: Affection, Love and Lace, Always, Leather, You and Me / Love and Lace
Layered Chipboard: Love and Lace
Stickers: Combo Sticker / Love and Lace
Noteworthy: Love and Lace
6x6 Paper Pad: Love and Lace
Glitter Paste: Sugar
Stickable Stencils: Bliss and Brocade
Glimmer Spray: Bronze
Pearlescents: Sugar, Chocolate, Blush and Island Mist
Laser Cut Chipboard: Family
Jewel Flourishes: Frosting
Dot Jewels: Double Dot Ruby Red, Double Dot Think Pink
Elegant Border Die
Nested Terrific Tag Dies
Nested Fancy Frame Dies
3x4 Ornate Frame Die
Lovely Leaf Dies
Foil Transfers: Accents in Gold, Filagree in Gold
Doilies: 4" Small Doilies
Stamps: Distressed Textures and Stained Textures
Stamp Block Set
Ink: Licorice

Thanks so much for stopping on over today! Have a super scrappity day!

Tuesday, September 15, 2015

C'est Magnifique Guest Designer Part II for September

Tuesday greetings, I'm super excited to be hosting the blog on over at C'est Magnifique today as a Guest Designer with Part II of my September projects. I am featuring designs using the C'est Magnifique September 2015 Card Kit which includes Cocoa Vanilla Studio and Authentique papers.

"This Life is Pretty Wonderful" (12x12 Page)

I love the elements in the Card Kit so much, I also had a few extra goodies to include from the Embellishment Add-On Kit as well as the black flower from the Flower Add-On September 2015 Kit. I started this page inspired by the green card base which I used to mat my photo collage, along with some simple black cardstock.


I loved the idea of mixing this strong chevron design with some florals. I used a sheet of kraft card stock from home, then used crackle modeling paste and a stencil. I added the small gold glitter paste stars using a stencil. You will also see a few wood veneer stars mixed in which I lightly touched with Gold Glimmer Spray to blend in.

Some Gelatos were used in 4 different colors, and just smeared in to blend. After that, I sprinkled drops of Glimmer Spray about in coordinating colors to the pattern papers. I stamped using some of my BoBunny stamps and black ink.


The blue banner and pink arrow and sequin elements are from the Embellishment Add On Kit. I added the string and pearl along with the ink for coloring the "Hello" speech bubble. The partial tag I cut using a simple tag die.

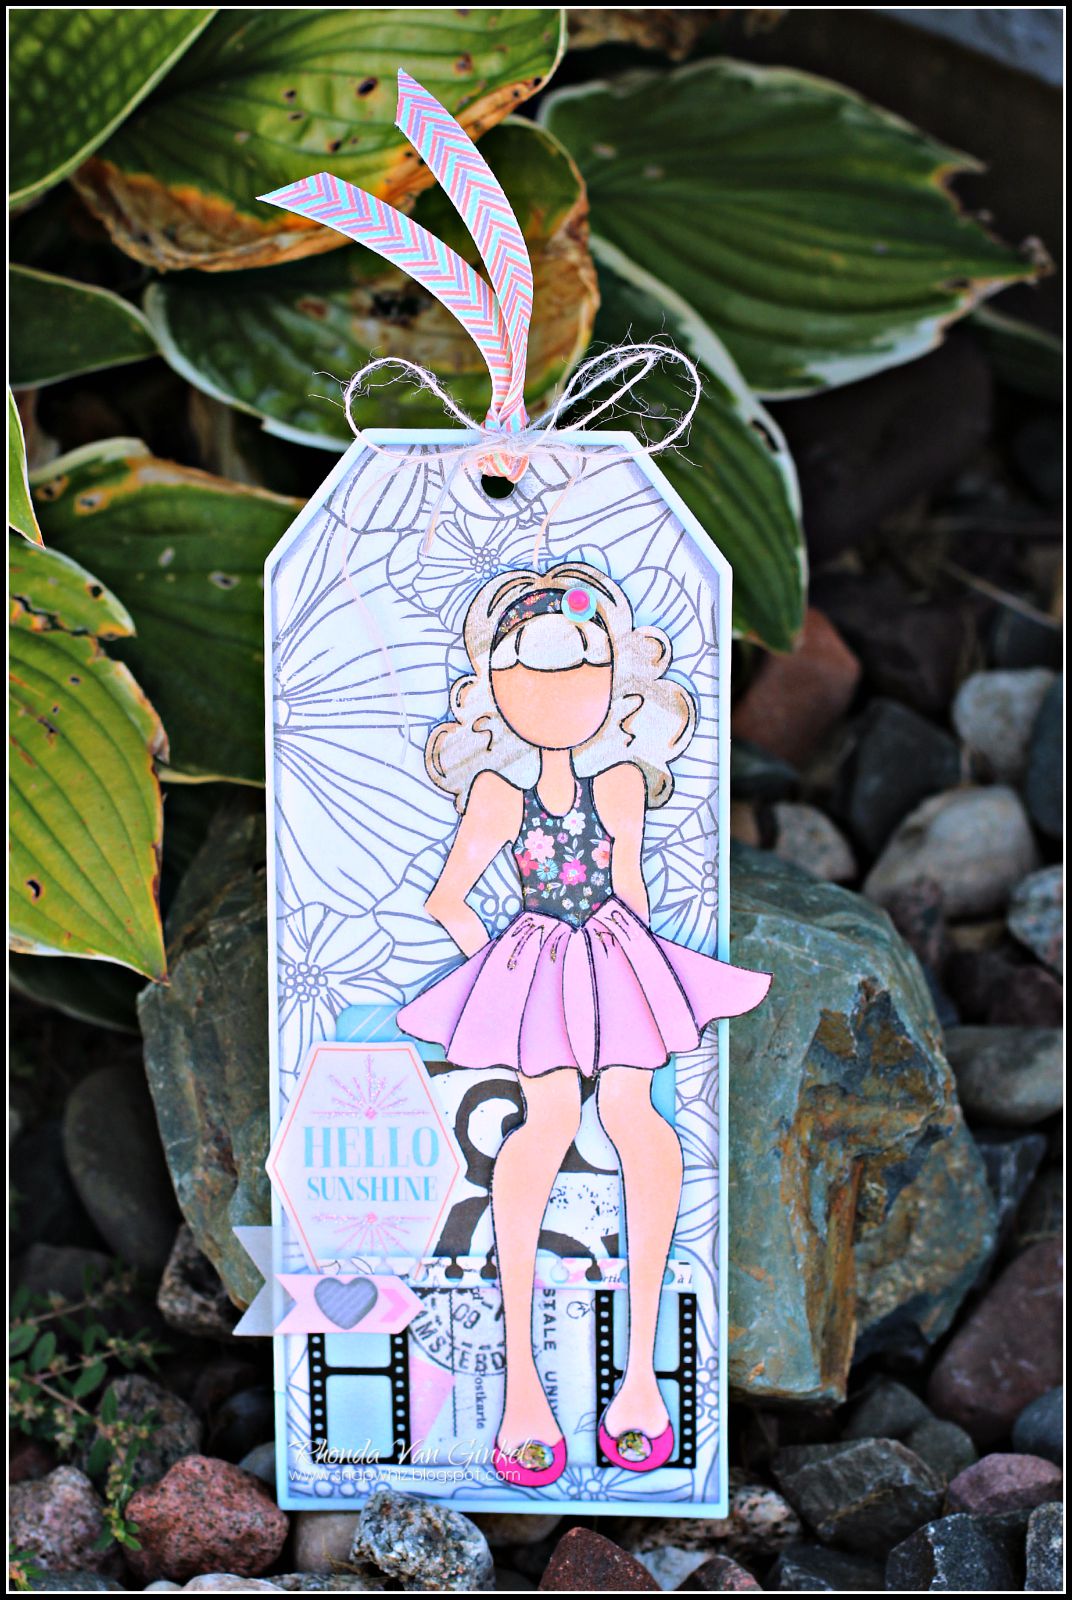
"Hello Sunshine" Tag

For my next project, I created a tag to fit the cute pink polka dot envelope that comes in the kit. I've used the Prima Doll Stamp included in the kit as my focal point. She is colored with Copics and paper pieced. 


I've used a scrap from one of my first projects on this. In the background you should see a frame and behind it I've backed it with the black and white ampersand. This was a really fun project to do, I love using these doll stamps, the possibilities are endless!


I added some Diamond Stickles to accent the bodice florals as well as the top of the skirt. The paper piecing that I did with her hair is from a woodgrain pattern paper included in the kit. I highlighted some of the hair design with my marker.

The headband, bodice and florals on her shoes all coordinate to the same patterned paper. To accent the headband, I added a single sequin and an Enamel Dot.


Here's the coordinating envelope. I added a few simple touches and love how it fits perfectly! 

For this project I used a Prima Tag Pad from my own collection of items for the base, then added other papers and embellishments to it.

"Hello" (A2 sized card)

This card showcases another one of the beautiful designed card bases included in the kit. I decided to layer over the florals lightly with a few other pieces. 


The "Hello" sentiment flag was cut from the pattern papers in the kit. I cut one of the vellum hearts in half and used for "leaves" under the flower cluster on the left. To create this look, I used a few of my MFT dies and my die cutting machine.

Are you loving the projects you've been seeing? If so, be sure to check out the C'est Magnifique Store to get your very own September 2015 Card Kit today!

If you love those enamel dots, wood veneers, die cuts, sweet bows and arrows, be sure to check out the Embellishment Add-On Kit while you're there. There is also a Flower Add-On September 2015 Kit if you crave some flowers for your projects.

Thank you to C'est Magnifique Kit Club for inviting me Guest Design again with you this month. I loved working with these beautiful papers and goodies!  

Have a super scrappity day!

Thursday, August 20, 2015

Angel Documented with BoBunny

Greetings!  I was recently up on the BoBunny blog featuring a mixed media page with one of our newest collections, Genevieve.
 
Angel Documented Mixed Media Page
Angel Documented Mixed Media Scrapbook Page featuring Genevieve Collection and Celebrate Laser Chipboard by BoBunny designed by Rhonda Van Ginkel

My project for today is a mixed media page featuring the all new and utterly beautiful "Genevieve" collection. I wanted to feature the angelic feel of my photos from our recent vacation. This particular center photo looks to me like an angel glowing at the end, so that is the perspective behind the title.

To begin, I stamped the angled typescript from the "It is Written"stamp set. I've used Silver Glitter Paste with our new Whimsy Stickable Stencil for a background accent.

Angel Documented Mixed Media Scrapbook Page featuring Genevieve Collection and Celebrate Laser Chipboard by BoBunny designed by Rhonda Van Ginkel

For my title work I've combined one of the new "Celebrate" Laser Cut Chipboard sentiments, finished with gesso and then a light rub of Silver Pearlescents.  The "Documented" sentiment and flourish are from the Filagree Silver Foil Transfer collection.

Angel Documented Mixed Media Scrapbook Page featuring Genevieve Collection and Celebrate Laser Chipboard by BoBunny designed by Rhonda Van Ginkel

A few splatters of Glimmer Spray in Sugar and Frost added a bit of movement and texture on the page also. For my collage, I layered piece of Noteworthy, Chipboard and Combo Stickers. The extra small chipboard sentiment was the perfect finishing touch.

BoBunny Supplies:
Patterned Paper: Porcelain, Lavish / Genevieve
LaserCut Chipboard: Celebrate
Buttons: Genevieve
Pearlescents: Sugar
Glitter Paste: Silver
Glimmer Spray: Sugar and Frost
Stickable Stencils: Whimsy
Noteworthy: Genevieve
Jewels: DoubleDot Blue Hues
Chipboard: Genevieve
Stickers: Combo Sticker / Genevieve
Foil Transfers: Filagree Silver Foil
Stamps:  It is Written

Thanks so much for stopping on over today! Be sure to ask for the Genevieve collection at your local scrapbook store, it's beautiful.