
Tuesday greetings to you! Is the reality of winter setting in kind of a bummer to you as it is for me? Do you need a bit of a "pick me up" to your day?
Check out the Imaginisce Blog because baby it is hopping SPRINGTIME all over!!! It is our big release party for the spring line, Hippity Hop! We hope to inspire you all week and of course give you a chance to win your own HIPPITY HOP COLLECTION! Be sure to follow along all week long!
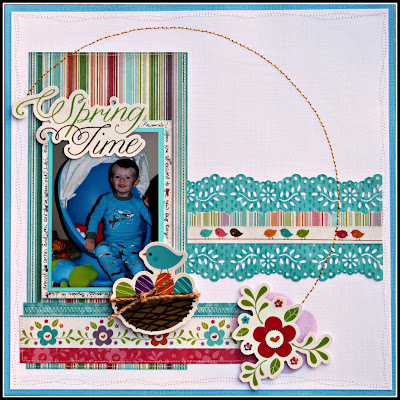
Today I have a couple of fun and cheerful Hippity Hop projects to share with you! First up, "Spring Time Pajamas" layout:
 A few details for you:
 I added some stitching on the page and layered one of our "Gotta Have It" sheer pink flowers under the die cut for some pretty texture. I love to use Pink on my boys pages!!! Of course, I also love to add a bit of bling with my i-Rock tool as well. I used it for my bird's eye and on the floral die cut.

My next project was just such a happy discovery! I purchased some treats from a school fundraiser and the packaging was so cute, I thought, well let's take it apart and see how it's done! I'm sure someone, somewhere has made these too, but this was new to me.


Check out the Imaginisce Blog because baby it is hopping SPRINGTIME all over!!! It is our big release party for the spring line, Hippity Hop! We hope to inspire you all week and of course give you a chance to win your own HIPPITY HOP COLLECTION! Be sure to follow along all week long!
Today I have a couple of fun and cheerful Hippity Hop projects to share with you! First up, "Spring Time Pajamas" layout:


I added a hand stitched circle to the page and altered my stitch colors orange and yellow, every other one. A touch of my Copic marker to my clear i-Rock bling custom coordinated my gem to the green script titlework.
My next project was just such a happy discovery! I purchased some treats from a school fundraiser and the packaging was so cute, I thought, well let's take it apart and see how it's done! I'm sure someone, somewhere has made these too, but this was new to me.

A side view with a bit of detail for you:

(If you'd like to make your own treat box, I scanned my template and you can get it here.)
Here's how it started out for me:

I traced the deconstructed template on top of my paper. Trimmed the paper to size, then used my craft knife to cut out the "kite" shapes from the back side of my pattern paper.

Following the example of my inspiration, score the kite shapes on point as shown all the way top to bottom.

Turn the template and score the two lines on point as shown at the center point of the kite shape.
Fold all the horizontal lines to achieve your containers shape. Ink edges if desired. Use a strong adhesive tape to adhere the quarter lip after aligning to the opposite side. Now you can gently push the ends in toward the middle and you will see your shape appear nicely.

I used some pretty seam binding crinkle ribbon to tie mine. Aren't those die cuts the cutest?!!!
If you create some of these fun treatboxes I would love to see them! Please link them up.
Thanks so much for hopping on by today! I hope you enjoyed my projects. If you love this line as much as I do, you definitely want to stop on by the Imaginisce Blog to leave a comment for your chance to win one!!!
Have a super scrappity day!
~ Rhonda
6 comments:
So cute wow hard to believe spring is just around corner
I'm too busy enjoying Christmas at the moment to think about spring! Besides, I'll need spring to look forward to when January hits. :)
Your projects are adorable. Love the papers so much. Hope to see these items again when we get closer to Spring and Easter.
Your little treat box is so unusual! I've never seen that template before either! And what a cutie in his jammies!
TFS. Your projects with Hippity Hop were cute. The treat packaging was a plus, thanks.
I love that page layout! Good color & sweet little birdies!
Post a Comment