Showing posts with label d-Stress. Show all posts

Monday, August 20, 2012

Happy Monday with Moxxie!!!

Happy Monday crafty peeps!

I've got a fun Halloween Mini to share with you that I created with Moxxie's "All Hallow's Eve" line.  I loved working with this collection, it has an eery elegance to it!!!

The Cover...  with a little cheesecloth spiderweb accent.

Don't you love that eyeball?  It's from A. Jillian Vance Designs
and the bubble cap is Epiphany Crafts.

Crackle Accents on the bat.  Wonky Rectangle mats and stamped spider.

This line has an elegant 'Eek' feel to it!  Don't you love it?!!!

Loved the way the black ric-rak complimented these papers too!

The back cover.


This mini was created for the CHA release party in Chicago.  It was super fun to put together!  The spiderweb base album is from EK Success.

Ingredients:
"All Hallow's Eve" collection by Moxxie
d-Stress by Imaginisce
"Eye on Halloween" stamp set by A Jillian Vance Designs
Wonky Rectangle dies by Spellbinders
Round 25 Bubble Cap and Tool by Epiphany Crafts
Crackle Accents by Ranger
Black Tinted Tape by Vintage Street Market 
Bling by Zva Creative (leftovers!)
Spiderweb Album Base by EK Success
Vagabond by Sizzix
Other:  Button, Black Hemp, Cheesecloth, Ric-Rak Black Tulle and Ribbon

Be sure to stop on over to the Moxxie blog too and check them out!!!

Have a super scrappity day!
~ Rhonda

Monday, July 16, 2012

Everyday Inspiration with Imaginisce!


Greetings!  

Today I have a cool post and fun project for you.  We were challenged over at Imaginisce to create a project from everyday inspiration.  Hmmmm...  What a fun idea!  I had done this only once before and it was really by accident, not a formal 'challenge'.

So, for my everyday inspiration, I selected the children's book The Very Hungry Caterpillar.  Currently it's a big favorite of the little guy who is 3.  In looking at the cover, I saw our i-Top 2.0 and brad daddies come to life with a variety of cool paper colors.


Here is my project:

Let's start with my Sun...

The yellow Makin' Waves paper was used, and I stamped the center of the Sun Snag' Em Stamp on it.  A 28mm i-Top punch was used to punch the shape.  Next, I used my d-Stress tool to give the edges a bit of wear and texture. I then used a circle die to give my sun the relief area so I could feature the "HI" letters in my alphabet strip.


Every caterpillar needs a set of antennae and to create mine, I use one of my favorite tools, the Fabric Petal Roller.  Simply use this tool with either florist wire or fine gauge jewelry wire and creating antennae for your butterflies or creatures is a breeze! I use this tool all the time!!!


I finished Mr. Caterpillar off with my i-Rock and silver tear glam rocks for feet.

What have you seen today that inspires you?  Sometimes the simplest things can trigger inspiration!  With the tools from Imaginisce, my inspiration really comes to life!  Be sure to stop on by the Imaginisce blog all week long for fabulous inspiration from the Design Team.

Trust me, you do NOT want to miss a day!

Ingredients:
Makin' Waves Paper, Imaginisce
Geek is Chic Paper, Imaginisce
Hello Cupcake Paper, Imaginisce
Sun Snag' Em Stamp - Makin' Waves, Imaginisce
i-Top 2.0
i-Top Brad Daddies:  34mm (1), 28mm (2), 22mm (3), 16mm (1)
i-Top Punches: 34mm, 28mm, 22mm, 16mm
Fabric Petal Roller, Imaginisce
i-Rock
Glam Rocks - Silver Tears
Glam Rocks - Black
Cardstock - Bazzill
Olive Branch Die - Cheery Lynn Designs
Fence Die - Cheery Lynn Designs
Squiggle Die - MFT
Circle Die - Spellbinders
Vagabond - Sizzix
Black Ink - Memento

Other:  Jewelry Wire, Wire Snips, Googley Eyes, Sewing Machine, Thread

Thanks so much for stopping by today!  Have a super scrappity day and week!  
~Rhonda

Monday, June 11, 2012

Imaginisce Tool Extravaganza!!!

Greetings to all my crafty peeps! 


Today, I'm super excited to be up on the Imaginisce blog featuring one of my very favorite tools... the d-Stress!  I have a couple of fun projects and ways to use one of my favorite tools to share here today!

For my first project, I used a plaque as the inspiration and used the Bon Voyage collection to decorate it with a bit of Father's Day flair.

If you look at the design of the base plaque closely, you'll notice the inverted bevel edge makes creating the perfect cover for it a little tricky.   What to do?  I put the d-Stress tool to work for me!


I coated the top of the sign with a layer of Modge Podge, then applied a trimmed rectangular piece of Bon Voyage paper on top (right side up).

Once I smoothed it out and allowed to dry a bit, I then used my sanding tip to sand off the paper all along the edges at an angle for the perfect custom fit!


Ingredients:
Bon Voyage Papers, Sticker Stackers and Die Cuts, Imaginisce
Foam Tape, Imaginisce
Sign, KaiserCraft
Liquid Glue, Modge Podge
Chipboard Alphas, Colorbok
Inks, PowderPuff Chalk Inks, Quick Quotes
Chipboard Gear, Quick Quotes
Mini Alpha's, My Little Shoebox
Diamond Stickles, Ranger
Other:  Black Hemp, Brown Jute

---------

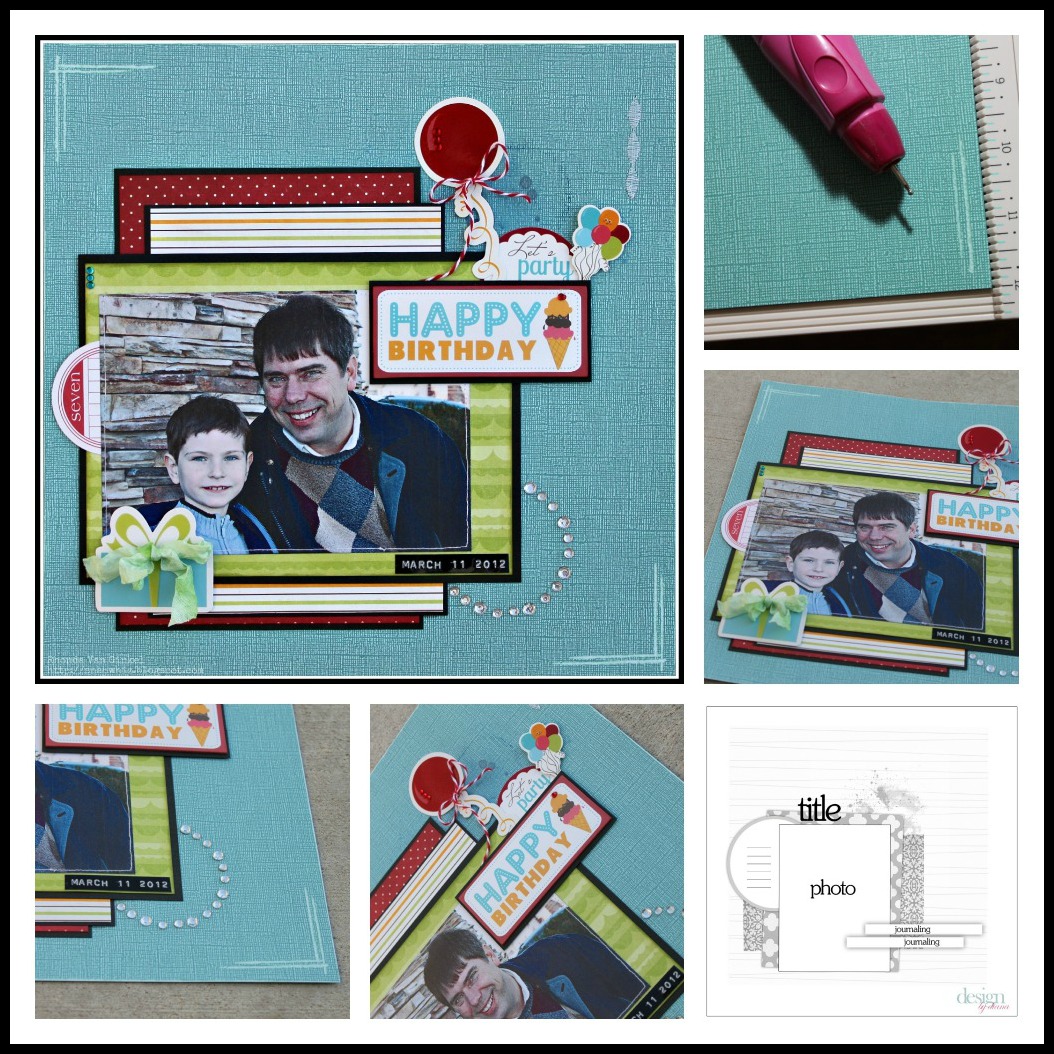
My next project is a layout inspired by Diana's awesome sketch for this month's Imaginisce Challenge!  (Psst... there's still a lot of time left to play!!!)

I just love the new Hello Cupcake line and had the perfect Core'dinations card stock that coordinates with the colors in the line.


Using the Core'dinations as my background paper, I de-bossed some lines into the card stock using my scoreboard, my d-Stress tool and etching tip.  You don't want to press hard for this technique, just let the tool guide you slowly to gently touch the top of the card stock.


I then switched tips to my white sanding tip and ran it all along the outside edges of my page to give the depth of a lighter definition.

Finishing design touches to my page were some gem accents on my balloon, the cherry in the Happy Birthday chipboard and along the left edge and my circle using the i-Rock, Hot Rocks and Frames Stencil.

Ingredients:
Hello Cupcake pattern papers, sticker stackers and die cuts, Imaginisce
d-Stress, Imaginisce
i-Rock, Imaginisce
i-Rock Frames Stencil, Imaginisce
Hot Rocks Compact - Crystal, Imaginisce
Hot Rocks Compact - Jewel, Imaginisce
Foam Tape, Imaginisce
Cardstock, Core'dinations
Black Cardstock, American Crafts
Round "seven" die cut, Jillibean Soup
PowderPuff Chalk Inks, Quick Quotes
Smooch Spritz
Twine, The Twinery
Other: Sewing Machine, Thread and Ribbon

I hope I've inspired you with a few different ways to use your d-Stress tool.  I absolutely love it for my pages, mini albums and altered projects!!!

Thank you so much for stopping on over today!  Have a super scrappity day!
~ Rhonda

Monday, July 25, 2011

Santa's Little Helper Release Party!

Happy Monday to you!  We're so excited this week to be celebrating a little "Christmas in July" at Imaginisce! 

Welcome to the Release Party for "Santa's Little Helper"!

I have a few projects to share with you today, let's start off with a layout that I did using our official holiday photo from 2010.  We are really hoping for a better Santa experience in 2011, which was the prompt for my journaling card.  "All Done Santa, See You Next Year!": 

I used my i-Rock and a variety of gems and of course that awesome flourish template!  These papers have the best patterns, I found it really quick to put my projects together.  On the top of the page I used some ball trim that I had in my stash. 

The journaling card is from Maya Road and the mini alpha's are from My Little Shoebox.  They were so generous to send alpha stickers to our Design Team and I have been using them all the time! 

My next project is a "Dear Santa" card that I created using my Cricut Expression and the Sentimentals Cricut cartridge to create the stamp card base.
I placed some black card stock behind the wavy lines and the sweet Santa image into the stamp cutout.  I thought this was such a cute shaped card!  Of course, I used my i-Top and a 28mm brad to embellish my gifts die-cut along with my i-Rock and assortment of gems.  You'll see my MLS min alpha's were used for the sentiment.

My final project(s) are a trio of Christmas ornaments that were created from a thrifty find.  Those are the best kind, no?  Michael's has these cute dollar chipboard albums in all kinds of shapes during the holidays.  Well I grabbed a few of the star ones because they transcend the holidays, but they really do make wonderful ornaments as well!

I used the larger Sizzix Tim Holtz accordion flower die, then a few Martha Stewart snowflake punches with some kraft cardstock.  The final stack of little punched stars finished this nicely.  Doing chipboard projects is a breeze with our d-Stress tool!  Don't you just love how it worked the edges of this ornament?  This one feels so classic to me. 

This ornament was lovingly adorned with many glam rocks using my i-Rock.  I love the metal studs, they go on so fast and really add that perfect little spark.  I started with a Martha Stewart doily tag, inked it in some Antique Linen distress ink and it matched the paper perfectly.  The accordion flower was layered on it and topped off with Santa. 


My final ornament I had some fun with my i-Top and the fun characters in the line.  Rudolph is just adorable!  I used some frosted lace stickles on my snowflakes and a few strategic gems.  I love the classic feel of these ornaments and am pretty excited to have a few already made for this year.  Our sons love to play with them, so chipboard covered ornaments are perfect for their ages.

Imaginisce Tools Used:

That's what I have to share with you for today.  I hope you enjoyed a little Christmas in July with me and be sure to stop on over to the Imaginisce Blog to see what the other Designers have created.  You'll want to be sure and leave a comment too!  They are giving away three collections to some lucky commenter's this week...  it could be YOU!

Have a super scrappity week!
~ Rhonda