Showing posts with label Merry Mistletoe. Show all posts

Friday, November 4, 2016

Holiday Card Inspiration with SEI

Friday greetings and welcome to the blog today. I was recently up on the SEI Blog with my final projects for my Design Team term. It has been an honor and sincere pleasure to design for them. I have loved their products from the very start of my paper crafting journey.

I have a bit of holiday inspiration that pushed me out of my comfort zone just a bit. I've created three quick and fun cards using the Merry Mistletoe collection. Yes, you read that correctly, I said quick! 
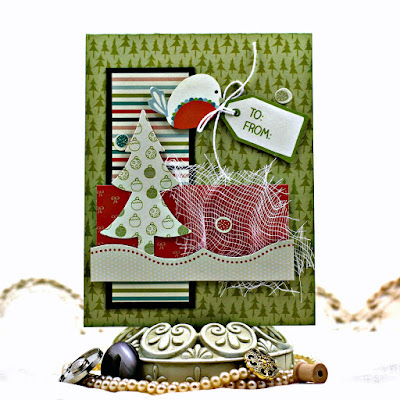


For the first A2 sized card, I've featured a bit of the packaging from my Die Cut Pack and also some of the Alpine Velvet Papers.The sweet little die cut bird is delivering the sentiment tag. The design here is very simple, but the cute stickers and embellishments make it easy to create something fun in a flash!


To create my second card, I went with a bit of a smaller scale card, it's approximately 4" square. 

I loved the sweet reindeer sticker, so I selected him and then layered the pine bough swag behind the reindeer antlers to give him a festive look. A bit of fabric trim from my stash creates a focal point for the sentiment sticker which is adhered with foam squares.


It doesn't get much simpler than this, yet cute! A gem on his nose would be fun too.


The third card is again a smaller scale 4" square design. I used a die cut circle, punched a snowflake and layered between it and the "Love" sticker sentiment. I added the "Happy Holidays" on the bottom to anchor the design and added a bit of banner light bulb sticker underneath.


A bit of dimension in the layers keeps it interesting.
SEI Products:
Merry Mistletoe Collection

I hope I've inspired you to take out your SEI holiday papers and put together a few cards! It's always nice to do a few here and there to be sure you have plenty on hand for the holidays.

One final thank you again to SEI for having me on their Design Team this year, what a wonderful group of folks to work with!

Thanks so much for stopping on over today for a visit. Have a super scrappity day!

Friday, December 11, 2015

Merry Mistletoe Cards with SEI


Friday greetings to you! I was recently up over on the SEI Blog, sharing a few cards created featuring the Merry Mistletoe Card Kit which includes card bases, envelopes, die cuts, glitter elements, stickers, pearls and adhesive foam squares.

This kit has instructions and materials to complete 8 holiday greeting cards. I thought it would be fun to come up with a few other designs.

Joy to the World card featuring Merry Mistletoe Card Kit by SEI designed by Rhonda Van Ginkel

My first card is "Joy To The World" and has a pop up feature to it in the interior. I selected the red micro dot pop up card base, added the blue striped border to the edge finished with a touch of gold string that I had on my desk. The sentiment was adhered using the foam squares.

Joy to the World card featuring Merry Mistletoe Card Kit by SEI designed by Rhonda Van Ginkel

I started with the mistletoe and layered a bit of the floral trim which I cut into a banner at the end. The mistletoe is embellished with the gold glitter circle accents and a few of the pearls. I added some foam squared to the die cut bird and adhered.

Joy to the World card featuring Merry Mistletoe Card Kit by SEI designed by Rhonda Van Ginkel

For the interior, I added the gingerbread house to the pop up fold, then adhered the candy cane stickers on either side on top of the gold string. The glitter lights banner was added above the sentiment block.

Snowman card featuring Merry Mistletoe Card Kit by SEI designed by Rhonda Van Ginkel

My second card, "May your Holidays be Bright and Merry" is more clean and simple in design. I love that the kit elements give you so many fun options! For this card, I chose the light green card base and added the multi color fold accent. I used a gold accent strip and tied a bow using some of my gold string.

Snowman card featuring Merry Mistletoe Card Kit by SEI designed by Rhonda Van Ginkel

The snowman was attached using foam squares, then I tucked in the sentiment and added one small package using a foam square. The light banner was trimmed and layered to fit under the snowman and up to the trim. I accented the lights with a bit of glossy accents for shine.

SEI Products Used:
Merry Mistletoe Card Kit

Thanks so much for stopping over today for a visit. Have a super scrappity day!


Thursday, December 3, 2015

Merry and Bright with SEI

Greetings and welcome, I am super excited to share with you my first design team project for SEI, featuring their Merry Mistletoe collection of pattern papers, die cut pack and stickers.


I thought it would be fun to create a page featuring a family photo for 2015. Even though the photo isn't perfect, I like that it's more of a casual shot taken when we were out goofing off at a park.


Design Steps:
  • Once my photo was matted, I selected my background paper and layers. 
  • I stitched the red 10.5" square using my sewing machine. 
  • Next I added a bit of modeling paste using a stencil with crack shapes for a bit of subtle texture.
  • Once dry, I used a scrap piece of 6" diameter circle corrugate that I had, trimmed it and tore the paper a bit and inked with a touch of Iced Spruce distress ink. 
  • The corrugate was attached to my page by stitching it, then I stitched around the outside of it to frame the shape a bit.
  • A 3.5" x 5.5" piece of cheesecloth was trimmed to layer on top of the corrugate
  • I die cut a few banners using my die cut machine and a border and notebook paper element which are layered under the photo
  • Layered the vertical strip and attached, stapled a few staples at the top.
  • The banner pieces were layered with the border below and notebook paper. 
  • Photo was adhered using foam dimensional adhesive.
  • Reindeer, With Love Tag and Red Bird elements from the Merry Mistletoe Die Cut Pack were tucked in. Mr. Reindeer has his eyes accented with Glossy Accents, a sticker on his nose, topped with a touch of glitter glue. The With Love Tag was accented with glitter glue around the border also.
  • Final touches are the snowflake stickers tucked in and the branch sticker layered under the bird.
  • I cut the "Merry & Bright" title using the Under Mistletoe paper and my Silhouette Cameo. I used one of the stickers to dot the "i" in the title.
SEI Products Used:
Merry Mistletoe Paper Collection
Merry Mistletoe Die Cut Pack
Merry Mistletoe Stickers

Thank you for stopping on over to visit my blog today.  Have a super scrappity day!