Showing posts with label Helmar. Show all posts

Thursday, November 1, 2012

Fall Blog Hop with Quick Quotes

Happy Fall to you!  

The designers over at Quick Quotes are celebrating with a blog hop! We're thrilled to feature adhesive products from our friends at Helmar. They were so kind to send us products to sample.

You should be arriving to my blog from Christine

If you don't know where to start, please visit the Quick Quotes blog.

*****

I created a home decor project on a 9 x 12 flat canvas panel featuring our Cherry Truffle collection, PowderPuff Chalk Inks, Chipboard Laser Die Cuts and a Vellum Quote to share with you today.  

"The Will of the Wind"

There are a few different techniques that I am excited to show you!

To start, I prepared my canvas. I simply inked the edges all around with some Biscotti first, then lightly with Mocha Mama. After that, I grabbed my silicone mat and used it to create my palette to paint for the canvas. I just pressed my ink pad down in three separate places to give me my colors and then spritzed a bit of water into them.

The effect I was going for was a slight tint of color wash for the canvas. I used a very watered down Baja Blue on the top, then my Green with envy on the bottom.  A bit of the Amaretto in the middle was to bring them all together.  Adding just a little water to my canvas using a lightly damp 1/2" wide brush, I continued until I had the right touch of color. I did not put away my inks just yet! Once my canvas was completely dry (about 20 minutes or so), I started on my next step.

Hint:  You need the canvas completely dry when you start this next step for the best results.

Stenciling with PowderPuff Chalk Inks
"Fall Leaves" - Bag o Chips were used.


This was so fun and super easy.  I used the relief discs and a dry paintbrush to color in the leaves with my PowderPuff Chalk Ink.  I held the disc with one hand and applied with my paintbrush using the other. You could tape the disc easily too.

I had a damp paper towel and used one brush and alternated between the three colors to achieve my blended results. I really just love how nicely they turned out!  I let those dry and worked on my Tree next.

*****

The featured tree is called the "Whimsical Tree" and I just love it!  It's a nice lightweight chipboard and it takes our Chalk Inks beautifully.  I applied some Mocha Mama, Amaretto, Baja Blue and Green with Envy PowderPuff Chalk Inks here.

After achieving the coloring that I liked on the tree, I wanted to add some more life like texture as well. I've had Helmar products for a little while and this is from my personal stash.  It's a crackle medium which I applied to the Whimsical Tree after inking.  It's a 2 step process.


At this point I cut my bike and leaf embellishments and inked some of them.  I also selected my "Will of the Wind" vellum quote, tore it into sections, then inked on the back to create a little blended coloring.  


To apply my bike and the vellum quote, I used the Helmar V2 Vellum Adhesive.  It worked so beautifully!  If you want to adhere your plain vellum and have no adhesive peek-a-boo, I strongly  recommend this product.  You spray it on and then wait for a few minutes and it's ready to apply.  Simple as that!

The crackle texture of the tree...  

I cut the title section of my quote with one of my cloud dies to nest.
The larger mat cloud was elevated using Helmar 1/4" Round ZapDots.

The quote was then matted and applied to canvas with Helmar 450.

I hope you enjoyed my little project today!  I'm super excited to hang this in our front entry for the Fall! That quote is absolutely perfect for my house full of boys!  

Quick Quotes Products Used:
Blue Leaf - October Club Q (Light blue and yellow paper from previous Club Q kit.)
Will of the Wind vellum quote 
Fall Leaves - Bag o Chips
PowderPuff Chalk Inks: Mocha Mama, Baja Blue, Biscotti, Green with Envy, Amaretto 

Helmar Products Used:
V2 Vellum Adhesive by Helmar
ZapDots by Helmar

Other Products Used:
Maple Leaf and Frond punches by Martha Stewart
Bike die by Memory Box
Cloud and Musical Note Dies by MFT
Flourish bling by Zva
i-Rock and Hot Rocks by Imaginisce


*************************

The Will of the Wind

A little boys will is the will of the wind,
He'll rough house, tumble and fall.
He loves his trucks and dirt and trees, and 
of course that isn't all.

A baseball cap upon his head,
his knees are bruises and scars.
Gim him some dirt and a Tonka truck and he'll 
build a bridge to the stars.

Give him a bat and give him a ball and 
give him a tree to climb...
A little boys will is the will of the wind
and I'm so glad he's mine!

Patsy Gaut

*************************

Thank you to Helmar and to Quick Quotes!  I am so blessed that I get to create fun projects using beautiful quality products from such wonderful companies.

Have a super scrappity day!  Don't forget to head back over to Quick Quotes and leave a comment about today's hop projects for your chance at a prize.

~ Rhonda

Saturday, April 24, 2010

Spring Flight of Fancy...

What do you get when you take a little Jillibean Soup, some Helmar adhesive and some super yummy Spellbinders and toss it all together?  I call this a little Spring flight of fancy!!!

Scrapbooks Too in Bloomington, MN (my favorite LSS!) had this fun little contest going on for Spellbinders last week.  When the contest first popped up I thought immediately of this fun little birdhouse and how cute it would be to make little "shingles" for the rooftop using their Labels Four dies and attached using my trusty favorite Helmar 450 adhesive! 

I used my trusty Helmar 450 to glue the whole house together.  I can not say enough great things about this adhesive, it dries so fast and holds like none other.  This house is surprisingly sturdy!


The template for this little birdhouse was created by Nichole Heady for Papertrey Ink and was posted over at Life Preserver's a while back for a challenge.  You can use the instructions for the roof and base if you have those Spellbinder dies.  I did not have them, so this is what works in place: 
  • Cut the base of your house at 1.75 x 1.75 square.
  • I used brown cardstock and then corner rounded mine using my corner chomper. 
  • Cut the roof for your house at 3.25 x 2. I then attached my shingles to cover the roof. 
The little flowers on the inside and the leaves peeking out of the birdhole are Jolee’s boutique parcel stickers, aren't they fun?  I used a Tim Holtz hitch for the post. 

Thanks for stopping by and have a super scrappity Saturday!!!

Tuesday, April 20, 2010

ScrapFit Workout #18 Reveal

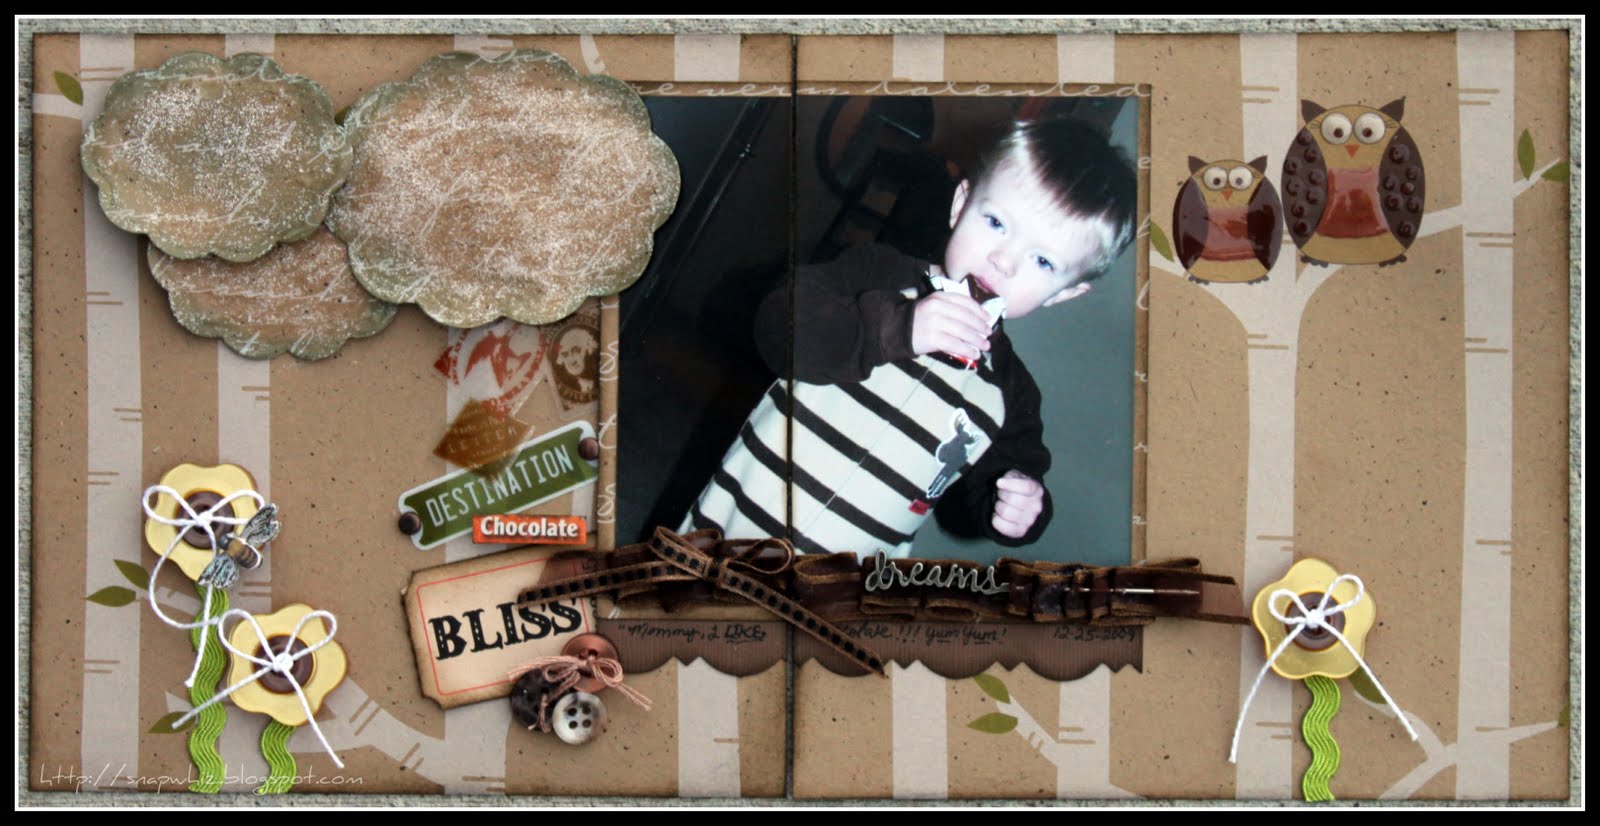
This month's sponsor for ScrapFit is Jillibean Soup!  For workout #18, it's all about things being better in 2's!    Your challenge is to create a 2 page layout with no title!!! 

I do not often create 2 page layouts, but at first when I got into scrapping, I did.  This workout really sent me on a fun journey!  I giggle every single time I look at this photo of my oldest son from Christmas morning.  The first thing he got into was his chocolate Santa!  He savored every single morsel, then looked at me lovingly and said "Mommy, I LIKE chocolate!".  Next he rubbed his stomach in a circular motion and said "yum! yum!". 

This is what I created using some Jillibean Talk Soup papers, a little Helmar 450, Zap Dots and Textured Effects plus lots of stash buttons, ribbon and ric-rak:


For my clouds, I used my Spellbinders Big Scalloped Ovals, some Ranger Tumbled Glass Distress Ink, some Ranger Frosted Lace Stickles and then topped them off with Helmar Textured Effects after I had adhered them with the Helmar Zap Dots.  I just love to differentiate the height using the clear and then the white Zap Dots.  I decided to touch a little smidge of the Textured Effects on my "chocolate" label also to tone down the shine.


If you haven't given ribbon pleating a try, it's so much fun!  I can't stop pleating my papers and ribbons lately, especially when you have the right tools, like a very fast drying and awesome holding Helmar 450!

I have to apologize for the slight delay getting this up and posted.  I've been under the weather and struggling a lot with allergies this past week.  That being said, I really hope you have fun with this challenge, there is an awesome prize package that Jillibean Soup has offered up!!!

As always, thanks so much for stopping by!

Wednesday, April 7, 2010

Pure Bliss....

What in the world is that?  What does it mean?  Well, in this case it involves a few beautiful things, awesome baby photos, a gorgeous March Life Preservers kit and some fabulous new adhesive products from Helmar!


For this project, I started out with the Helmar Craft Glue, and glued the ribbon down along the edge of my bracket paper after I had cut it and then hand stitched it.  This stuff rocks!

Next, I used some distress crackle paint on my Bliss sentiment, then thought I would seal it off with some of the Textured Effects.  I love how this turned out!  It was so rustic on the elegant scripting, just what I was hoping for!  You know what I just had to do next don't you?? .....


Yeah, I had to give this stuff a try on top of the photo.  I really wanted it to look like a timeless classic portrait.  All I can say is that I'm totally in love with this product!!!  So fabulous and fun to work with!  I used it as well on the upper left hand flower for some texture.


The flower on the right of the photo I used some of the craft glue and left dry for some dew effect on the flower.  I used ZapDots under my scallops and butterflies by cutting the small ones in half and they are just the right size!  The Helmar 450 was used for my small Prima flowers, to glue my Prima rose to the metal gear.  You have got to give this a try, I promise that you'll be hooked like I am!!

- Inspired by Gabrielle Pollacco to thread the ribbon through scallops!!

Happy Scrapping and as always, thanks oodles for popping on by!