Friday, May 27, 2011

Quick Quotes: May Club Q "Re-Do"!

Happy Friday to all my bloggy friends!

I'm so excited to post my first projects for Quick Quotes!  Part of what our Design Team is inspired to do is take the monthly Club Q projects and create something totally different.  We call that a "Club Q Re-Do!". 

Our May Project Kit: 

The May Page Kit:

My debut post for Quick Quotes was my Re-Do for the Project kit.  Here are my other projects that I created with my kits:


Techniques:
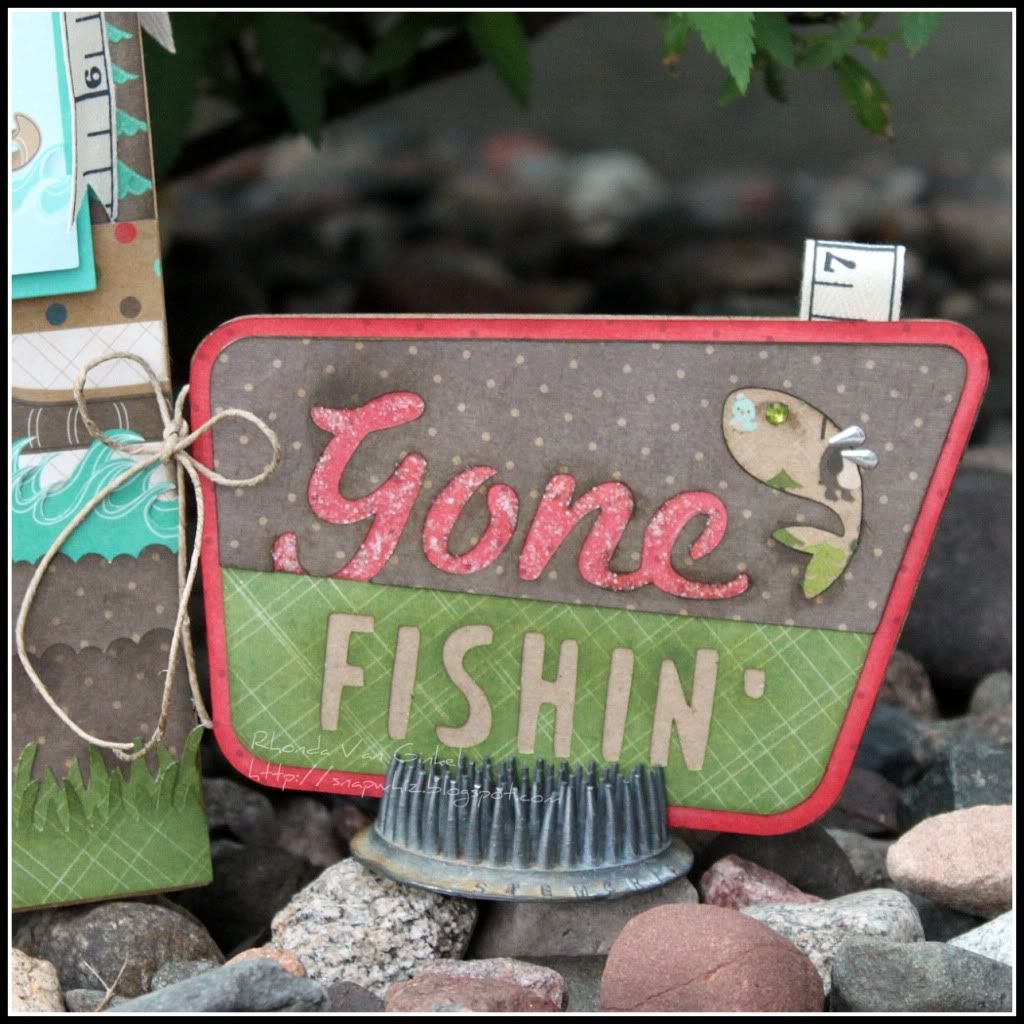
  • I used my Powder Puff Chalk Inks (LOVE them!!!) to create my colors on my laser cut title.
  • While I had my inks out, I smeared them to my silicone mat and used my "Memories" stamp for a soft varieagated feel.
  • Some of the kit circles, I cut into spirals, then created rolled roses with them.  The leaves are hand cut, a few are snipped from the vine trim included in the kit. 
Ingredients:
  • Club Q May Kit
  • Vintage crochet lace
  • I-Top, 28mm i-top brad and punch, Imaginisce
  • Butterfly and Dragonfly Punches:  EK Success, Martha Stewart
  • Butterfly Punch around the Page:  Martha Stewart
  • Circle Trim Punch:  Martha Stewart
  • Floral Punch:  Fiskars
  • Alphas:  AC Thickers
  • Ranger Stickles:  Diamond, Tropical Tangerine and Rock Candy
  • Dymo Labeler
  • Tim Holtz Tiny Attacher
  • Powder Puff Chalk Inks:  Marischino Cherry, Tahiti, Mango Mai Tai, Blue Hawaiian and Mocha Mama
  • Other:  1 Orange Recollections by Michael's mini rose
My third project:
Card Size: 6” x 3.5”
 
Techniques:
  • Inked edges of project with Maraschino Cherry and Tahiti Chalk Inks
  • Created a pocket using my striped papers, then stitched it together with my sewing machine.
  • I used tags in my pocket but you could easily make this a gift card holder card.
  • One tag was embossed using the Damask Cuttlebug embossing folder.
  • Folded circles and created a half flower by attaching with tiny staples. I folded the edges over my pocket and used glue dots to hold in place.
  • I cut apart my vine trim to use the leaves for my flower.
Ingredients:

  • Club Q May Kit
  • Aqua Cardstock, Gemstone
  • Seam Binding Ribbon, Hug Snug
  • Two orange mini roses, Recollections by Michael’s
  • String for tags
  • Thank You rub-on sentiment, Pebbles
  • Flower Punch, Fiskars
  • Tag Punch, Marvy Uchida
  • Thread
  • Sewing Machine
My Fourth Project:


Techniques:

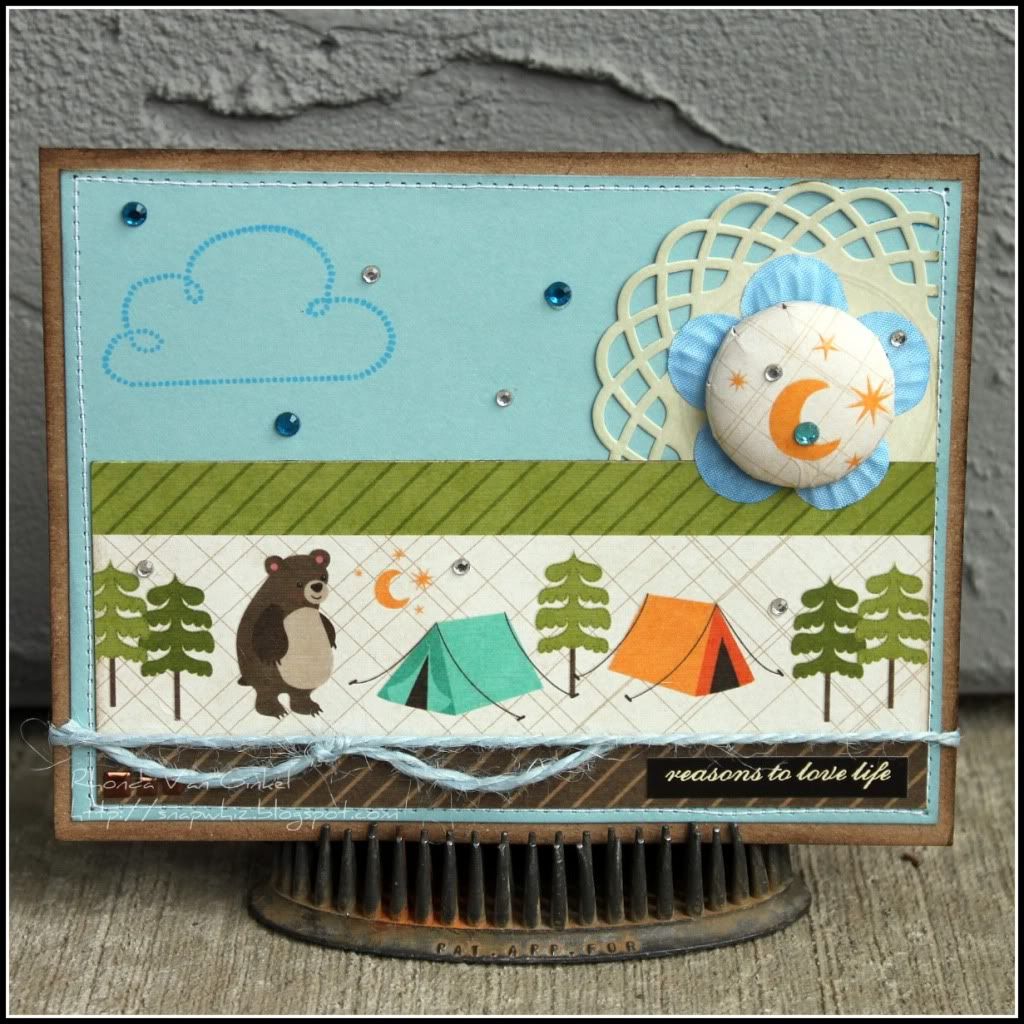
  • Layered my flowers with a little white tulle. I used the circles in the kit to create my rosebud centers. The leaf trim worked beautifully to create my flowers.
  • I then added a small pearl to center of the blue flower and tangerine stickles in the center of my orange flower.
  • Used the sentiment of the paper strip for my title, I glued my ric-rac on the underside using Beacon 3-in-1.
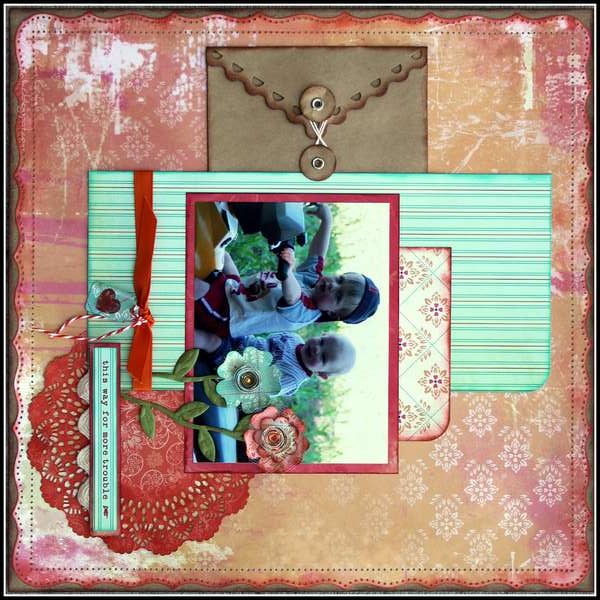
  • Created my little tag embellishment using heart shaped tool from Epiphany Crafts, then tied to the kit ribbon using bakers twine.
  • I attached my photo as a pocket so I could add additional journaling there and inside the kraft envelope.
  • The flowers are strategically disguising my husbands hand which was in the frame of the picture. : )
Ingredients:
  • Club Q May Kit
  • http://www.sketchinspiration.ning.com/ sketch 220
  • Powder Puff Inks: Tahiti, Mango Mai Tai, Maraschino Cherry and Mocha Mama
  • Mini Tag Punch, Martha Stewart
  • “Framed Dots” Punch Around the Page, Martha Stewart
  • Doily Die, MFT Dies (My Favorite Things)
  • Flower Punch, Fiskars
  • Corner Chomper, We R Memory Keepers
  • 1 Maya Road kraft envelope 
  • 1 yellow pearl, Kaisercraft (non kit)
  • White Tulle (non kit)
  • Ranger Stickles in Tangerine (non kit)
  • Epiphany Crafts Epoxy Heart (non kit)\
  • Orange Bakers Twine, The Twinery (non kit)
  • Oatmeal Ric-Rak (non kit)
That rounds out my Club Q Re-Do for May!  I wanted to say a big warm WELCOME and Hello! if you are a newer follower to my blog!  If you would like more information about Club Q or to sign up to start receiving kits, please click here.  The June kits are beautiful!!!

Have a super scrappity weekend!
~ Rhonda

Thursday, May 26, 2011

Who's a Happy Camper?

Happy Thursday to all you Happy Campers out there!  Sorry, I couldn't resist!

It's been a week packed full of amazing creativity over at Imaginisce while we celebrate our newest release...  "Happy Camper"!  The line is just wonderful and lends itself to so many types of projects!

My first project:  "NOT a very happy camper".  Our youngest is two years and three months old...  need I say any more?  *giggles*

I'm a firm believer in scrapping things real.  This is a very real, unstaged, typical moment of disappointment when we were leaving from the park.  I decided to use the words "Rest Stop" and "Waterfall" on my sign to convey the moment. 
I used my Cricut Expression and the "Campin Critters" Cricut Cartridge for the tree with the deer, the sign and my suns circle. 

To create my sun, you will see several 22mm i-top punched pieces to create the rays.  Our petal roller tool helped roll them and provide some texture.  I used my Cuttlebug "Mesh" folder for the tree top.  For the bling eyes of the deer I used my i-Rock tool and black gems for his nose, the new Glam Rocks - Silver Tear, but I colored it with my Copic marker to make it brown.  Isn't that fun?
I cut apart my thermos/coffeecup diecut and turned it sideways, then added the log diecut on top to create a fun embellishment.  I used my sewing machine in several places as well,.  

You'll notice I added a little bling in the sun, the tree and on the title work.   The Deer was cut at 7" on my Campin' Critters Cricut Cartridge using my Cricut Expression.  The sign was cut at 3" and my sun (badge) was cut at 6".

Ingredients:
Imaginisce "Happy Camper": Pattern Papers, Great Outdoors Word Die Cuts, Camp Critter Icon Die Cuts
Kraft Cardstock, "The Paper Company"
Blue Cardstock, Bazzill
Alphas:  AC Thickers, Making Memories
I-Rock by Imaginisce, assorted gems
Petal Roller by Imaginisce
Corner Chomper, We R Memory Keepers
Cricut Expression
Campin' Critters Cricut Cartridge
Brown Baker's Twine, Martha Stewart
Bazill Basics Trim flourish in kraft
Ranger Distress Inks: Walnut Stain, Shabby Shutters, Fired Brick
----------------------------------------------------------------------------------------------------
For the next project I thought it would be fun to create a Father's Day gift bag and gift card holder for my sweet Husband.  He is just starting to get into fishing, so I thought this would be the perfect thing to tuck in some new fishing tackle.  I love how this project turned out and for sure will be making more for my Brothers who are avid fisherman.

The bag is a simple kraft paper bag you can buy in bulk packages for an affordable price at your local craft store.  The tag I created using my Campin' Critters Cricut Cartridge at 2.5" and I used the packaging from my Happy Camper Sticker Stackers for one of the layers.  (Use your multi-cut feature for packaging this heavy to be sure you cut all the way through.  I cut mine twice.)  I used a clear gem and my handy Copic marker to color the fish's brown eye.  The silver tear bling were just perfect to create a little splash of water onto the tag.

On the bottom layers, I used some punches, then hand cut the waves for a little layered effect for the water.
For the card, again, I used Campin' Critters at 3.5".  To give the text some "pop", I did slip in other papers in between my layers for interest.  The word "Gone" is accented with some Ranger Stickles Rock Candy. 
The final little touch was this cute ruler grosgrain ribbon I found in my ribbon stash.  I just love it tied onto the bag and peeking out from my card!

Ingredients:
Imaginisce "Happy Camper":  Pattern Papers, Canvas Stickers, Chipboard Sticker, Sticker Stacker
Kraft Cardstock, "The Paper Company"
I-Rock by Imaginisce, assorted gems
Cricut Expression
Campin' Critters Cricut Cartridge
Fiskars "Grass" punch
EK Success "bumpy" punch
Ranger Distress Inks:  Walnut Stain, Shabby Shutters, Fired Brick
Brown Baker's Twine, Martha Stewart
Copic Marker to color i-rock gem
Other: Hemp, Grossgrain ruler trim, Kraft gift bag
------------------------------------------------------------------------------------------------------
My final Project:  "Reasons To Love Life" card
I thought it would be fun to showcase the cute strips that come on the "Fireside Fun" paper and the adorable Snag 'Em cloud stamp. 

The moon and stars are from the "Fresh Air" paper on an i-Top in 28mm size, then using my i-rock, I attached a few little gems.  To add a little dimension, that blue flower is layered between it and the Martha Stewart doily tag that I slipped in. 

Ingredients:
Kraft Cardstock,  The Paper Company
Blue Cardstock,  Bazzill
Imaginisce "Happy Camper": Pattern Papers, Snag 'Em cloud stamp
i-Rock by Imaginisce, Assorted Gems
i-Top by Imaginisce, 28mm Brad, 28mm Punch
Doily Tag by Martha Stewart
Distress Inks by Ranger:  Walnut Stain, Weathered Wood, Antique Linen
Powder Puff Chalk Ink by Quick Quotes:  Blue Hawaiian to stamp cloud
Other:  Sewing Machine, thread, blue jute, Sentiment sticker by Cosmo Cricket

Thank you so much for taking a few minutes with me here today!  I really have enjoyed this collection so much, it's just fun and incredibly versatile.

Please take a moment today to stop on over to the Imaginisce Blog and see what the other Design Team gals have created as well!  There are some incredible projects for sure, and of course, the opportunity to win some of this yummy collection for your very own!!!

Have a super scrappity day!!!
~ Rhonda

Tuesday, May 24, 2011

Happy Camper Release Party!


It's an exciting week over at Imaginisce!  We are celebrating our newest release called "Happy Camper"!  What a super fun collection of wonderful patterns and colors!!!  Here's a peek in case you missed this yesterday over at Imaginisce.

If I know my friends at Imaginisce well, (and I think I do!)...  I'm fairly certain there are some wonderful giveaways involved in addition to the incredible Design Team inspiration! 

I'll be back to share my Happy Camper creations later on this week.  Have a super scrappity day!!!

p.s.  Thank you so much to all my scrappy friends and family for the sweet birthday wishes yesterday!  My day was wonderful!!!

Wednesday, May 18, 2011

Epiphany Crafts & Vintage Street Market

Greetings to all my crafty friends!

I am so excited to share with you a fun project that I created for my scrap room!   Vintage Street Market and Epiphany Crafts have paired up and it couldn't be a more beautiful match!!! 

I've been wanting a magnetic inspiration board for my scrap room and the Dimestore Vogue Kit from Vintage Street Market had the perfect paper and size to help cover this nice sized board from Ikea! 

Here are my magnets that I created using the Round 14 and Epiphany Crafts Vintage Settings in "Tea Room".  I also used our Felt Flowers "Spring Flowers" for the blue flower magnet.  My magnets were adhered using E-6000.

I used the aqua foil from the kit for the center of the top pink magnet.
I just adore these inspirational rub-on quotes from DCWV!  I had to use a few of them for fun and inspiration on here!

Ingredients:
Vintage Street Market "Dimestore Vogue" Kit
Making Memories "Sky" and "Deep Corals" paint
Ranger "Walnut Stain" and "Worn Lipstick" Distress Inks
Donna Salazar "Fairy Dust Glitter"
Butterfly Punches, Martha Stewart and EK Success
Epiphany Crafts Round 14
Epiphany Crafts Vintage Settings "Tea Room"
Epiphany Crafts Felt Flowers "Spring Flowers"
DCWV Rub-On's, Hobby Lobby
Magnets
E-6000 adhesive
Ikea "Spontan" Magnetic Board (Width: 14 ½ " Depth: ¾ " Height: 30 ¾)

Thank you so much for stopping by today and have yourself a super scrappity day! 

Please be sure to stop on over to visit Vintage Street Market on Facebook today and say hello!!!  There are some fabulous prizes to be had!

Have a super scrappity day!!!
~ Rhonda

Tuesday, May 10, 2011

It's a Floral Celebration!

Welcome to the Flower Power Party - Day 3!
We're so excited at Imaginisce this week!  One of our favorite product lines has just been expanded and I think you'll agree that it's a wonderful thing!!!   I use flowers on almost every project that I create.  These new Pop Up Posies and Roly Rosies are just absolutely awesome!
 
I thought it would be really fun to take our latest release, Little Cutie and create a Father's Day card using the new denim fabric Roly Rosies.  I used the stars in the line, along with my mini EK Success circle punch to help create my sentiment "All Star Dad". 

Here's a little closeup for you:
How perfect is that blue Pop Up Posie?  I adore the little green one too, the colors were just perfect with the Little Cutie for boys.  I added a little Martha Stewart Lace doily, then used one of her mini tag punches and added my metal "Love" embellie to it.  If you look closely, you can see the center of my denim Roly Rosie... it has pink glitter glue in it from my i-bond.  : )  I thought that was cute!

I used my Cuttlebug folder "stars" and the debossed side for my cardstock blocking, then added my Hug Snug seam binding dyed crinkle ribbon bow.  The star pin is from Maya Road and the sugar pick is Jillibean Soup.

My next project was really fun!  I've been wanting to create some decor for my crafty room and found these really cute initials at my local Michael's.  They start out white, so I base coated mine with Making Memories Powder Puff.  The majority of Roly Rosies on here are the "Cool Colors", along with a denim fabric one.  The new fabric petal roller is a must-have for our new fabric flowers!
I just LOVE our new i-Rock bling flourish templates, and what goes better with flowers than bling?!!  Yum!  Following the curves of the bling, I added in my Roly Rosies and Posies using my i-bond. The yellow flowers I spritzed with some Maya Road blue metallic mist. 

The black rub-on on top is from Jenni Bowlin Studio, the one on the bottom was in my stash.  The lines of the flourish followed the new flourish template so I placed the bling on top.
The final touches were a white tulle bow and I slipped in two little blue tickets from Pink Paislee.  I thought the colors were so pretty together. 

I hope we've inspired you to get some packages of these pretty flowers and play too!  I will warn you, they are just addicting in a really fun way! 

Be sure to pop on over to the Imaginisce Blog to check out all the other wonderful inspiration from the Design Team.  There are some stunning creations and you don't want to miss it!  Of course, knowing Imaginisce, there are also prizes to be had too!!!

Thank you so much for stopping on over and spending a moment with me!  Have a super scrappity day!!!

~ Rhonda

Saturday, May 7, 2011

Exciting Quick Quotes News to Share!


I'm so honored to have been selected as a member of the...  Quick Quotes Design Team!

I couldn't be more excited to be a part of their team and be given the privilege to design using their products.  You are going to fall in love with their chalk inks and Club Q!  

If you want to check out their shop, click HERE.  Be sure to stop at the new Quick Quotes Blog for a coupon to use on our website for 20% OFF a $20* or more retail order before shipping!

Here is my debut project using my Club Q kits and those yummy chalk inks..   are you ready?
This started out as the project kit.  I took my 6x6 canvas and decided to get inky with it!  I used my silicone craft mat, smeared my chalk inks into it and spritzed with water.  A little paint brush splattering action and I was loving it!  I also took my Beacon 3 in 1 adhesive bottle and created the ink rings that you see.

I really wanted to use the canvas as a mini book cover.  For my flower, I used four of the cut circles and folded them in half, inked them and layered them, then added some stardust stickled.  The scallop punch underneath is an EK Success scallop circle, then I cut the "petals" of the scallops and inked.  The top two butterflies are Martha Stewart punches and the bottom right one is an EK Success butterfly chain punch.
Tangerine Stickles were used for the butterfly trails on my orange butterflies and Stardust Stickles were used on the large blue one.
Aren't the colors in these Cosmo Cricket papers just scrumptious?  I decided to keep the pages simple to let the papers shine!  I love the mini envelope and tag that come pre-cut in the kit!  The bird I used my Cricut Expression to cut and I attached him with pop dots for dimension. 
I used my Martha Stewart butterfly punches for these pages and my Stampin Up tab punch.
I absolutely adore those pretty beaded pearl brads, such a pretty touch with those super cute pre-cut envelopes in the kit! 
My circle journaling spots are 7 Gypsies stamps that I used with the ,kit papers, then cut out.  This back cover was created using a piece of scrap lightweight chipboard from the bottom of a paper stack or something similar.  I decided to stitch around the border for texture and slipped in a little piece of the orange gingham ribbon as a "tab" on the back cover.

I just love those sweet envelopes!  I loved the idea of using a ticket to decorate this page and cut that with my Cricut Expression and Home Decor and More cartridge.  The butterfly punch is Martha Stewart.

Chalk inks used:  Mango Mai Tai, Mocha Mama

I assembled all of my pages, then I bound them when completed.

Please be sure to pop on over to the new blog:  http://www.blogquickquotes.com/!  There are some amazing and inspiring new creations from our Design Team!!!  Word has it that there are some super awesome prizes to be given away also!!!

Thank you SO much for popping on over and sharing in my excitement today!  Have a super scrappity weekend!!!

~ Rhonda

*Coupon Expires May 31st 2011. Not valid on Private Reserve, Club Q or Convention Special items.

Thursday, May 5, 2011

Mother's Day Fun!

Happy Thursday to you!!! 

My hubby was so sweet yesterday, he said "Hey, I really hate to go to the store to buy a card for my Mom.  Do you think you can make something more special that we can send to her?"...

Well you know I was way more than happy to do that!!!  My mother-in-law is so appreciative of cards and flower and such, it's really a joy to create something for her. 

I'm also entering this little creation into the Cricut Circle Blog's Monthly Challenge for May.  It's a recipe challenge of sorts and so much fun!
For this card I chose the newly released "Little Cutie" line from Imaginisce for girls, a little Garden Party and Enchanted tossed in with some cardstock.  I used my i-Top brad maker for the center flower and our Mesh Brads from Garden Party for the other flower centers.  My i-rock shows up with those adorable new metal hearts on the flower centers and gems in my pattern paper on top.  The alpha stickers are from "Me & My Big Ideas". Twine is from the Twinery. Hemp is by Darico.
I used my Cricut Expression and the Doodlecharms cartridge for my sun and flowers.  I liked that the flowers sort of echoed the shape of the sun a bit.  I didn't attach the rays of the sun or the petals/leaves from my flowers just so I could provide a little texture and pop.

The touch of ric-rak at the bottom was just the perfect pop of pink that I thought it needed to be cheerful.

I hope this little card brings some sunshine into your day!  Have a super scrappity day!!!
~ Rhonda